This tutorial uses ChronoForms, a popular extension for Joomla!, to illustrate how you can integrate the Consent Database with your Joomla! forms. If you’re using another extension you may still refer to this tutorial as the implementation approach is generally the same.
To use the Consent Database with ChronoForms you’ll need to use the JavaScript method of implementation.
In short, you must:
- embed the Consent Database code;
- create (or modify) your form in a way that includes the necessary
idtags; and - send the consent data to iubenda APIs.
1. Embed the Consent Database code
To begin, copy the code you find under Consent Database > Embed > Javascript.
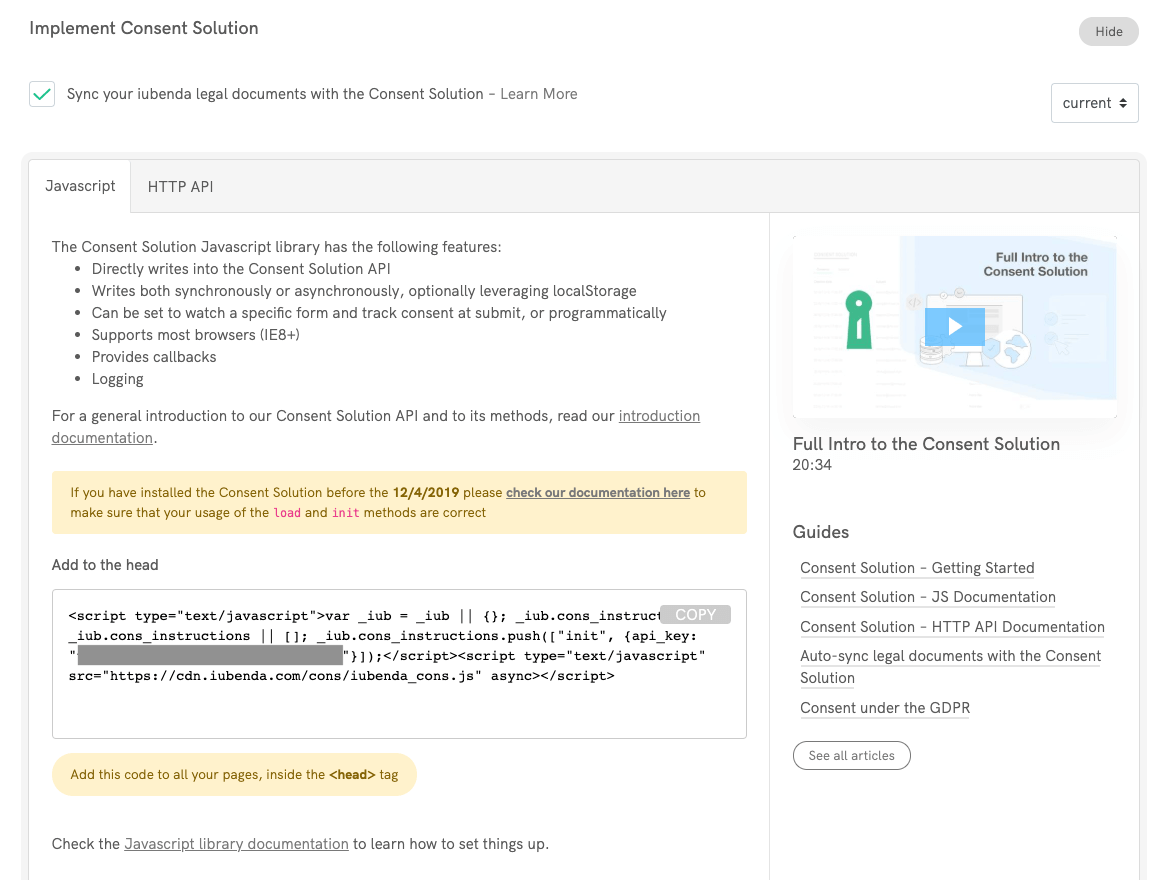
Then paste this code inside the head of all your pages. You can do this via one of the following methods:
- access the Template Manager directly; or
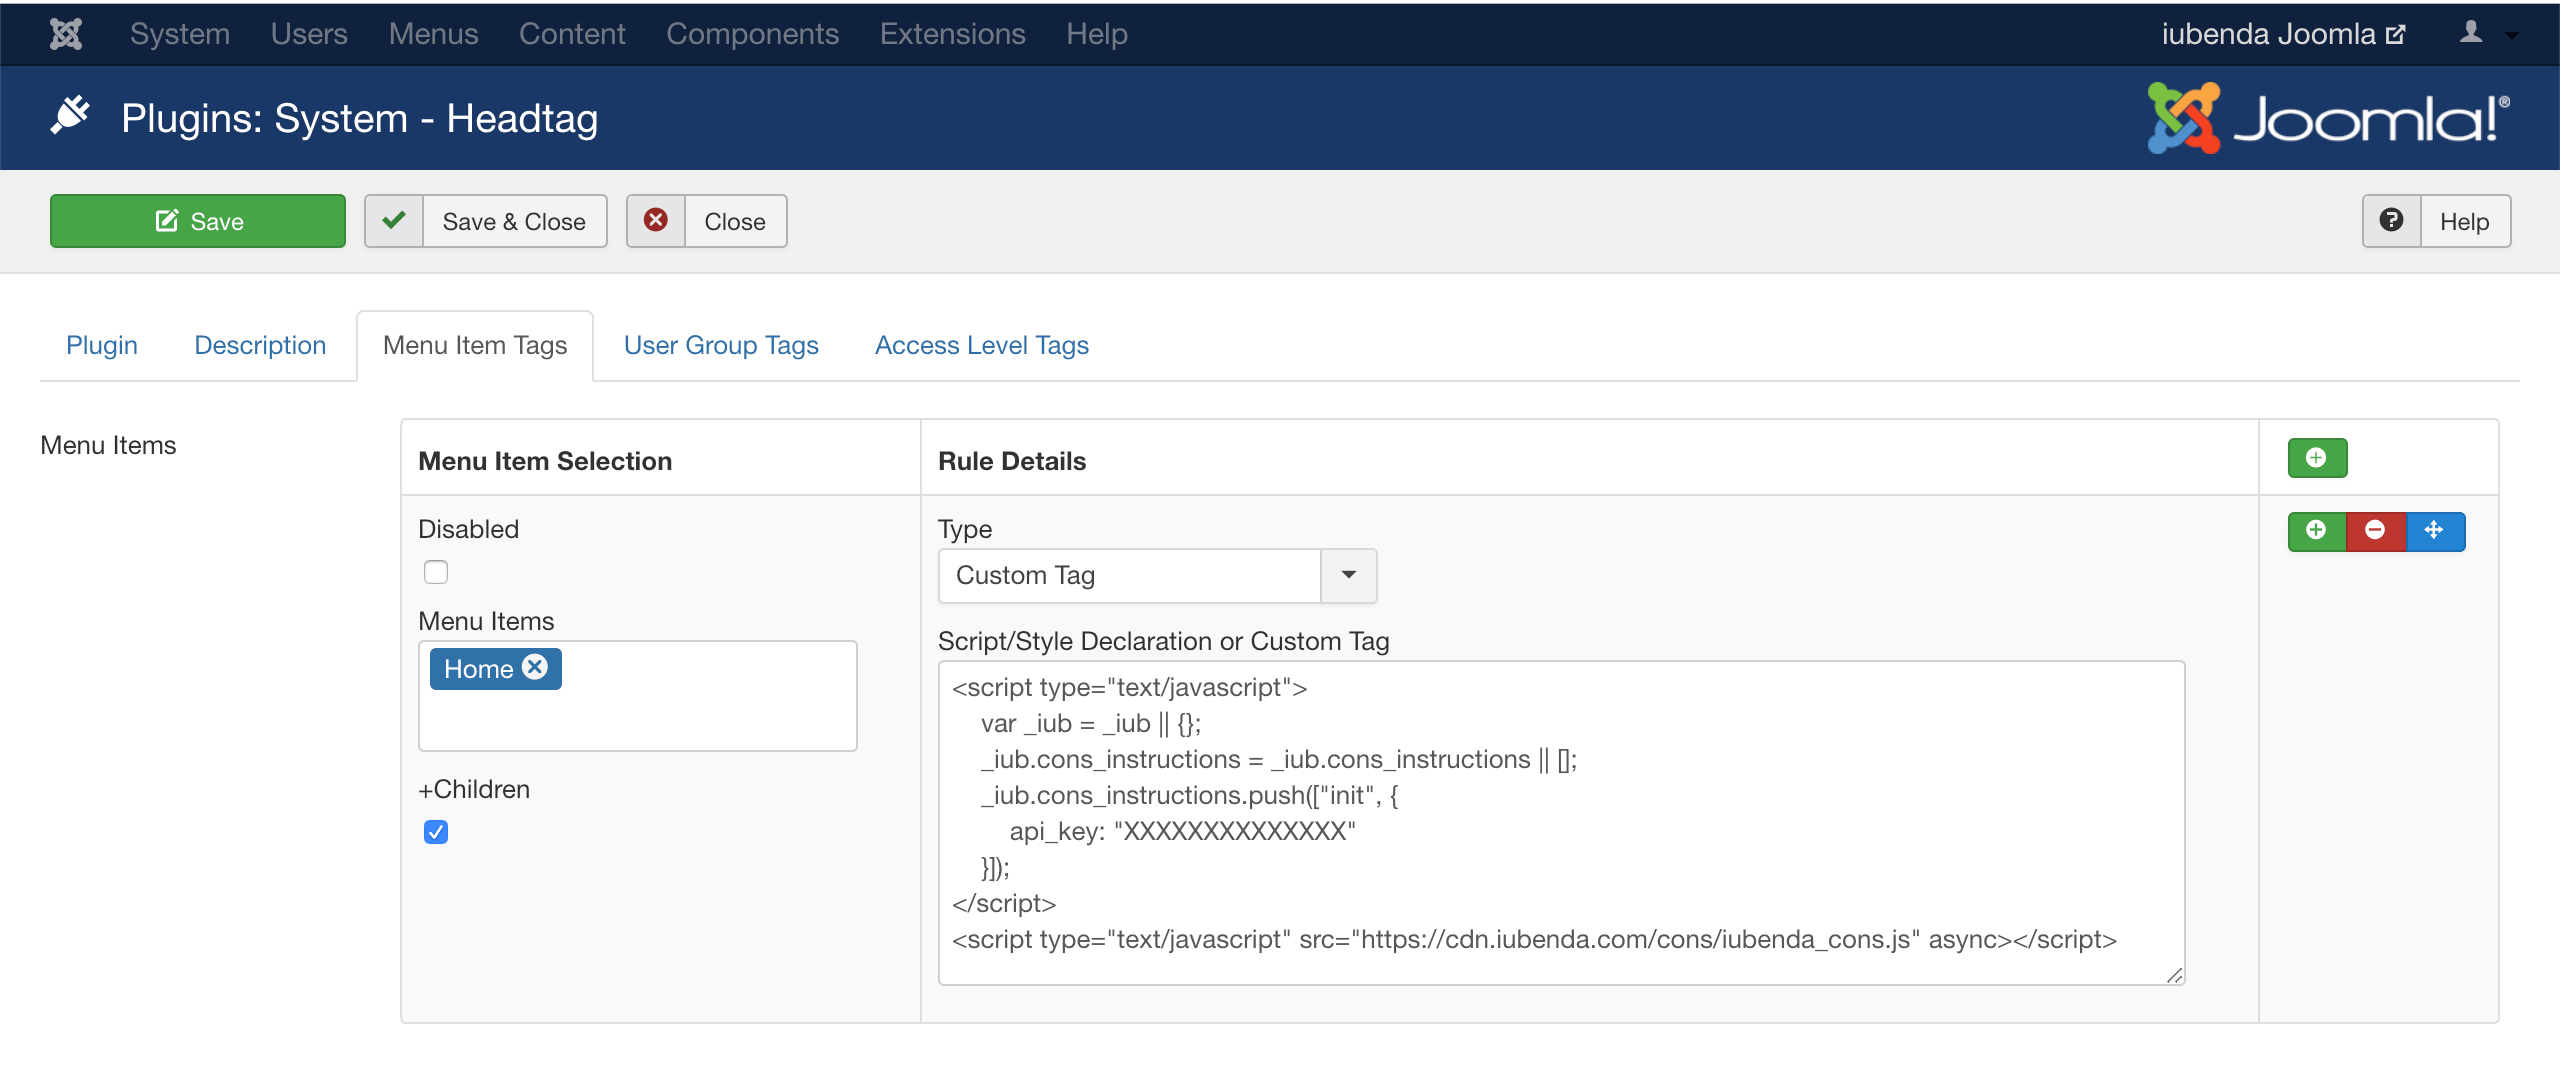
- if you’re not comfortable with directly editing theme files, you can use a plugin for coding and scripts integration, like HeadTag. Once you’ve installed the plugin, you can access the
headby going to Extensions > Plugins > System – Headtag > Menu Item Tags and paste the Consent Database script.
2. Create or modify your form
Once you’ve included the Consent Database’s code inside the head of your site, access your Joomla! dashboard and create a form (e.g. “contact”) using the ChronoForms extension.
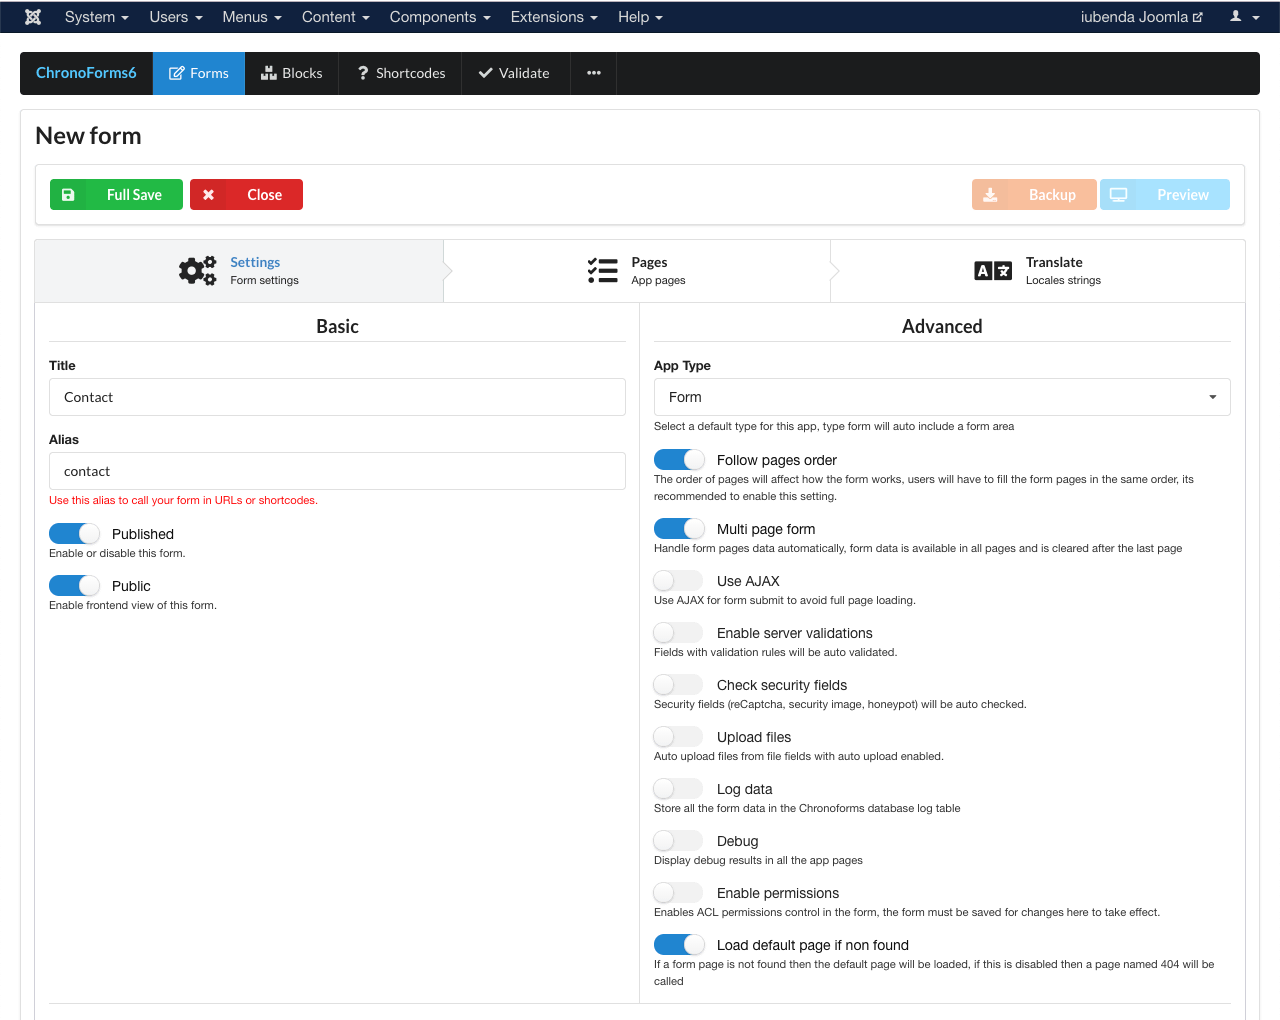
If you’re already using ChronoForms on your site, simply head to your forms overview page (Components > ChronoForms6) and click on the form you’d like to integrate with the Consent Database.
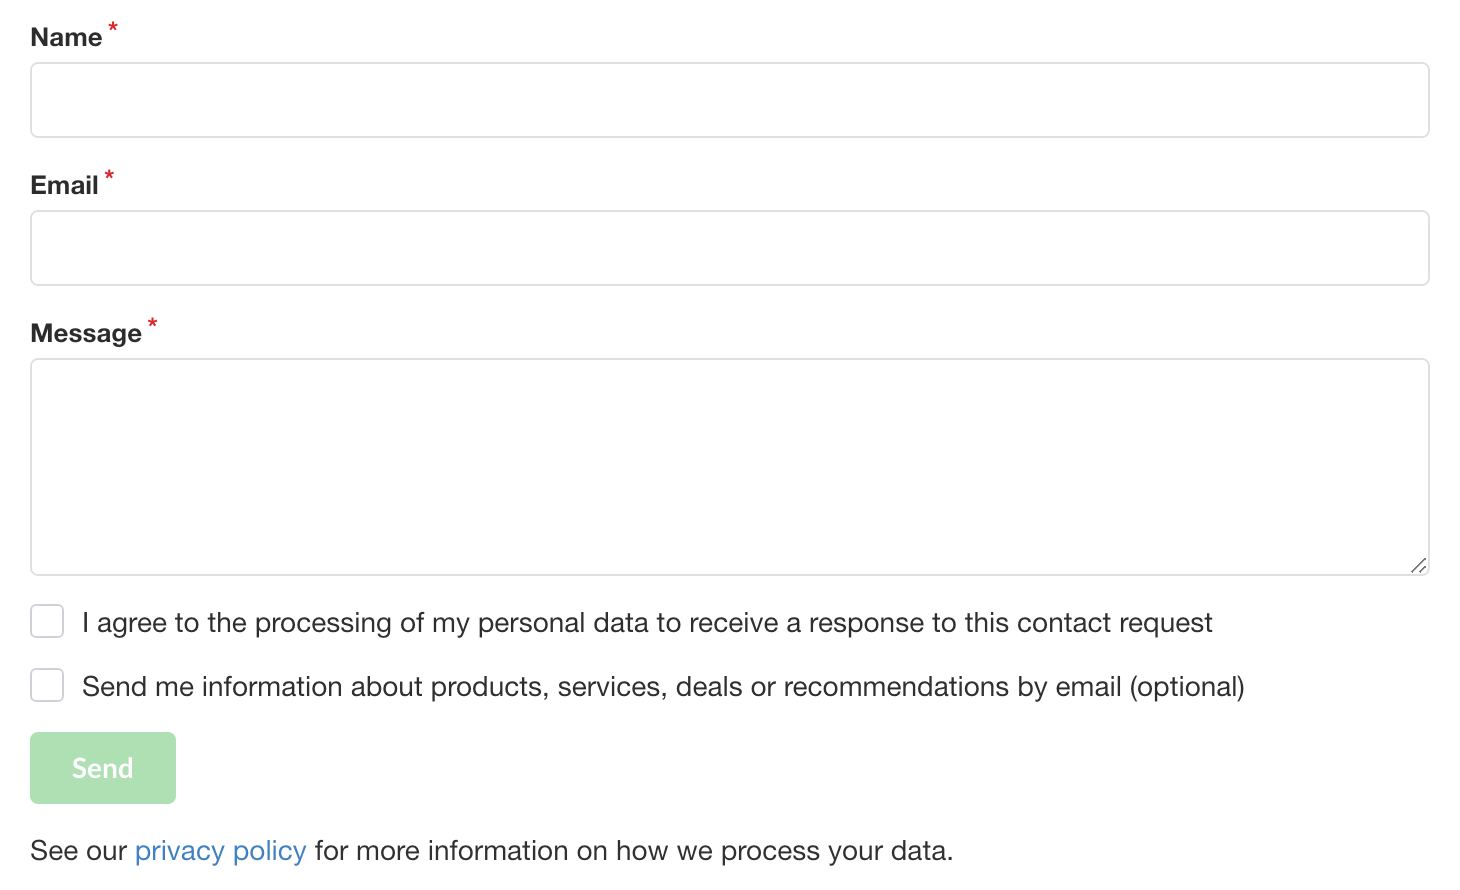
Here’s the contact form we’ll be using in our implementation example (name, email, message and newsletter subscription):
On ChronoForms it will look something like this:
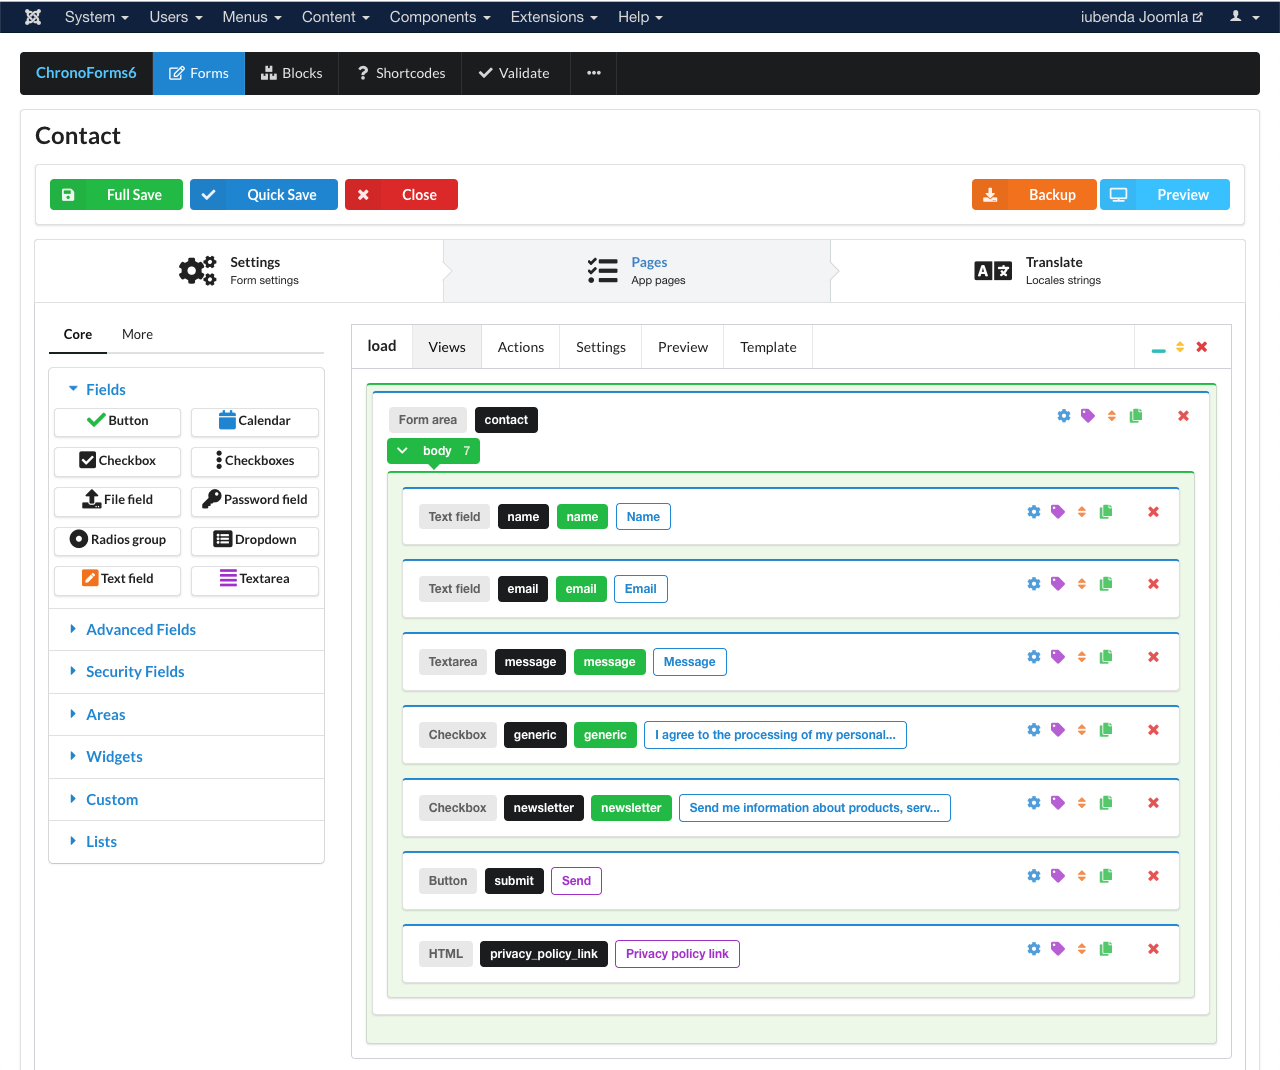
Once you’ve defined your form area, you’ll need to customize the form to map its various inputs so that the Consent Database can actually identify and pull the information that your users enter into the various input points.
To do the mapping you can use the load (or submit) function with the map object. In order for the load/submit function to work you’ll need:
- an
idfor theformelement; - different names for all the
subjectandpreferencesinputs; and - an
idfor thesubmitelement;
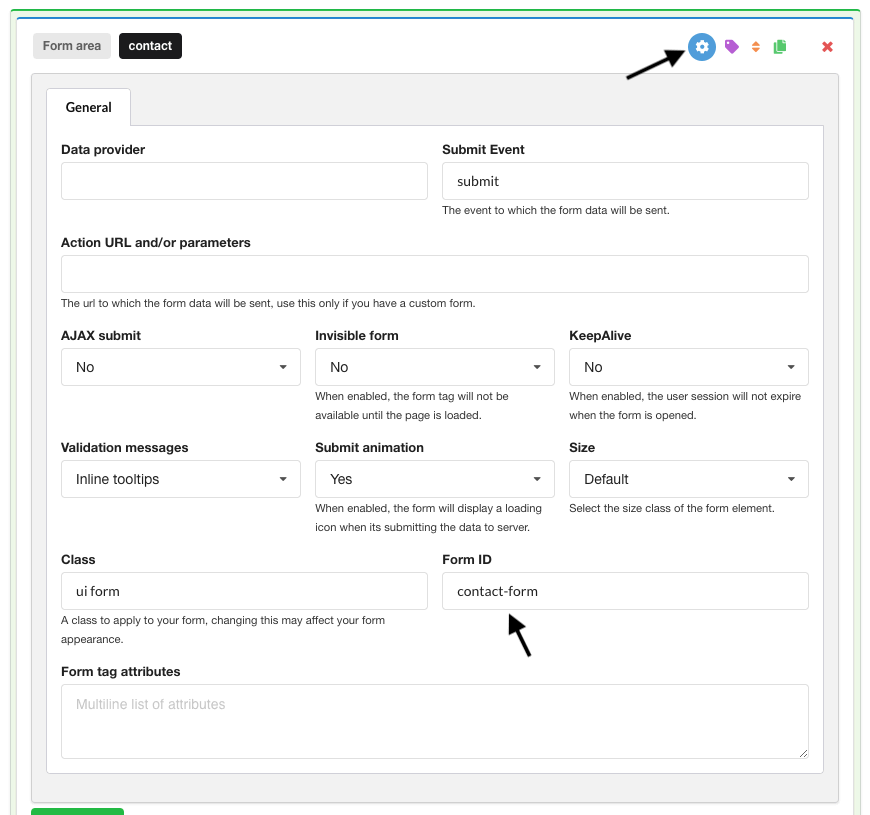
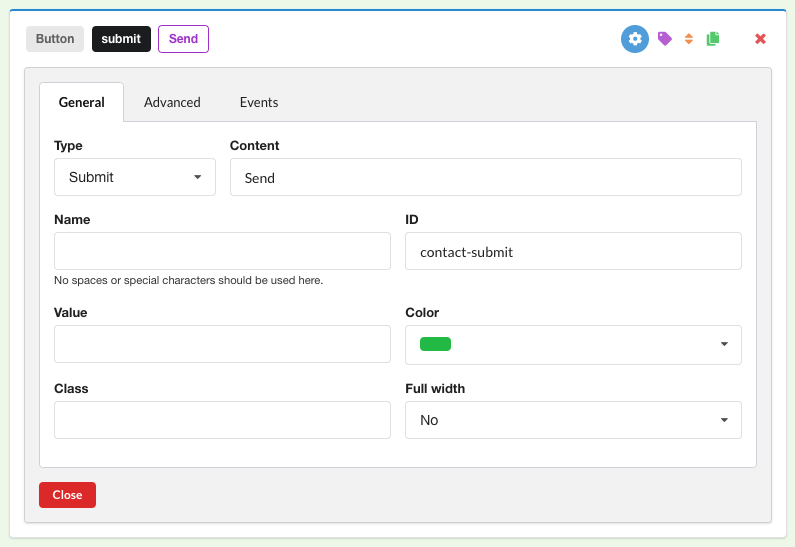
a. Click on the settings icon next to the form area and add an id to your form:
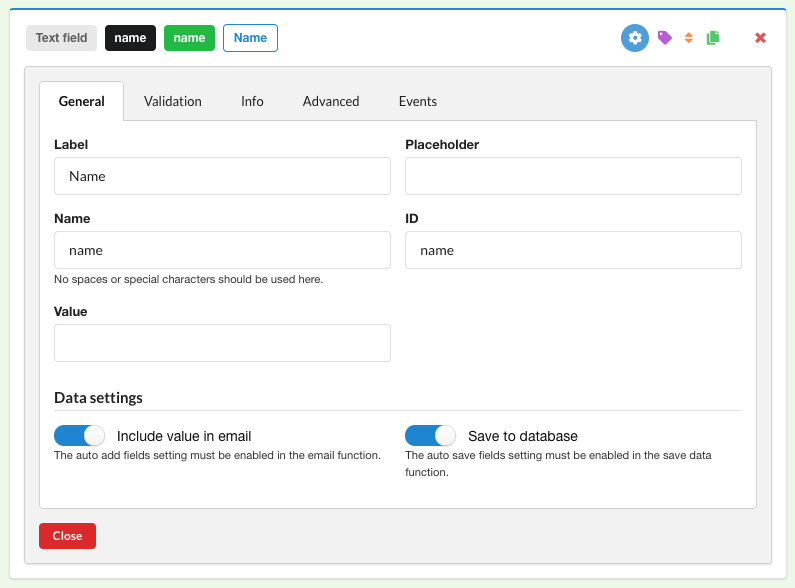
b. Similarly to the Form ID, add an id to the text fields (in our example, name, email and message):
And to the checkboxes (in our case, “generic” and “newsletter”):
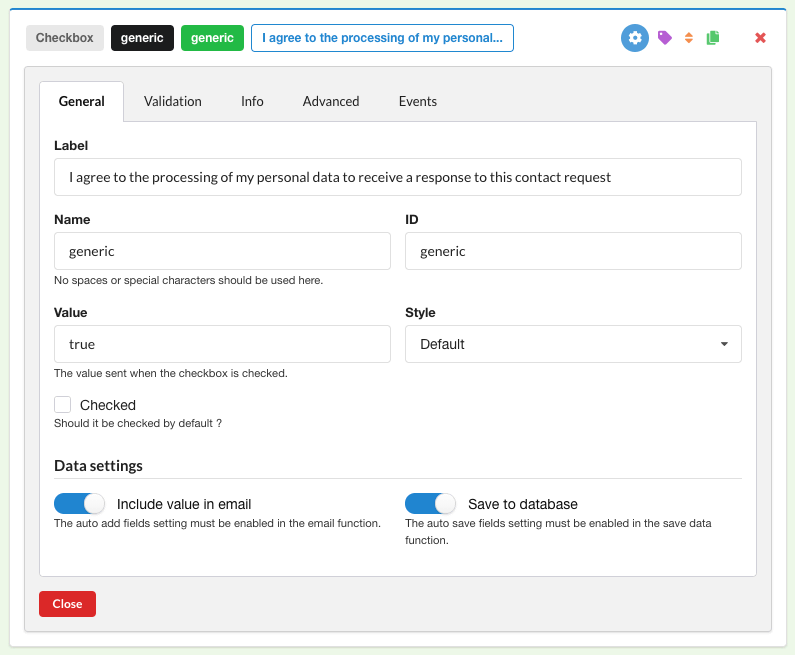
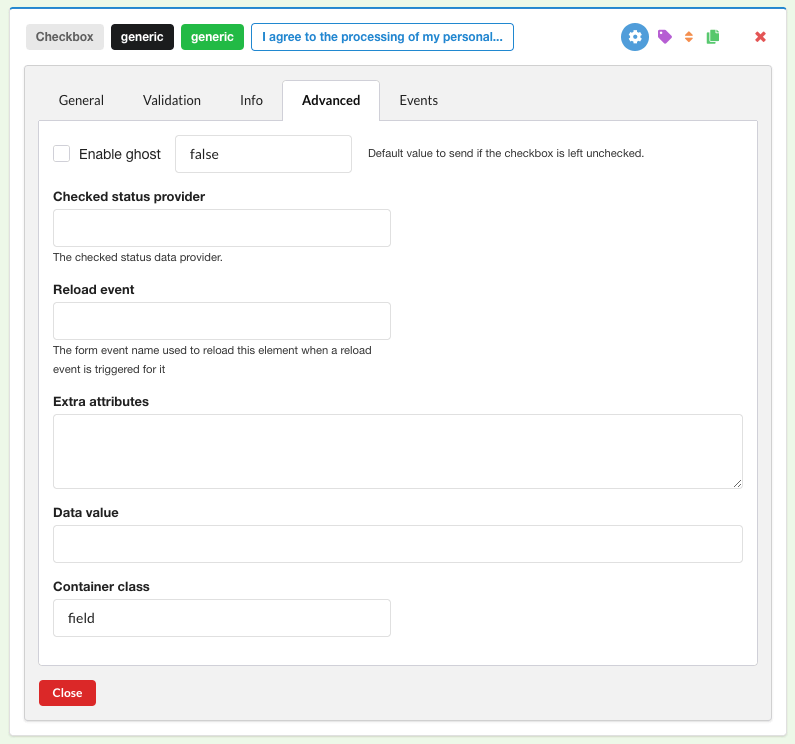
For a mandatory checkbox like the generic above, be sure to:
- Disable the validation
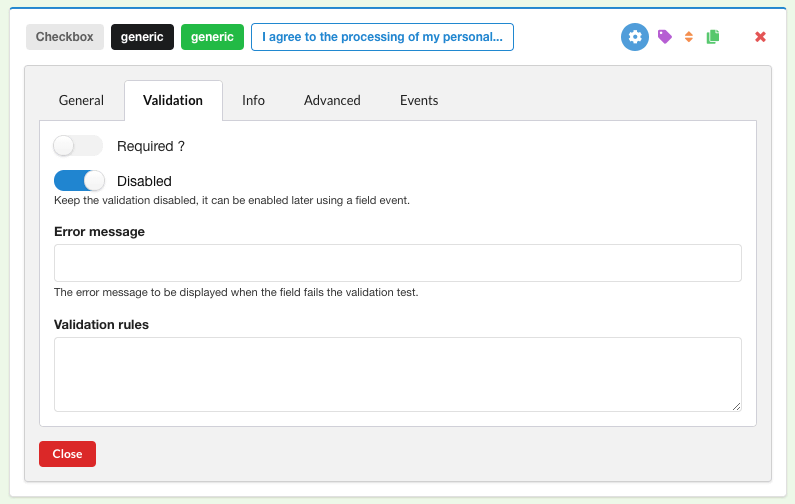
- Disable ghost
- Add two triggering events that will enable/disable the submit button (note that we’re using
#contact-submit, as indicated on the general configuration of the submit button):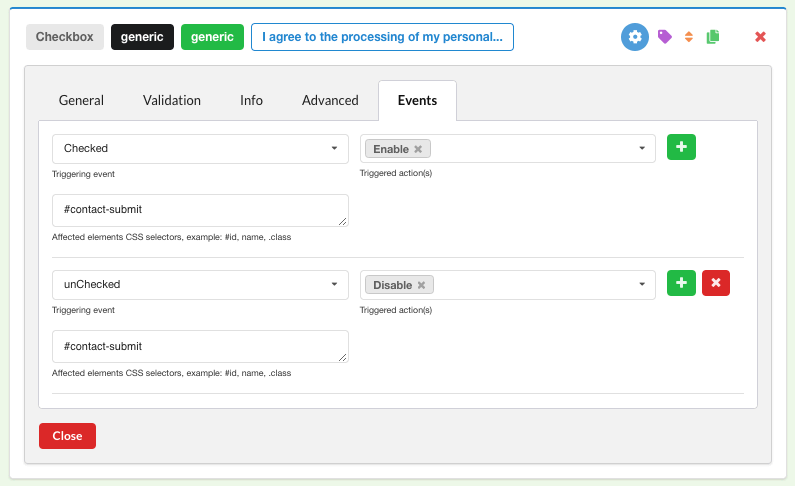
c. Finally, add an id to the submit button as well:
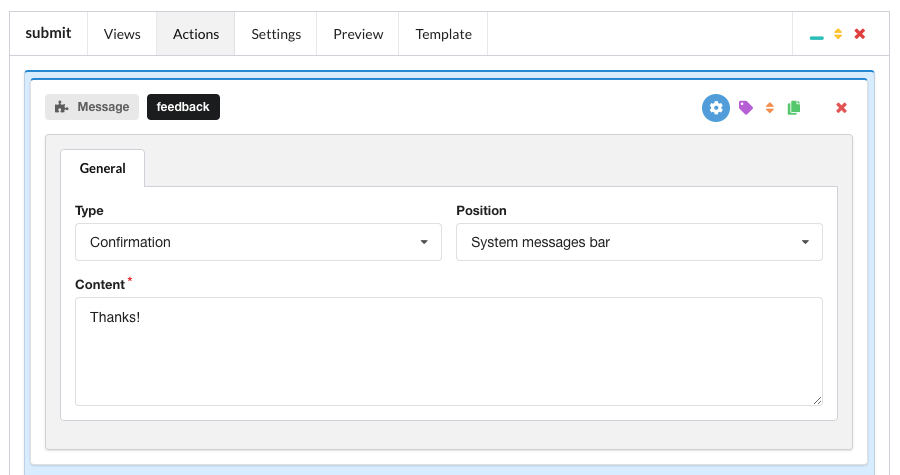
You may also want to add a confirmation message to be shown to your users after they’ve filled out the form (submit > Actions):
Save your changes and make sure that your form is published.
Form embedding
If you’re modifying an already-existing form on your site, jump to the section below, otherwise (if you’ve only just created the form) copy the shortcode generated by ChronoForms:
{chronoforms6}contact{/chronoforms6}And paste it in a page of your site (e.g., “Contact us”).
3. Send the Consent data to iubenda APIs
Now that your form is ready you need to make sure that it sends the information to the Consent Database when the user fills in and submits it. There are two ways to do this:
- the
loadmethod allows you to send the Consent data to iubenda APIs asynchronously; - the
submitmethod allows you to send the Consent data to iubenda APIs synchronously.
Load method
The load function allows you to bind fields of the consent object to input fields of your <form> and to automatically record the consent either by setting up a trigger function under submitElement: or programmatically via a dedicated trigger.
By default, this method writes into localStorage to protect from any loss of data in case a new page is loaded before the JavaScript has finished executing.
Caution
The load function must only be invoked after the declaration of the form object (as can be seen in the example below).
Here’s the load function with the map object:
<script>
    _iub.cons_instructions.push(["load", {
        submitElement: document.getElementById("contact-submit"),
        form: {
            selector: document.getElementById("contact-form"),
            map: {
                subject: {
                    first_name: "name",
                    email: "email"
                },
                preferences: {
                    generic: "generic",
                    newsletter: "newsletter"
                }
            }
        },
        consent: {
            legal_notices: [{
                    identifier: "privacy_policy",
                },
                {
                    identifier: "cookie_policy",
                }
            ],
        }
    }])
</script>
In the code above please note:
- the
contact-submitandcontact-formids; - the
first_nameandemailsubjectmapping (remember that you have four non-editable options:first_name,last_name,full_nameandemail); - the checkbox preferences, where you’re free to use the keys you like (in our case,
genericandnewsletter); - the
legal_notices, which are automated if you sync your iubenda legal documents with the Consent Database (just use the standard identifiersprivacy_policyandcookie_policy).
Be sure to include the load method after the form (for example inside the footer of your contact page), and you’re done!
Once you’ve collected your consents, you’ll be able to sort and analyze your user consent data in the Consent Dashboard.
Read the JS documentation for more information about the load method.
Submit method
The submit method allows you to send the Consent data to iubenda APIs synchronously.
Caution
Please note that this method will not work if there is a redirect after the form is submitted.
<script>
    document.getElementById("contact-submit").onclick = function() {
        sendToConsentSolution()
    };

    function sendToConsentSolution() {
        var inputName = document.getElementById("name").value;
        var inputEmail = document.getElementById("email").value;
        var inputMessage = document.getElementById("message").value;
        var subjectId = inputEmail.toLowerCase().replace(/\W/g, '-'); //optional
        _iub.cons_instructions.push(["submit", {
            form: {
                selector: document.getElementById("contact-form"),
                map: {
                    subject: {
                        first_name: "name",
                        email: "email"
                    },
                    preferences: {
                        generic: "generic",
                        newsletter: "newsletter"
                    }
                }
            },
            consent: {
                subject: {
                    id: subjectId
                },
                legal_notices: [{
                        identifier: "privacy_policy"
                    },
                    {
                        identifier: "cookie_policy"
                    }
                ]
            }
        }])
    }
</script>
In the code above please note:
- the
contact-submitandcontact-formids; - the
first_nameandemailsubjectmapping (remember that you have four non-editable options:first_name,last_name,full_nameandemail); - the checkbox preferences, where you’re free to use the keys you like (in our case,
genericandnewsletter); - the
legal_notices, which are automated if you sync your iubenda legal documents with the Consent Database (just use the standard identifiersprivacy_policyandcookie_policy); - optional: instead of letting it be generated automatically, we can customize the
subjectIdwith the email address – for example – of the subject, all lowercase and with the symbol “-” instead of “.” and “@” (this way for john.doe@iubenda.com thesubjectIdwould become john-doe-iubenda-com).
Be sure to include the submit method after the form (e.g., inside the footer of your contact page), and you’re done!
Once you’ve collected your consents, you’ll be able to sort and analyze your user consent data in the Consent Dashboard.
Read the JS documentation for more information about the submit method.