Oltre a raccogliere una prova del consenso per i tuoi form, la nostra Consent Database può essere usata anche per salvare le preferenze sui cookie raccolte tramite la Privacy Controls and Cookie Solution. In questa guida scoprirai come salvare la prova del consenso ai cookie combinando queste due soluzioni.
Se devi tenere traccia delle preferenze di consenso su più dispositivi, passa all’integrazione avanzata.
Integrazione di base
Consent Database
Una volta attivata il Consent Database, copia il codice che trovi in Dashboard > [Il tuo sito] > Consent Database > Integra e incollalo nell’HEAD delle tue pagine:
<!-- Consent Database -->
<script type="text/javascript">
    var _iub = _iub || {};
    _iub.cons_instructions = _iub.cons_instructions || [];
    _iub.cons_instructions.push(["init", {
        api_key: "YOUR_PUBLIC_API_KEY" //usa la tua chiave API
    }]);
</script>
<script type="text/javascript" src="https://cdn.iubenda.com/cons/iubenda_cons.js" async></script>
La chiave API (visualizzata come “YOUR_PUBLIC_API_API_KEY” nell’esempio soprastante) è generata in fase di attivazione del Consent Database ed è unica per ogni sito web.
Privacy Controls and Cookie Solution
Al codice del Consent Database dovrà seguire quello di Privacy Controls and Cookie Solution. Una volta configurato il tuo cookie banner, otterrai un codice simile a questo:
<!-- Cookie Solution -->
<script type="text/javascript">
    var _iub = _iub || [];
    _iub.csConfiguration = {
        "lang": "it",
        "siteId": XXXXXX, //usa il tuo siteId
        "cookiePolicyId": YYYYYY, //usa il tuo cookiePolicyId
        "banner": {
            "position": "float-top-center",
            "acceptButtonDisplay": true,
            "customizeButtonDisplay": true
        }
    };
</script>
<script type="text/javascript" src="//cdn.iubenda.com/cs/iubenda_cs.js" charset="UTF-8" async></script>
Per poter passare le preferenze di consenso al Consent Database dovremo definire la variabile bannerHTML (dove salveremo l’HTML del cookie banner da usare come prova) e un paio di callback:
<!-- Cookie Solution -->
<script type="text/javascript">
var _iub = _iub || [];
var bannerHTML; //bannerHTML variable
_iub.csConfiguration = {
"lang": "it",
"siteId": XXXXXX, //usa il tuo siteId
"cookiePolicyId": YYYYYY, //usa il tuo cookiePolicyId
"banner": {
"position": "float-top-center",
"acceptButtonDisplay": true,
"customizeButtonDisplay": true
},
"callback": {
"onReady": function() {
var banner = document.getElementById('iubenda-cs-banner');
if (banner) {
bannerHTML = banner.innerHTML;
}
},
"onPreferenceFirstExpressed": function(event) {
_iub.cons_instructions.push(["submit",
{
consent: {
subject: {},
preferences: event,
legal_notices: [{
identifier: "cookie_policy"
}],
proofs: [{
content: JSON.stringify(event),
form: bannerHTML
}]
}
}
]);
}
}
};
</script>
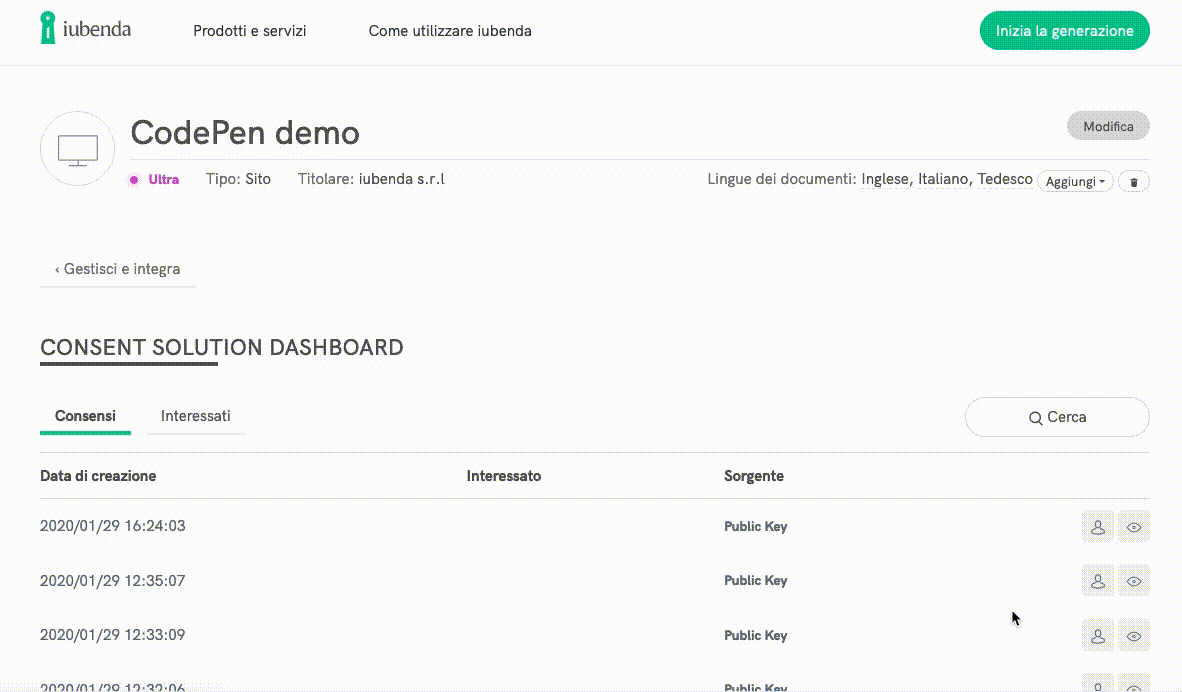
<script type="text/javascript" src="//cdn.iubenda.com/cs/iubenda_cs.js" charset="UTF-8" async></script>Così facendo, la dashboard del Consent Database mostrerà tutte le preferenze di consenso raccolte tramite il cookie banner:
Ovviamente puoi sempre aggiungere altri parametri alle tue prove di consenso, come ad esempio consentOnScroll, consentOnLinkAndButton o purposes (per maggiori informazioni consulta la guida avanzata a Privacy Controls and Cookie Solution).
Integrazione avanzata (preferenze di consenso sincronizzate su più dispositivi)
Se devi tenere traccia delle preferenze di un utente su più dispositivi (ad es. sito web e app mobile), dovrai chiamare il Consent Database ad ogni visualizzazione di pagina per tenere sincronizzate le preferenze di consenso tra le varie installazioni di Privacy Controls and Cookie Solution.
Vediamo come.
Consent Database
Come per l’integrazione di base, una volta attivata il Consent Database, copia il codice che trovi in Dashboard > [Il tuo sito] > Consent Database > Integra e incollalo nell’HEAD delle tue pagine:
<!-- Consent Database -->
<script type="text/javascript">
    var _iub = _iub || {};
    _iub.cons_instructions = _iub.cons_instructions || [];
    _iub.cons_instructions.push(["init", {
        api_key: "YOUR_PUBLIC_API_KEY" //usa la tua chiave API
    }]);
</script>
<script type="text/javascript" src="https://cdn.iubenda.com/cons/iubenda_cons.js" async></script>
La chiave API (visualizzata come “YOUR_PUBLIC_API_API_KEY” nell’esempio soprastante) è generata in fase di attivazione del Consent Database ed è unica per ogni sito web.
Privacy Controls and Cookie Solution
Anche in questo caso, al codice del Consent Database dovrà seguire quello di Privacy Controls and Cookie Solution. Una volta configurato il tuo cookie banner, otterrai un codice simile a questo:
<!-- Cookie Solution -->
<script type="text/javascript">
    var _iub = _iub || [];
    _iub.csConfiguration = {
        "lang": "it",
        "siteId": XXXXXX, //usa il tuo siteId
        "cookiePolicyId": YYYYYY, //usa il tuo cookiePolicyId
        "banner": {
            "position": "float-top-center",
            "acceptButtonDisplay": true,
            "customizeButtonDisplay": true
        }
    };
</script>
<script type="text/javascript" src="//cdn.iubenda.com/cs/iubenda_cs.js" charset="UTF-8" async></script>
Per passare le preferenze di consenso al Consent Database (e coprire tutti i casi in cui è necessaria la sincronizzazione), dovrai definire un paio di callback nello script di Privacy Controls and Cookie Solution:
<script type="text/javascript">
    var _iub = _iub || [];
    _iub.csConfiguration = {
        "lang": "it",
        "siteId": XXXXXX, //usa il tuo siteId
        "cookiePolicyId": YYYYYY, //usa il tuo cookiePolicyId
        "banner": {
            "position": "float-top-center",
            "acceptButtonDisplay": true,
            "customizeButtonDisplay": true
        },
        "callback": {
            "onReady": function() {
                consSyncronizer();
            },
            "onPreferenceFirstExpressed": function(preferences) {
                consSyncronizer();
            }
        }
    };
</script>
Ora andranno definite due funzioni per coprire tre passaggi:
- una funzione che si attiva al caricamento della pagina e prima che Privacy Controls and Cookie Solution venga inizializzata (necessaria per evitare che venga mostrato il cookie banner qualora sia presente un consenso remoto per un dato utente). La chiameremo
consPreflight. - una funzione che si attiva quando Privacy Controls and Cookie Solution viene inizializzata (callback
onReady) e che controlla se il consenso sul dispositivo e il consenso del Consent Database sono allineati. La chiameremoconsSyncronizer. consSyncronizersi attiva anche quando le preferenze espresse tramite Privacy Controls and Cookie Solution vengono riaperte e modificate.
Dovremo ripetere questi tre passaggi ad ogni pageview. Vediamoli più dettagliatamente.
1. Funzione consPreflight
Per evitare che il banner venga visualizzato se è presente un consenso remoto per un determinato utente, questa funzione interroga il Consent Database sulla base di un subject_id (utilizzato per identificare in modo univoco un utente) e cerca di recuperarne le preferenze relative ai cookie:
- Se non vengono trovati né
subject_idné cookie locale che memorizza il consenso, viene attivata Privacy Controls and Cookie Solution e viene mostrato il banner. Questa eventualità in genere si verifica alla prima visita dell’utente. - Se non viene trovato nessun
subject_id, ma il cookie locale è presente, quest’ultimo viene salvato sul Consent Database e ilsubject_idrestituito viene memorizzato. Privacy Controls and Cookie Solution viene quindi attivata, ma il banner non viene mostrato. Questo è il caso di un utente che ha prestato il consenso prima che questa logica venisse implementata. - Se viene trovato il
subject_idma non il cookie locale, le preferenze remote vengono utilizzate per creare un cookie di consenso locale. Privacy Controls and Cookie Solution viene attivata e il banner non viene mostrato. Questo è il caso degli utenti che hanno espresso una preferenza su un’istanza di Privacy Controls and Cookie Solution (ad es. web), e hanno poi compiuto una visita su una seconda istanza (ad es. mobile). - Infine, se vengono trovati sia il
subject_idche il cookie locale, in questa fase non viene fatto nulla e Privacy Controls and Cookie Solution viene attivata. Questo è il caso più comune per gli utenti che continuano a navigare sul sito.
function consPreflight() {

  // Check if the subject id is available
  var subject_id = localStorage.getItem('subject_id');

  if (subject_id) {
    // Subject id available, check if we need to pull from the Consent Database before activating the Cookie Solution

    // Try to the fetch the Cookie Solution local cookie
    var cookiePolicyId = _iub.csConfiguration.cookiePolicyId;
    var cookieName = '_iub_cs-' + cookiePolicyId;
    var cookieLocal = getCookie(cookieName);

    if (cookieLocal === null) {
      // No local consent (cookie) found, but a remote consent (Consent Database) likely exists
      // Fetch the remote consent and create a local consent from it
      // Perform a request for the given subject_id to the Consent Database
      // WARNING: This uses the private key and should be done in the backend
      $.ajax({
        url: "https://consent.iubenda.com/subjects/" + subject_id,
        type: "GET",
        headers: { "ApiKey": "vs3hcMXwsqrrauIfmW14pFHcUIm9CVvp" }
      })
      .done(function(data, textStatus, jqXHR) {
        var consPreferences = data.preferences;

        // Create the local consent with the remote consent info
        var cookieContent = {timestamp: consPreferences.cookieTimestamp.value, version: consPreferences.cookieVersion.value, purposes: consPreferences.cookiePurposes.value, id: cookiePolicyId};
        setCookie(cookieName, escape(JSON.stringify(cookieContent)), 365);

        if (_iub.csConfiguration.enableTCF) {
        // If the Cookie Solution uses the TCF...
          if (consPreferences.cookieTCFv2) {
            // ...create a cookie for the TCF...
            var cookieTcfName = 'iubeuconsent-v2';
            var cookieTcfContent = consPreferences.cookieTCFv2.value;
            setCookie(cookieTcfName, cookieTcfContent, 365);
          }
        }
      })
      .fail(function(jqXHR, textStatus, errorThrown) {
        // If the request fails, a few retries should be performed before activating the Cookie Solution
        activateCookieSolution();
      })
      .always(function() {
        // Once the request and the syncronization is finished, activate the Cookie Solution
        activateCookieSolution();
      });
    } else {
      // Local consent (cookie) found, we don't need to do any pre-configuration
      activateCookieSolution();
    }
  } else {
    // No subject_id available, so we have nothing to syncronize from
    activateCookieSolution();
  }
}
Importante
Memorizziamo ilsubject nel localStorage a scopo puramente dimostrativo. Un’applicazione in produzione dovrebbe legare utente e subject_id a livello di database o comunque in un modo più affidabile.
Inoltre, le richieste GET al Consent Database sono possibili solo utilizzando la chiave privata (la chiave pubblica è di sola scrittura). Questa chiave non dev’essere disponibile pubblicamente a livello di frontend. Le richieste GET dovrebbero quindi essere eseguite via backend e i risultati passati a Privacy Controls and Cookie Solution.
2. Funzione consSyncronizer
Questa funzione si attiva una volta che Privacy Controls and Cookie Solution viene inizializzata (callback onReady) e controlla se il consenso del dispositivo e il consenso del Consent Database (se presente, o se creato in precedenza) sono allineati.
Questo viene fatto confrontando il timestamp del cookie con le preferenze del Consent Database:
- Se i timestamp sono uguali, non viene eseguita alcuna azione poiché i due consensi sono sincronizzati.
- Se il timestamp remoto è più recente del timestamp locale, le preferenze remote vengono utilizzate per aggiornare le preferenze locali.
- Se il timestamp locale è più recente del timestamp remoto, le preferenze locali vengono caricate sul Consent Database per aggiornare il subject.
function consSyncronizer() {
  // Check if the subject id is available
  var subject_id = localStorage.getItem('subject_id');

  // Gather all the local consent info
  var cookiePurposes = _iub.cs.consent.purposes;
  var cookieTimestamp = _iub.cs.consent.timestamp;
  var cookieVersion = _iub.cs.consent.version;
  var cookiePolicyId = _iub.cs.consent.id;

  if (subject_id === null) {
    // No subject_id found...
    if (cookieTimestamp == undefined) {
      // ...and also no local consent. This is most likely a first time visit
      return;
    } else {
      // ...but local consent found. It has probably never been sent to the ConS, so do it now
      var cookiePreferences = {cookiePurposes: cookiePurposes, cookieTimestamp: cookieTimestamp, cookieVersion: cookieVersion, cookiePolicyId: cookiePolicyId};
      tcfAddPreferences(cookiePreferences, function() {
        consPreferencesPost({}, cookiePreferences);
      });

      return;
    }
  }

  // Both a subject_id and a local consent found, check if they need to be synced
  // Query the ConS and retrieve the remote consent for the given subject
  $.ajax({
    url: "https://consent.iubenda.com/subjects/" + subject_id,
    type: "GET",
    headers: { "ApiKey": "vs3hcMXwsqrrauIfmW14pFHcUIm9CVvp" }
  })
  .done(function(data, textStatus, jqXHR) {
    var consPreferences = data.preferences;

    // Convert local and remote timestamps into Unix time for easier comparison
    var consTimestamp = consPreferences.cookieTimestamp.value;
    var cookieUnixTime = new Date(cookieTimestamp).getTime();
    var consUnixTime = new Date(consTimestamp).getTime();

    if (cookieUnixTime == consUnixTime) {
      // Timestamps are equal: the local and remote consents are in sync, do nothing
      return;
    } else if (cookieUnixTime > consUnixTime) {
      // Local timestamp is newer than remote consent: something was changed locally, push the updated consent to ConS
      var cookiePreferences = {cookiePurposes: cookiePurposes, cookieTimestamp: cookieTimestamp, cookieVersion: cookieVersion, cookiePolicyId: cookiePolicyId};
      tcfAddPreferences(cookiePreferences, function() {
        consPreferencesPost({id: subject_id}, cookiePreferences);
      });
    } else {
      // Remote timestamp is newer than local consent: something was changed in another Cookie Solution instance and the local consent is now old, get the updated consent from Consent Database
      _iub.cs.api.storeConsent({purposes: consPreferences.cookiePurposes.value});

      if (_iub.cs.options.enableTCF) {
        // If the Cookie Solution uses the TCF...
        if (consPreferences.cookieTCFv2) {
          // ...update the cookie for the TCF...
          var cookieTcfName = 'iubeuconsent-v2';
          var cookieTcfContent = consPreferences.cookieTCFv2.value;
          setCookie(cookieTcfName, cookieTcfContent, 365);
        }
      }
    }
  })
  .fail(function(jqXHR, textStatus, errorThrown) {
    console.log("[consSyncronizer] Consent Database call failed");
  });
}
3. Funzione consSyncronizer (nuovamente)
La funzione consSyncronizer si attiva anche quando le preferenze di Privacy Controls and Cookie Solution vengono riaperte e modificate. Questo si verifica ad esempio quando si usa un pulsante con la classe iubenda-cs-preferences-link che (ri)apre la finestra delle preferenze.
In questo caso, poiché i due step precedenti sono già stati eseguiti, possiamo tranquillamente presumere che il consenso locale coincida col consenso remoto e che la nuova preferenza debba essere salvata nel Consent Database.
Una volta completati questi passaggi (coadiuvati da altre funzioni accessorie, vedi la demo su CodePen), la dashboard del Consent Database elencherà le preferenze di consenso raccolte tramite i cookie banner mostrati sui vari dispositivi.