Collecting cookie consent on AMP pages requires some work. Luckily, iubenda can help. Let’s break down the steps you’ll need to take and see how to integrate our Privacy Controls and Cookie Solution with Google’s Accelerated Mobile Pages, including blocking cookies before user consent and some useful tips for WordPress (our WP plugin supports AMP).
We’ll start with WordPress, as it’s the most popular option for AMP pages. If you’re using a different solution, skip to this section.
January 2022 update
Per-category consent is now supported by AMP. Therefore, you can enable granular consent with perPurposeConsent: true in the Privacy Controls and Cookie Solution configuration, and using the data-block-on-consent-purposes attribute instead of data-block-on-consent in the AMP configuration.
March 2021 update
We’ve completely overhauled our AMP integration, further improving our support for AMP. In addition to the existing features – such as TCF support and no resurfacing of consent if the user navigates out of AMP (with a browser that supports third-party cookies) – we’ve also included:
- Perfected Safari support. After adding the consent refreshing feature, our support for Apple’s browser is even better.
- The tracking preferences widget. This widget – now also fully supported in AMP – allows users to re-open and edit their tracking preferences after closing the cookie banner.
If you’re already using AMP and our Privacy Controls and Cookie Solution, download the latest version of our WordPress plugin, or update your manual integration to match our latest instructions.
iubenda and Google AMP – How to collect cookie consent in WordPress
Our WordPress plugin is fully compatible with Google AMP (it works with both the AMP and AMP for WP plugins), and it allows you to easily collect GDPR cookie consent and block cookies before the user grants consent as required by the Cookie Law.
Step 1 – Download our Cookie and Consent Database plugin
If you haven’t already, download and install our WordPress plugin. For more information, take a look at our installation guide.
Step 2 – Enable the Google AMP support
AMP requires specific configuration parameters and a page hosted on your domain where the configuration is loaded from.
Once you’ve added the Privacy Controls and Cookie Solution code and enabled the Google AMP support, our plugin will auto-generate the amp.html configuration file.
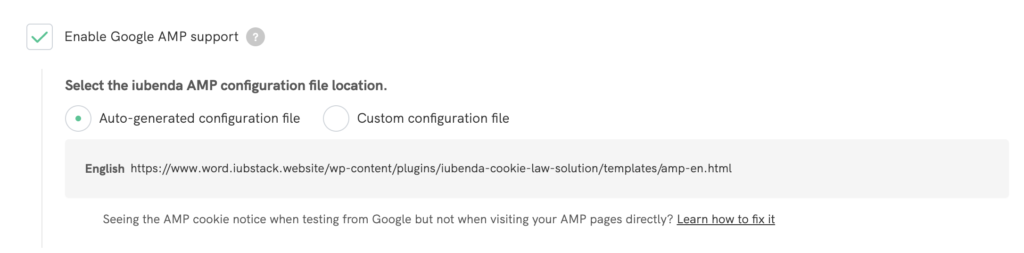
Just remember to set the “templates” folder permissions to 664 to avoid errors. See how to do this ⬇️
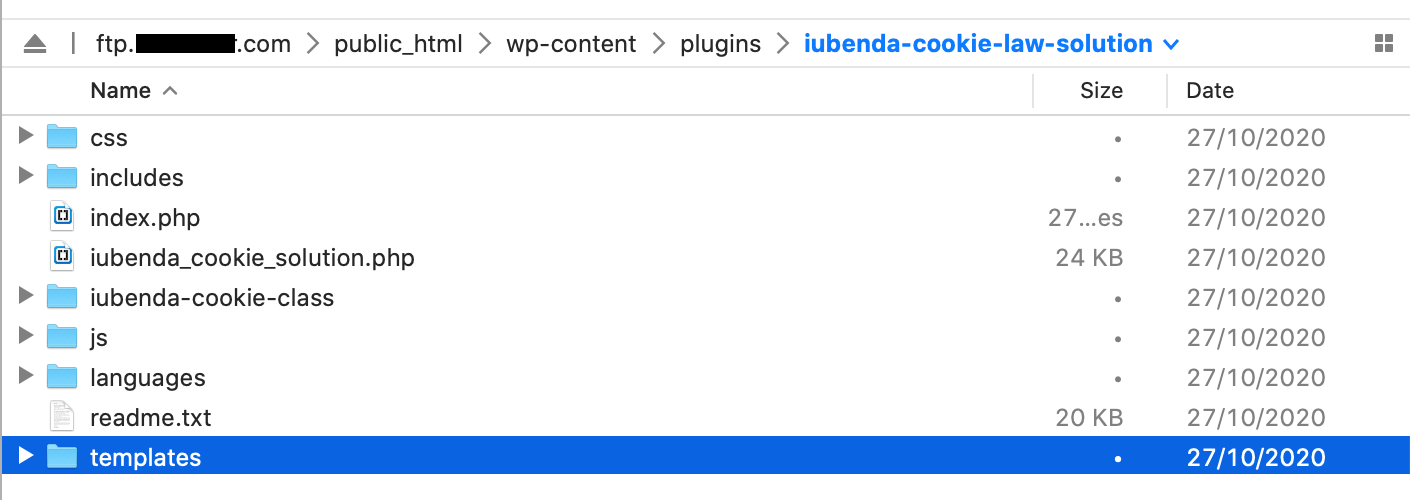
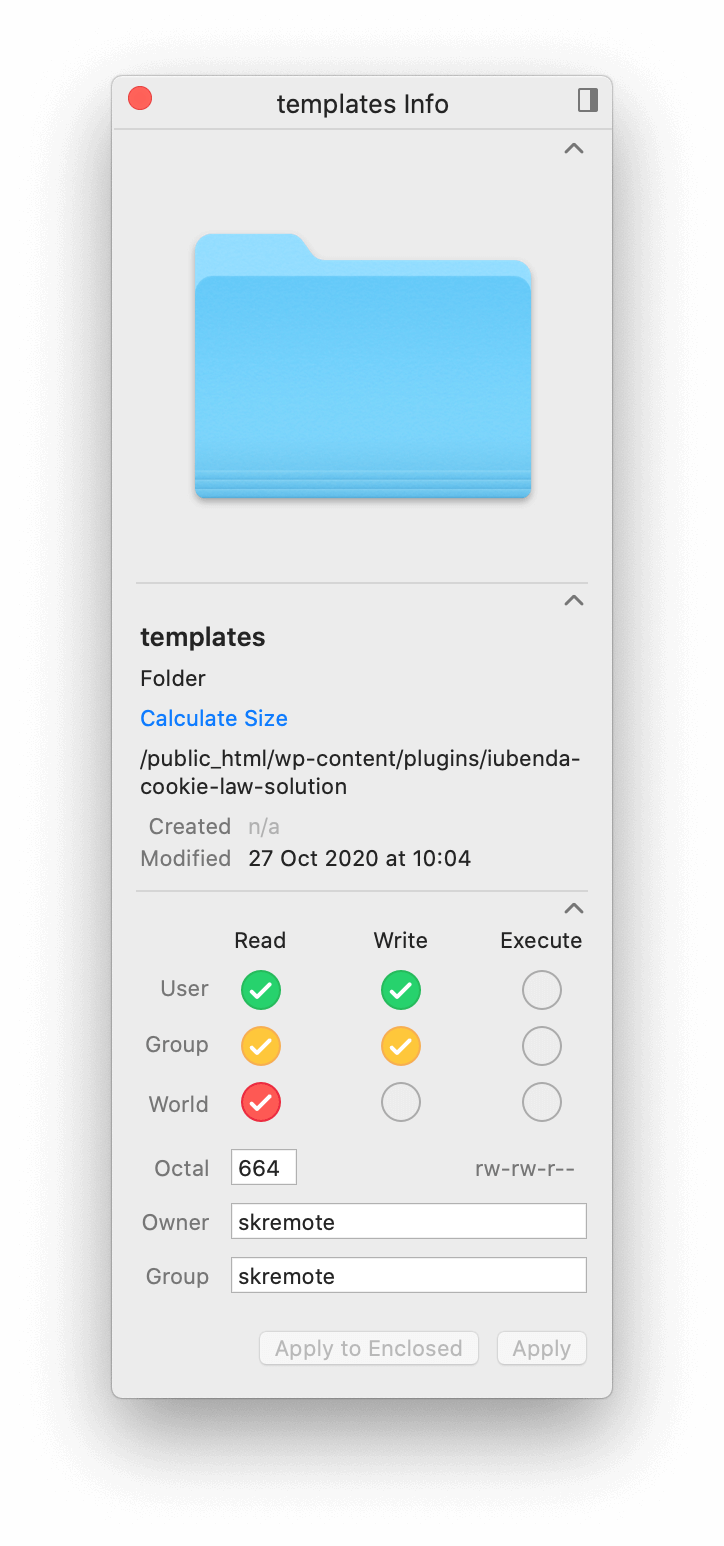
How to set the “templates” folder permissions to 664
You’ve enabled the Google AMP support, but got an error message when you auto-generate the AMP configuration file? The cause is a problem with the “templates” folder permissions. Here’s how to fix it:
- Through your FTP client, enter the (previously uploaded) “iubenda-cookie-law-solution” folder and create (if missing) a subfolder called “templates”

- Set 664 permissions for the “templates” folder (the “Get info/Edit permissions” option is usually available via right click)

- Repeat the “Google AMP support” enable procedure and save


Step 3 – Block components
As stated on amp.dev/documentation, once enabled the Google AMP support, you’ll have 3 alternative options:
- If you have not enabled per-category consent (with the CS configuration
perPurposeConsent: false):- use
amp-consent-blockingmeta tag in the head OR, - add
data-block-on-consenton all elements that need to be blocked based on consent.
- use
- If you have enabled per-category consent (with the CS configuration
perPurposeConsent: true) use instead thedata-block-on-consent-purposesattribute with a comma-separated list of consent purposes to set the categories to be prior-blocked (e.g.data-block-on-consent-purposes="1,2,3,4,5")
If you’ve enabled the Transparency and Consent Framework, please note that in the case of AMP pages, you must not add the stub-v2.js script.
iubenda and Google AMP – How to collect cookie consent on websites not powered by WordPress
If you’re not using WordPress, follow these steps to integrate our Privacy Controls and Cookie Solution with Google AMP.
Step 1 – Create an HTML file
First of all, copy this HTML code and host it on your HTTPS site in an HTML file (be sure to edit the Privacy Controls and Cookie Solution configuration to reflect your own):
<!doctype html>
<html lang="en">

<head>
    <meta charset="UTF-8">
    <meta name="viewport" content="width=device-width, initial-scale=1.0">
    <meta http-equiv="X-UA-Compatible" content="ie=edge">
    <meta name="robots" content="noindex">
    <title>AMP Cookie Consent</title>
</head>

<body class="iubenda-cookie-solution">
    <span class="iubenda-cs-preferences-link"></span>
    <script type="text/javascript">
        var _iub = _iub || [];

        // Your own Privacy Controls and Cookie Solution configuration
        _iub.csConfiguration = {
            lang: 'en',
            siteId: 896537, // Your own site ID
            cookiePolicyId: 8207462, // Your own cookie policy ID
            enableTcf: true,
            askConsentIfCMPNotFound: true,
            googleAdditionalConsentMode: true,
            googleAdsPreferenceManagement: true,
            floatingPreferencesButtonDisplay: false,
            banner: {
                acceptButtonDisplay: true, // Recommended
                customizeButtonDisplay: true, // Recommended
                rejectButtonDisplay: true // Advisable
            },
        };
    </script>
    <script type="text/javascript" src="//cdn.iubenda.com/cs/iubenda_cs.js" charset="UTF-8" async></script>
</body>

</html>
Privacy Controls and Cookie Solution, AMP and TCF
If you’ve enabled the Transparency and Consent Framework, please note that in case of AMP pages, you must not add the stub-v2.js script.
In production, you can host this file on:
- the same domain, or
- a subdomain, or
- a different domain (in this case you’ll have to enable
remoteConsent)
Testing environment
Since AMP does not allow the loading of iframes from the same domain, uploading this file on the same domain as your AMP page will result in the cookie notice not being displayed when you load AMP pages from that domain. This issue is only present when testing, because in a real-life AMP scenario the page will be loaded from google.com, so the same-domain issue will never happen.
Anyway, to avoid this issue in non-production use cases, host the HTML file on a different domain or subdomain (e.g. main domain is www.yourdomain.com, but you host the file on amp.yourdomain.com). One easy trick is to use www/non-www redirection to do this without adding extra subdomains.
Also note that the AMP iframe needs to be served via HTTPS.
Step 2 – Edit your AMP pages
Now add a copy of this <amp-consent> to your AMP pages:
<amp-consent id="iubenda" layout="nodisplay" type="iubenda">
    <script type="application/json">
        {
            "promptUISrc": "<uri-to-your-cs-page>",
            "postPromptUI": "post-consent-ui"
        }
    </script>
</amp-consent>
Next, add the code for the update preferences button, visible only when preferences are already expressed (to change the position, use the class iubenda-tp-btn--bottom-left, iubenda-tp-btn--top-left or iubenda-tp-btn--top-right instead of iubenda-tp-btn--bottom-right):
<div id="post-consent-ui">
    <button class="iubenda-tp-btn iubenda-tp-btn--bottom-right" on="tap:iubenda.prompt()"></button>
</div>
Finally, add the following <style amp-custom> to your document head:
<style amp-custom>
    .iubenda-tp-btn {
        position: fixed;
        z-index: 2147483647;
        background-image: url("data:image/svg+xml,%3Csvg xmlns='http://www.w3.org/2000/svg' width='32' height='32' viewBox='0 0 32 32'%3E%3Cpath fill='%231CC691' fill-rule='evenodd' d='M16 7a4 4 0 0 1 2.627 7.016L19.5 25h-7l.873-10.984A4 4 0 0 1 16 7z'/%3E%3C/svg%3E");
        background-repeat: no-repeat;
        background-size: 32px 32px;
        background-position: top .5px left 1px;
        width: 34px;
        height: 34px;
        border: none;
        cursor: pointer;
        margin: 16px;
        padding: 0;
        box-shadow: 0 0 0 1px rgba(0, 0, 0, .15);
        background-color: #fff;
        display: inline-block;
        height: 34px;
        min-width: 34px;
        border-radius: 4px;
        bottom: 0;
        right: 0;
    }

    .iubenda-tp-btn--top-left {
        top: 0;
        left: 0;
    }

    .iubenda-tp-btn--top-right {
        top: 0;
        right: 0;
    }

    .iubenda-tp-btn--bottom-left {
        bottom: 0;
        left: 0;
    }

    .iubenda-tp-btn--bottom-right {
        bottom: 0;
        right: 0;
    }
</style>
Wrapping up, here’s an AMP page example:
<!doctype html>
<html ⚡>

<head>
    <meta charset="utf-8">
    <meta name="viewport" content="width=device-width">
    <meta name="description" content="This is the AMP Boilerplate.">
    <link rel="preload" as="script" href="https://cdn.ampproject.org/v0.js">
    <script async src="https://cdn.ampproject.org/v0.js"></script>
    <script async custom-element="amp-consent" src="https://cdn.ampproject.org/v0/amp-consent-0.1.js"></script>
    <style amp-boilerplate>
        body {
            -webkit-animation: -amp-start 8s steps(1, end) 0s 1 normal both;
            -moz-animation: -amp-start 8s steps(1, end) 0s 1 normal both;
            -ms-animation: -amp-start 8s steps(1, end) 0s 1 normal both;
            animation: -amp-start 8s steps(1, end) 0s 1 normal both
        }

        @-webkit-keyframes -amp-start {
            from {
                visibility: hidden
            }

            to {
                visibility: visible
            }
        }

        @-moz-keyframes -amp-start {
            from {
                visibility: hidden
            }

            to {
                visibility: visible
            }
        }

        @-ms-keyframes -amp-start {
            from {
                visibility: hidden
            }

            to {
                visibility: visible
            }
        }

        @-o-keyframes -amp-start {
            from {
                visibility: hidden
            }

            to {
                visibility: visible
            }
        }

        @keyframes -amp-start {
            from {
                visibility: hidden
            }

            to {
                visibility: visible
            }
        }
    </style>
    <noscript>
        <style amp-boilerplate>
            body {
                -webkit-animation: none;
                -moz-animation: none;
                -ms-animation: none;
                animation: none
            }
        </style>
    </noscript>
    <style amp-custom>
        .iubenda-tp-btn {
            position: fixed;
            z-index: 2147483647;
            background-image: url("data:image/svg+xml,%3Csvg xmlns='http://www.w3.org/2000/svg' width='32' height='32' viewBox='0 0 32 32'%3E%3Cpath fill='%231CC691' fill-rule='evenodd' d='M16 7a4 4 0 0 1 2.627 7.016L19.5 25h-7l.873-10.984A4 4 0 0 1 16 7z'/%3E%3C/svg%3E");
            background-repeat: no-repeat;
            background-size: 32px 32px;
            background-position: top .5px left 1px;
            width: 34px;
            height: 34px;
            border: none;
            cursor: pointer;
            margin: 16px;
            padding: 0;
            box-shadow: 0 0 0 1px rgba(0, 0, 0, .15);
            background-color: #fff;
            display: inline-block;
            height: 34px;
            min-width: 34px;
            border-radius: 4px;
            bottom: 0;
            right: 0;
        }

        .iubenda-tp-btn--top-left {
            top: 0;
            left: 0;
        }

        .iubenda-tp-btn--top-right {
            top: 0;
            right: 0;
        }

        .iubenda-tp-btn--bottom-left {
            bottom: 0;
            left: 0;
        }

        .iubenda-tp-btn--bottom-right {
            bottom: 0;
            right: 0;
        }
    </style>
    <link rel="canonical" href=".">
    <title>My AMP Page</title>
</head>

<body>
    <amp-consent id="iubenda" layout="nodisplay" type="iubenda">
        <script type="application/json">
            {
                "promptUISrc": "<uri-to-your-cs-page>",
                "postPromptUI": "post-consent-ui"
            }
        </script>
    </amp-consent>
    <!-- This is the update preferences button, visible only when preferences are already expressed -->
    <div id="post-consent-ui">
        <button class="iubenda-tp-btn iubenda-tp-btn--bottom-right" on="tap:iubenda.prompt()"></button>
    </div>
</body>

</html>
Note:
- Add
<script async="" custom-element="amp-geo" src="https://cdn.ampproject.org/v0/amp-geo-latest.js"></script>only if you want to limit consent collection to EU - If these resources are already added to the page, an harmless error will be raised
Consent string and third party vendors
To retrieve the consent string on AMP, third party vendors can use context.initialConsentValue
Step 3 – Block components
As stated on amp.dev/documentation, once enabled the Google AMP support, you’ll have 3 alternative options:
- If you have not enabled per-category consent (with the CS configuration
perPurposeConsent: false):- use
amp-consent-blockingmeta tag in the head OR, - add
data-block-on-consenton all elements that need to be blocked based on consent.
- use
- If you have enabled per-category consent (with the CS configuration
perPurposeConsent: true) use instead thedata-block-on-consent-purposesattribute with a comma-separated list of consent purposes to set the categories to be prior-blocked (e.g.data-block-on-consent-purposes="1,2,3,4,5").