If you’re here, you’ve probably set up your Shopify shop and need to manage cookies. Or are you considering setting up your Shopify shop but are wondering how to display your cookie notice? Let’s see how to do it 👉
Once you’ve integrated the Privacy Policy on your Shopify website (which also includes the cookie policy if you’ve activated it) you can complete the configuration by embedding our Privacy Controls and Cookie Solution to:
- display a fully customizable cookie banner
- collect cookie consent
- measure conversions and analytics for users who did not provide consent thanks to full support for Google Consent Mode
- implement prior blocking, as required by the Cookie Law
In fact, except for exempt cookies, the Cookie Law includes not only the obligation to set up and show the user a Cookie Policy, but also to display a brief notice (banner) at the user’s first visit and to block scripts which install (or could install) cookies, until the user has granted consent.
👉 In this guide, you’ll learn how to integrate our Privacy Controls and Cookie Solution in your Shopify store. (In minutes!)
In short
- We’ll show you how to Generate your Cookie Policy (if you haven’t already)
- How to generate your cookie banner
- How to add the Privacy Controls and Cookie Solution Snippet to Your Shopify Store:
- using the CMP Insert Code app (Easiest and Fastest Method!), or
- editing your Shopify Theme Manually.
- Set up prior blocking of cookie scripts for non-exempt cookies, in just 3 steps!
- Easily manage cookie consent for your Shopify store 👉 Get started for free
Here is how to add a cookie banner to your Shopify store
The method shown below uses Shopify’s Customer Privacy API (which automatically blocks cookies and trackers installed either by Shopify directly or by any plugins that support it).
Since Shopify has its own Customer Privacy API, it is recommended not to use the iubenda autoblocking feature. Instead, rely on Shopify’s native functionality for managing cookies and trackers.
1. Generate your Cookie Policy (if you haven’t already)
1. First, go to your iubenda Dashboard and click on [Your website] > Privacy and Cookie Policy > Edit. You’ll notice a Cookie Policy box in the right column.
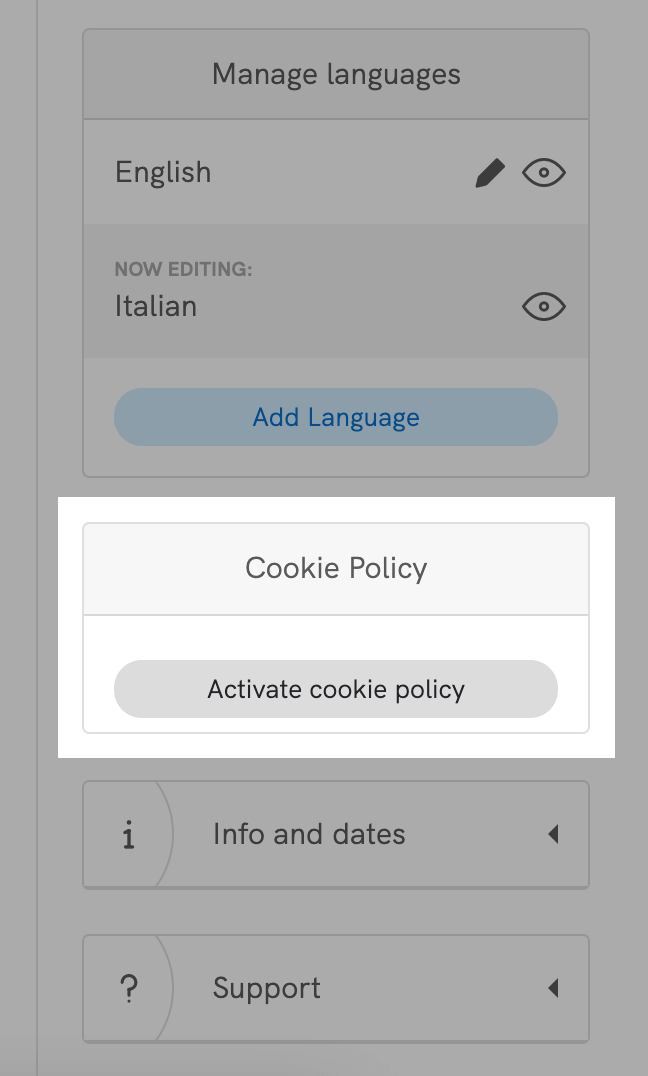
2. Click on Activate cookie policy and Save changes: your Cookie Policy will be generated automatically based on the configuration of your Privacy Policy.
💡 If you already have your own Cookie Policy, you can add the link in the Advanced View of the Privacy Controls and Cookie Solution configurator. Select Custom under Cookie and Privacy Policy > Cookie Policy URL. More info on the Privacy Controls and Cookie Solution advanced guide.
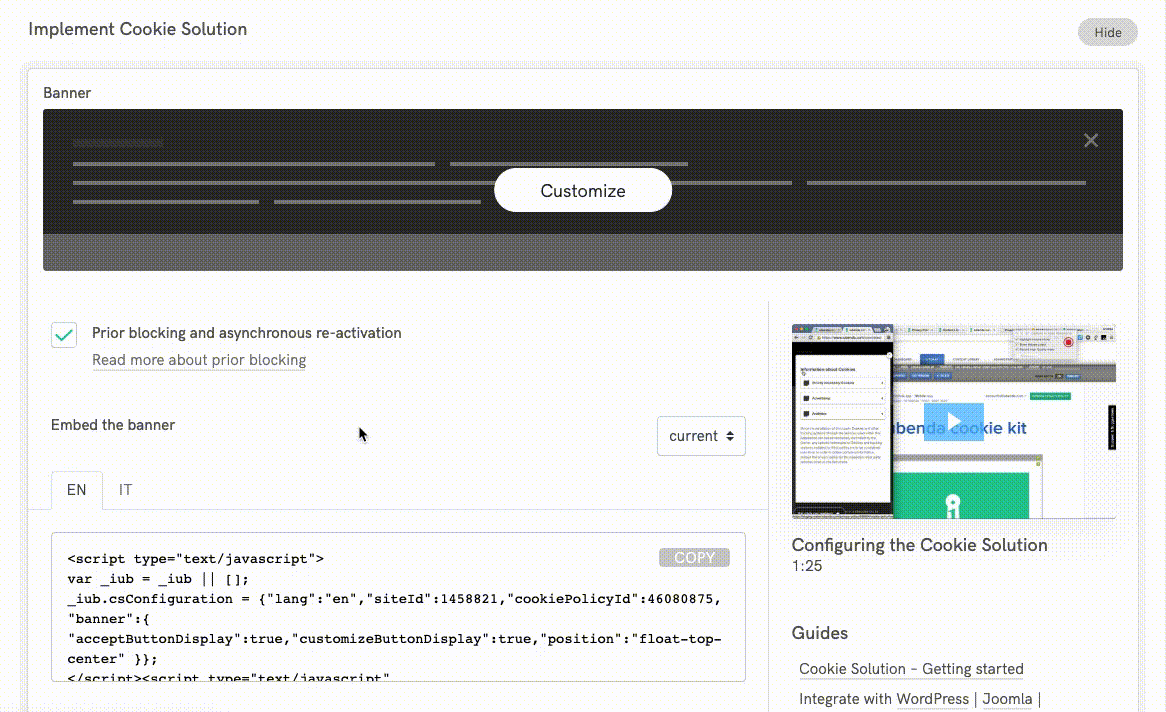
2. Generate your cookie banner
1. Click on Generate now under Dashboard > [Your website/app] > Privacy Controls and Cookie Solution.
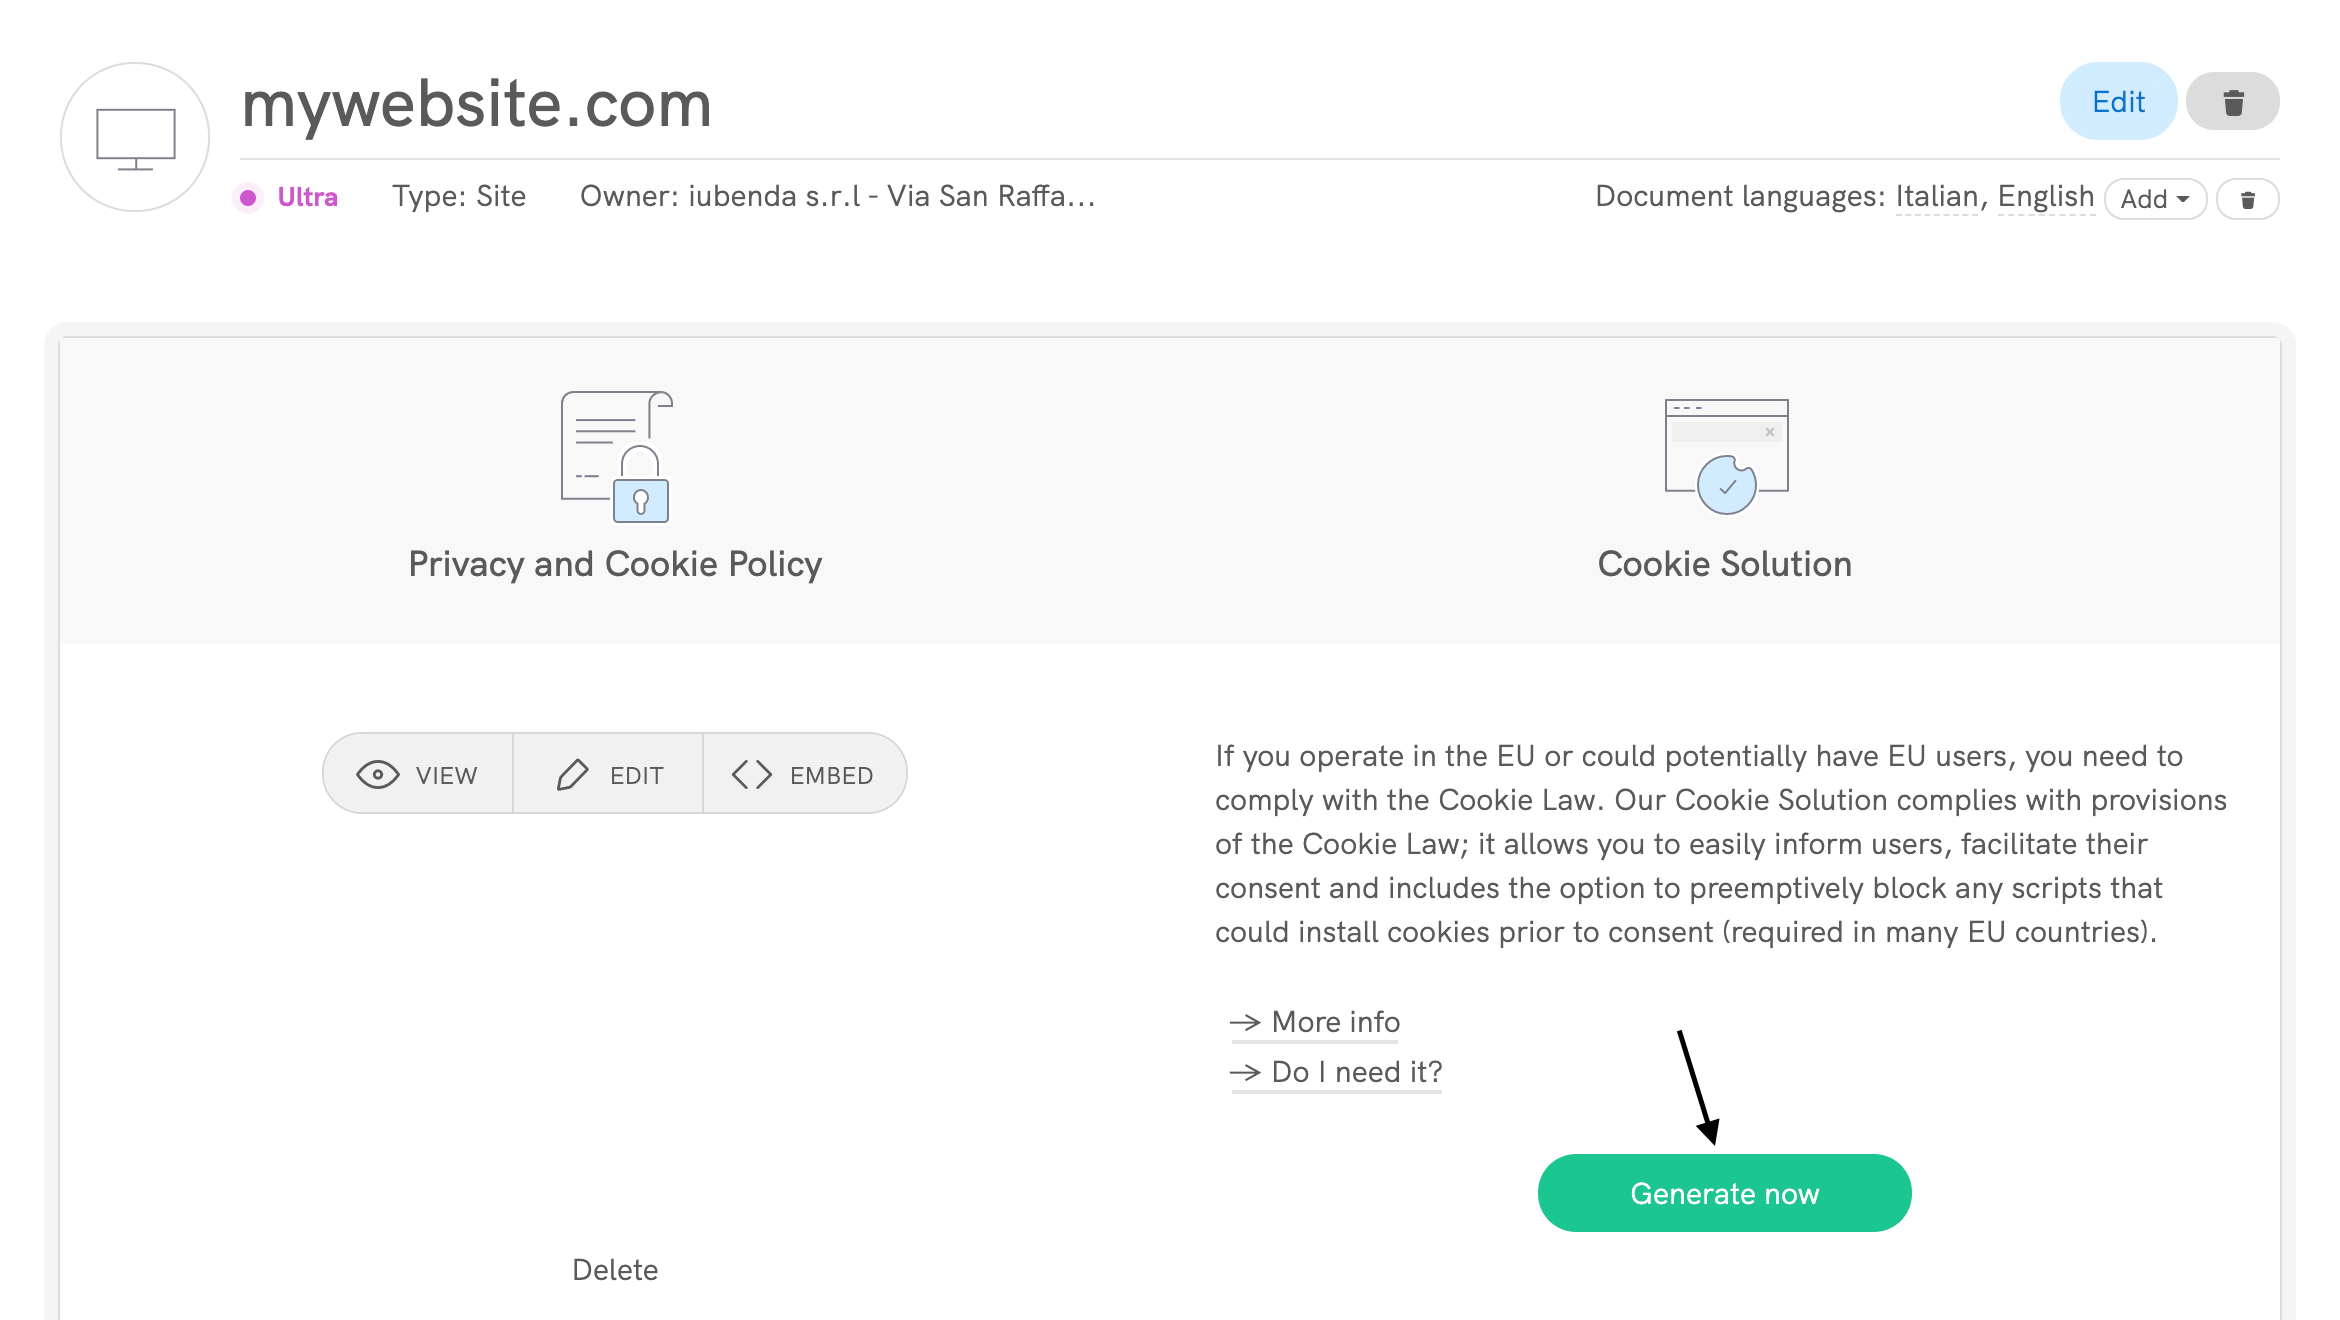
2. This will take you directly to the configuration panel of your cookie banner.
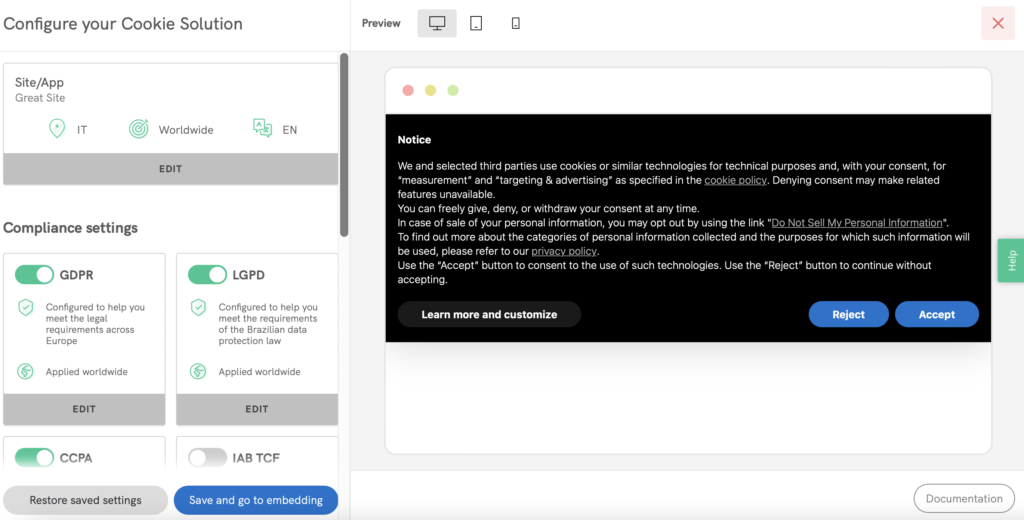
3. Once customized as you like, Save and Copy your Privacy Controls and Cookie Solution snippet.
3. Add the Privacy Controls and Cookie Solution Snippet to Your Shopify Store
Once you’ve copied your Privacy Controls and Cookie Solution snippet, it will look similar to one of these examples:
<script src="https://embeds.iubenda.com/widgets/[site-code].js"></script>
<script type="text/javascript">
  var _iub = _iub || [];
  _iub.csConfiguration = {
    "countryDetection": true,
    "consentOnContinuedBrowsing": false,
    "perPurposeConsent": true,
    "lang": "en",
    "siteId": 11223344, //use your siteId
    "cookiePolicyId": 55667788, //use your cookiePolicyId
    "floatingPreferencesButtonDisplay": "bottom-right",
    "banner": {
      "acceptButtonDisplay": true,
      "customizeButtonDisplay": true,
      "rejectButtonDisplay": true,
      "position": "float-top-center"
    }
  };
</script>
<script type="text/javascript" src="//cdn.iubenda.com/cs/iubenda_cs.js" charset="UTF-8" async></script>
Now you have two options for adding the Privacy Controls and Cookie Solution snippet to your Shopify store. We recommend starting with the CMP Insert Code method, as it’s the fastest and easiest way to integrate everything.
- 1. Use CMP Insert Code app (Easiest and Fastest Method!) 🎖️
- 2. Edit Your Shopify Theme Manually (❗️ Recommended for Advanced Users Only)
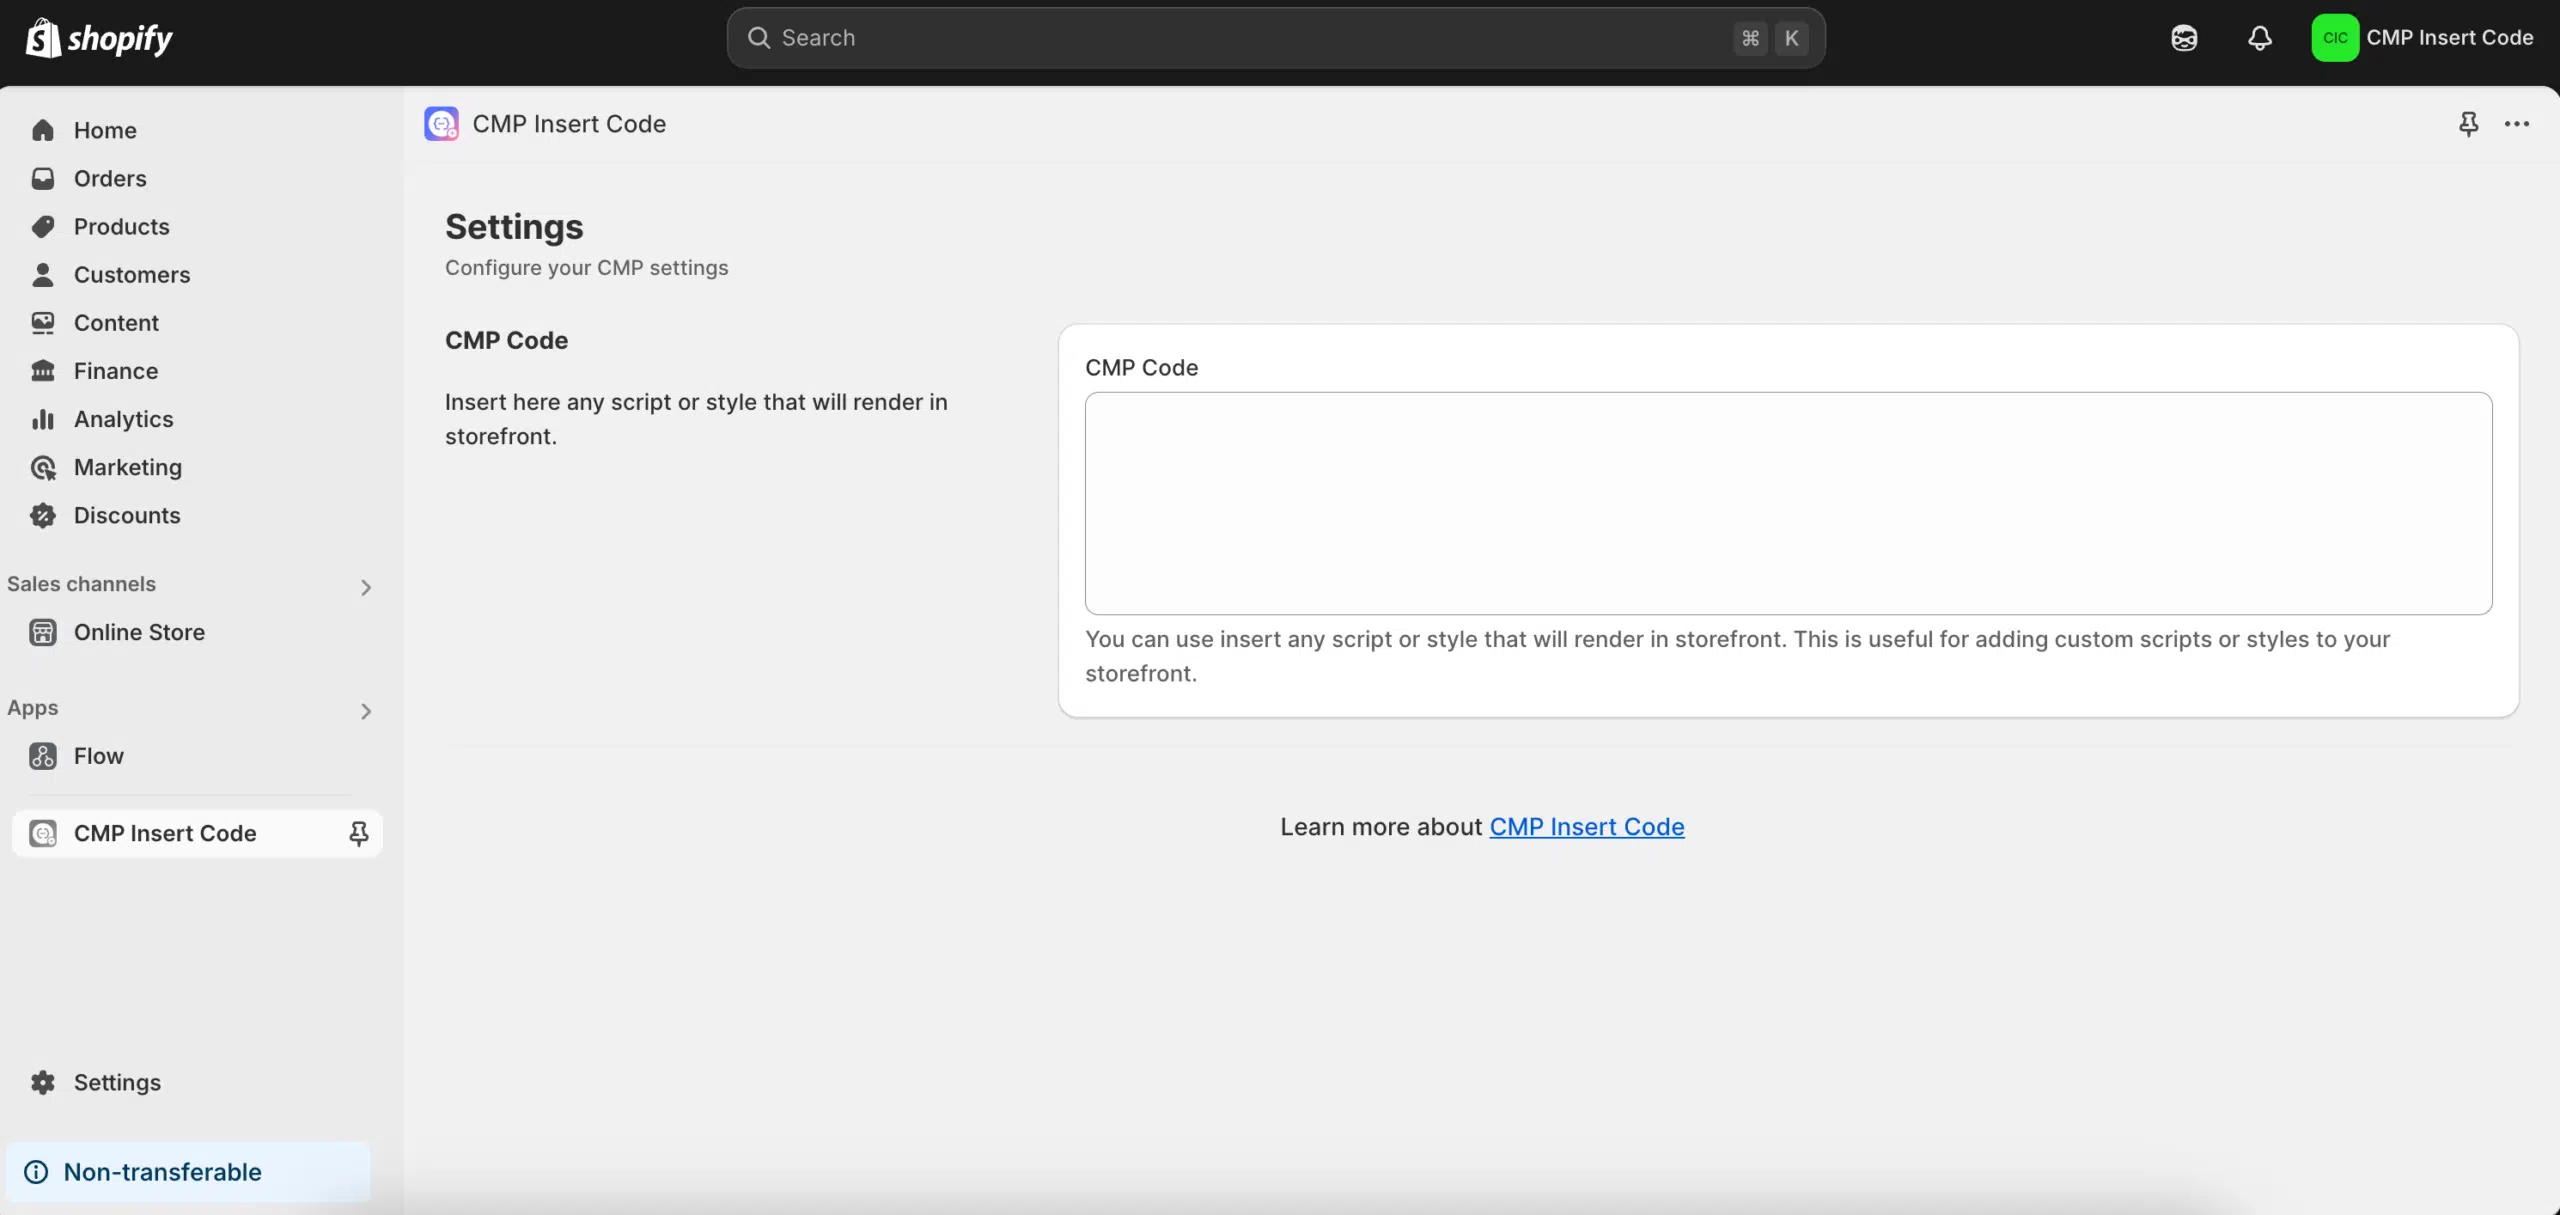
1. Use CMP Insert Code app (Easiest and Fastest Method!) 🎖️
With CMP Insert Code app, you can quickly embed the Privacy Controls and Cookie Solution snippet without needing to manually adjust any callbacks. This option automatically includes the necessary Shopify-specific callbacks, saving you time and effort.
How to do it:
- Install the CMP Insert Code app (find it [here]).
- Simply paste the Privacy Controls and Cookie Solution snippet into the CMP Script box.
- Before you paste the snippet, if you see a message saying “Theme app extension not enabled”, click the link and then click “Save” to enable the theme app extension.
- That’s it! No need to manually modify the script or add callbacks.
💡 Why choose CMP Insert Code app?
- Fast and easy: The app takes care of everything for you.
- Automatic callbacks: You don’t need to manually add the Shopify-specific callbacks.
- No coding required: Just install and copy and paste—nothing else to do!
📹 Video Guide
To help you get started, we’ve created a step-by-step video guide on how to use CMP Insert Code app to embed the Privacy Controls and Cookie Solution in your Shopify store. Watch the video guide here:
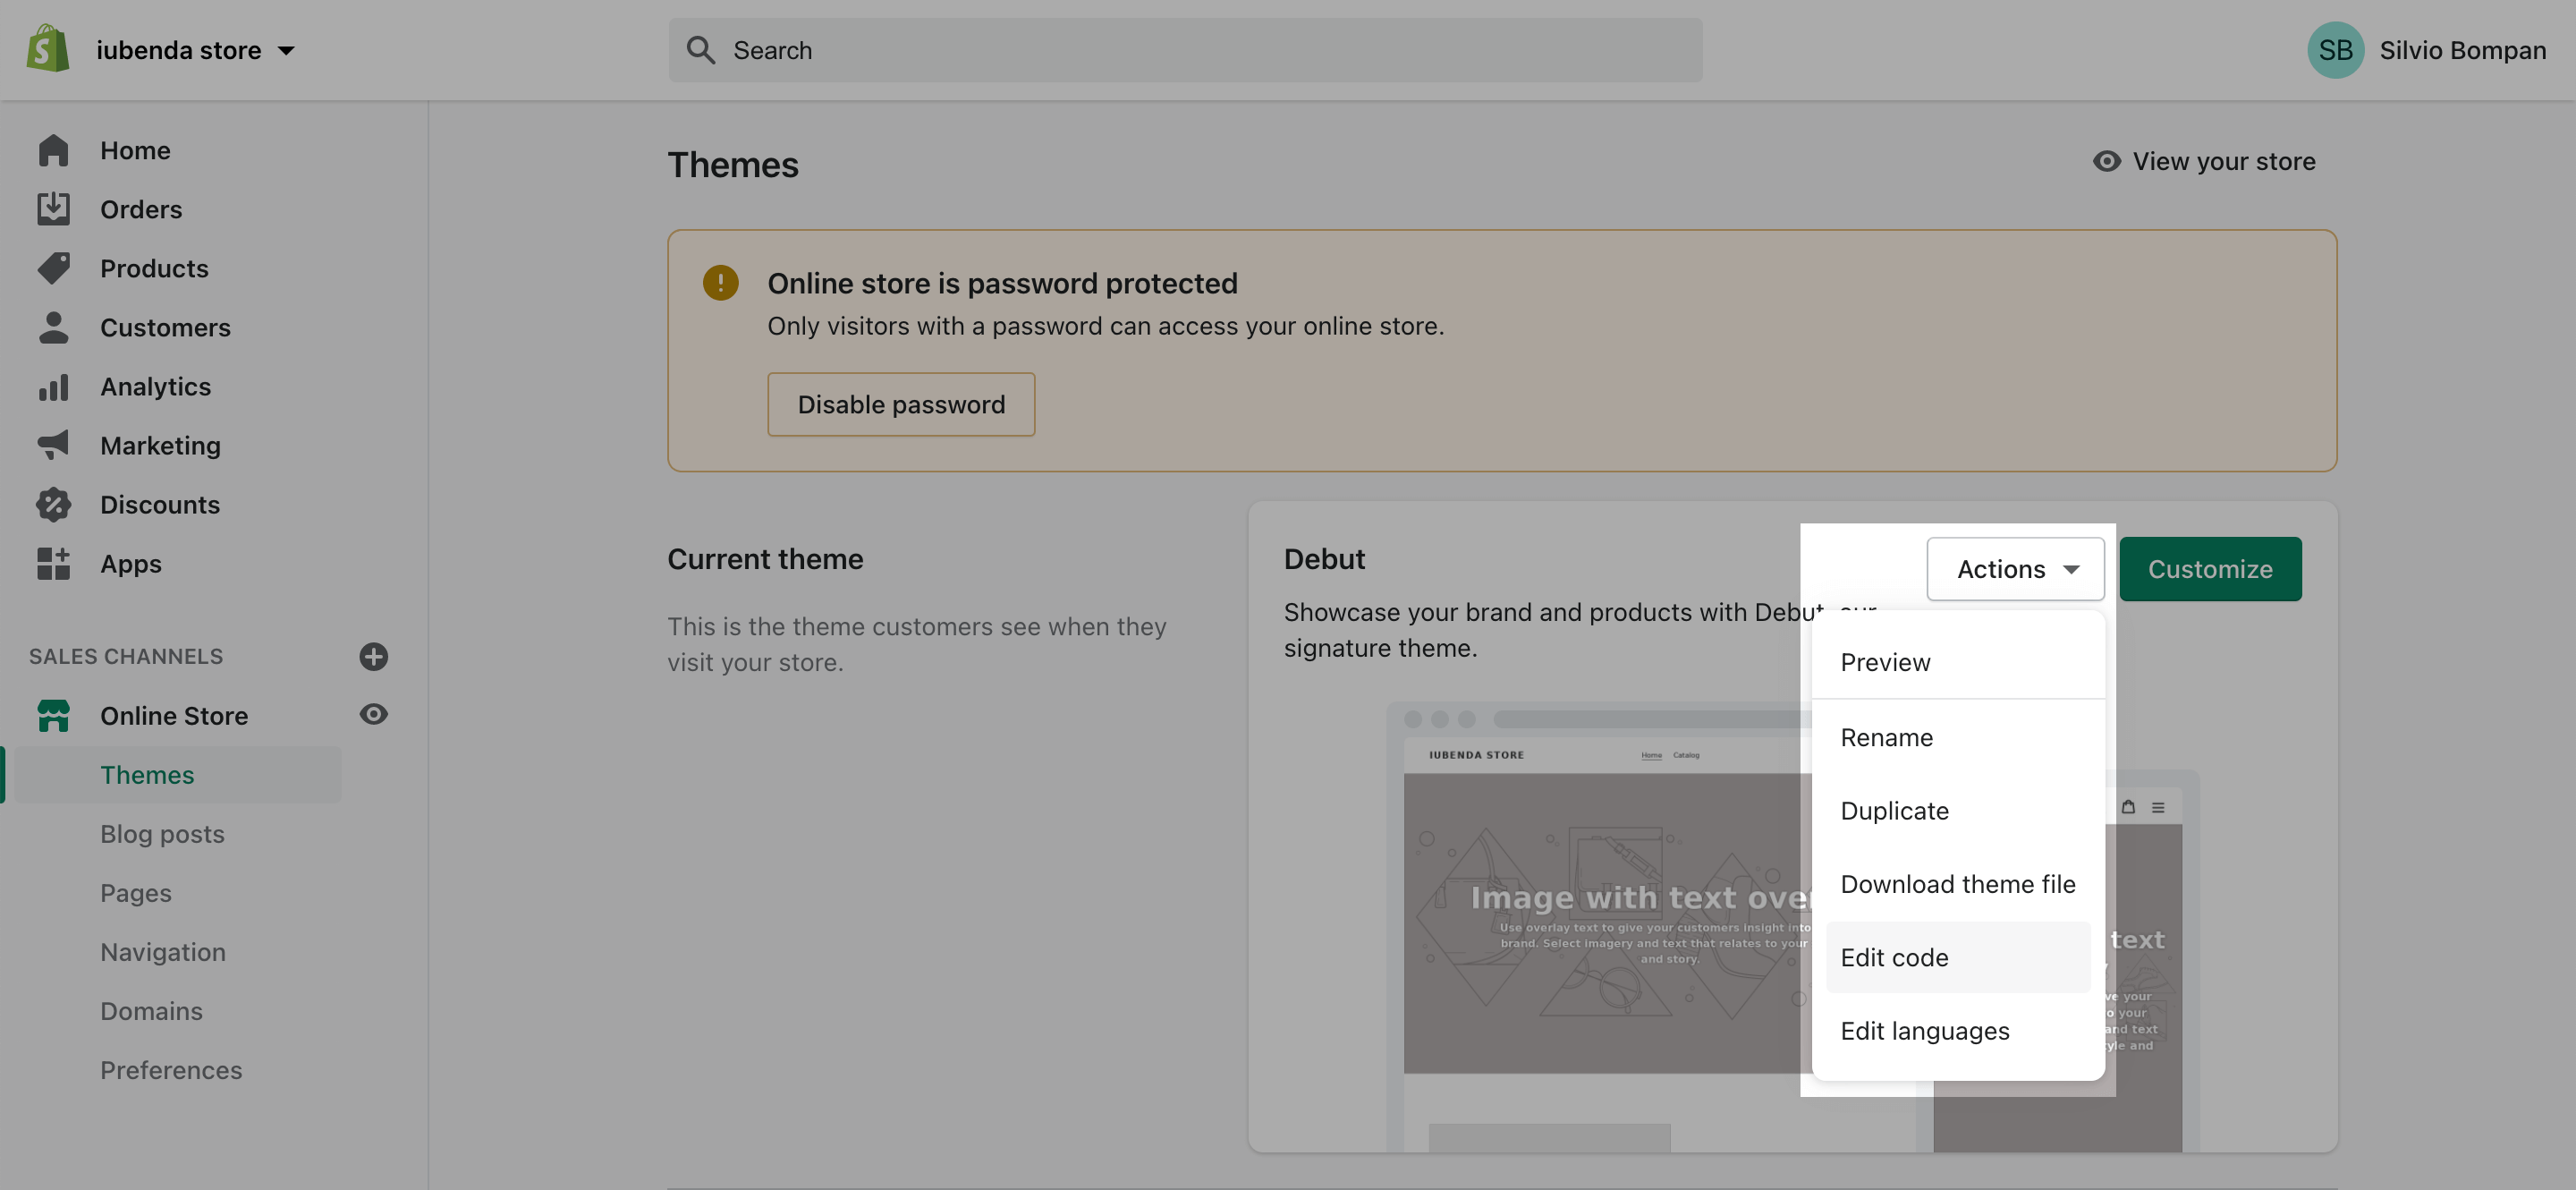
2. Edit Your Shopify Theme Manually (❗️ Recommended for Advanced Users Only)
If you want more control over the integration, you can manually add the Privacy Controls and Cookie Solution snippet to your Shopify theme. This option requires basic coding skills.
How to do it
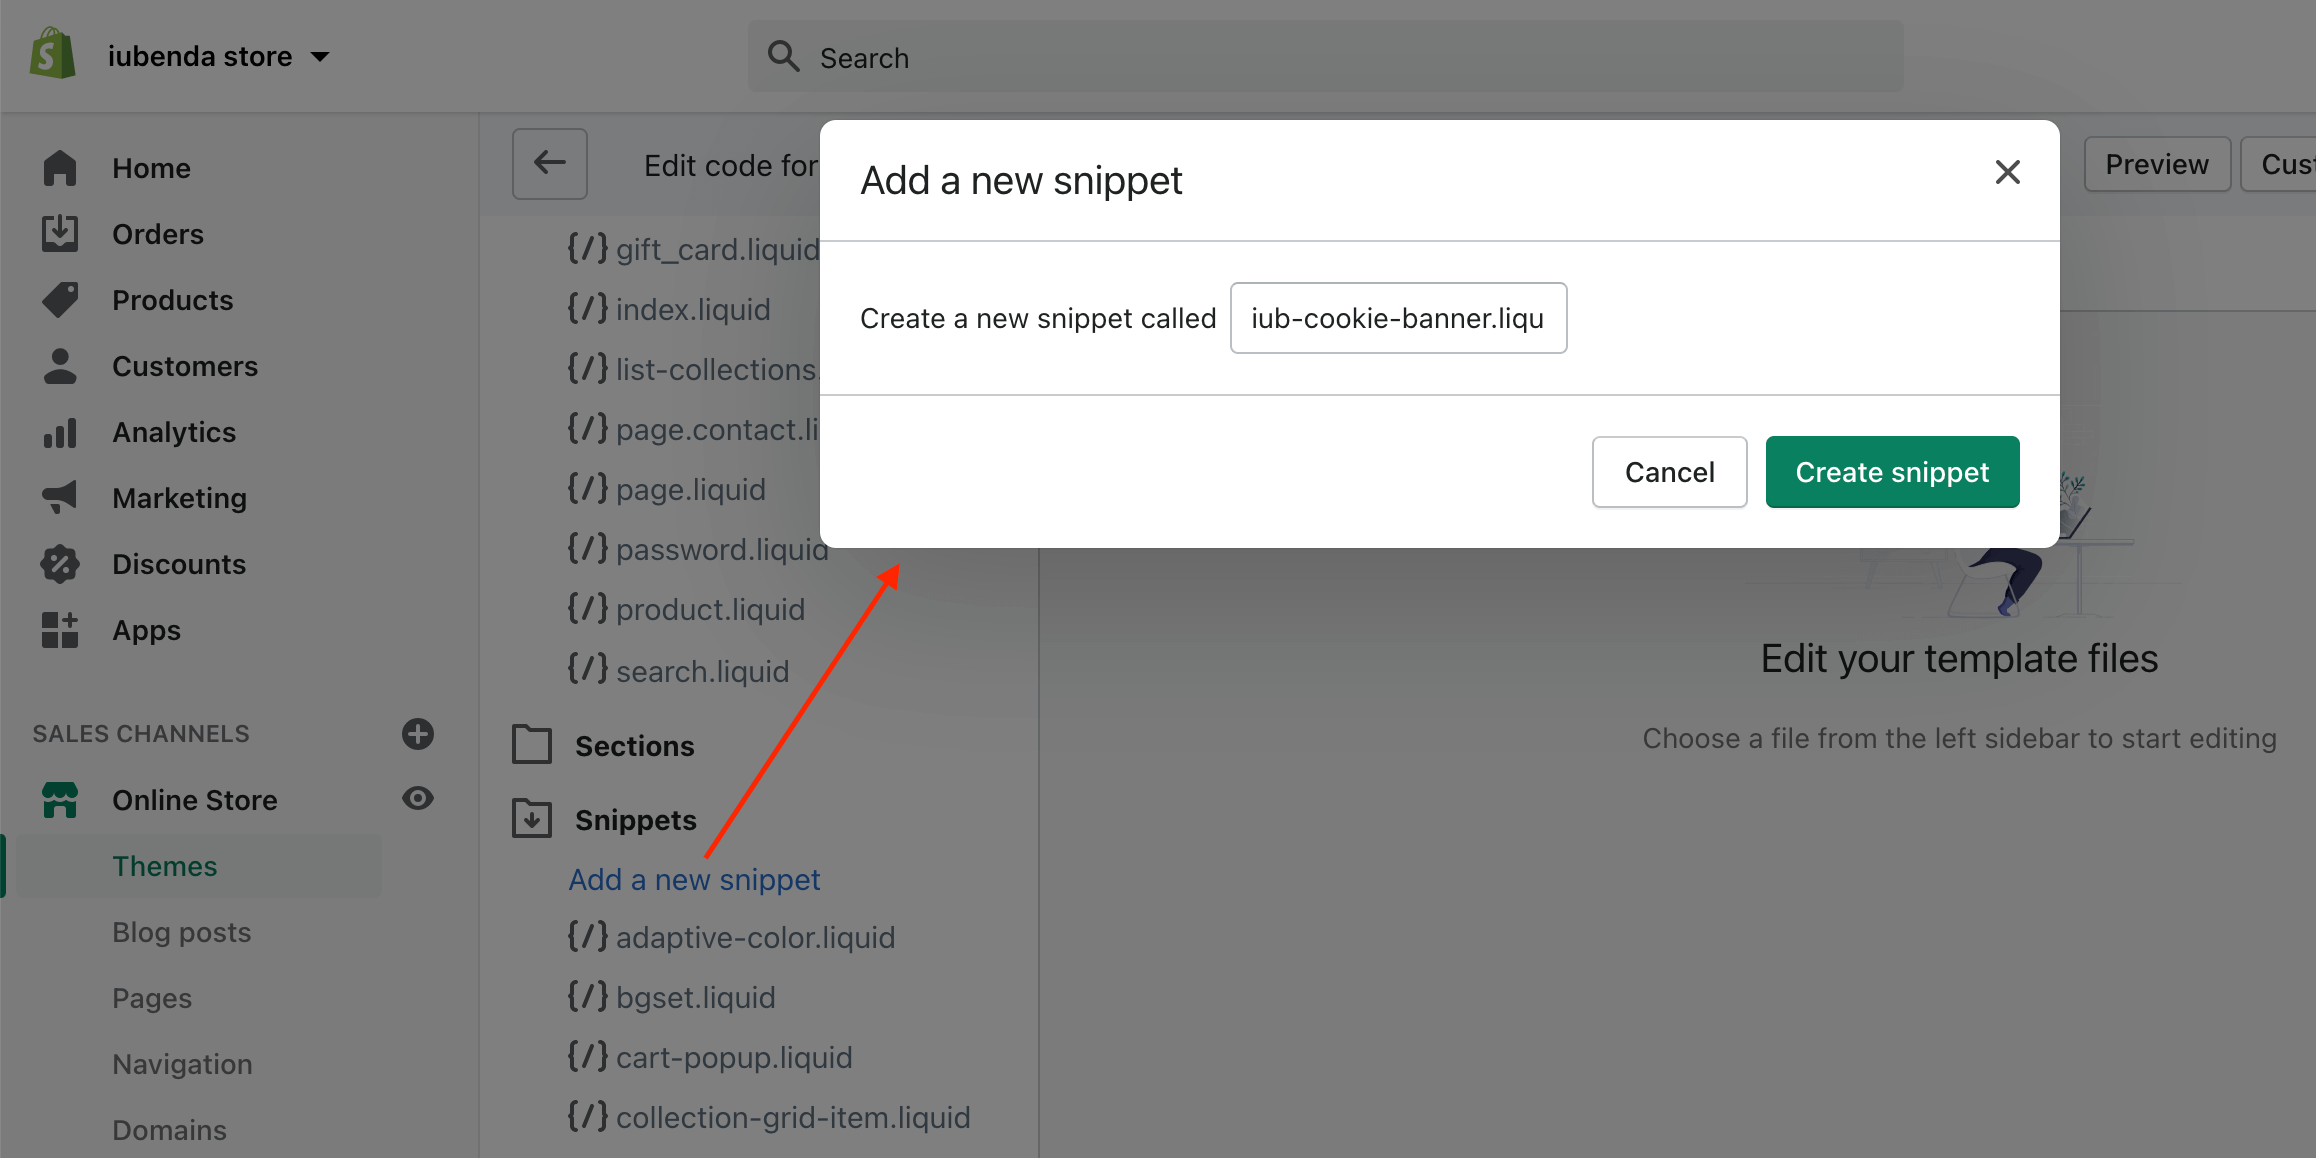
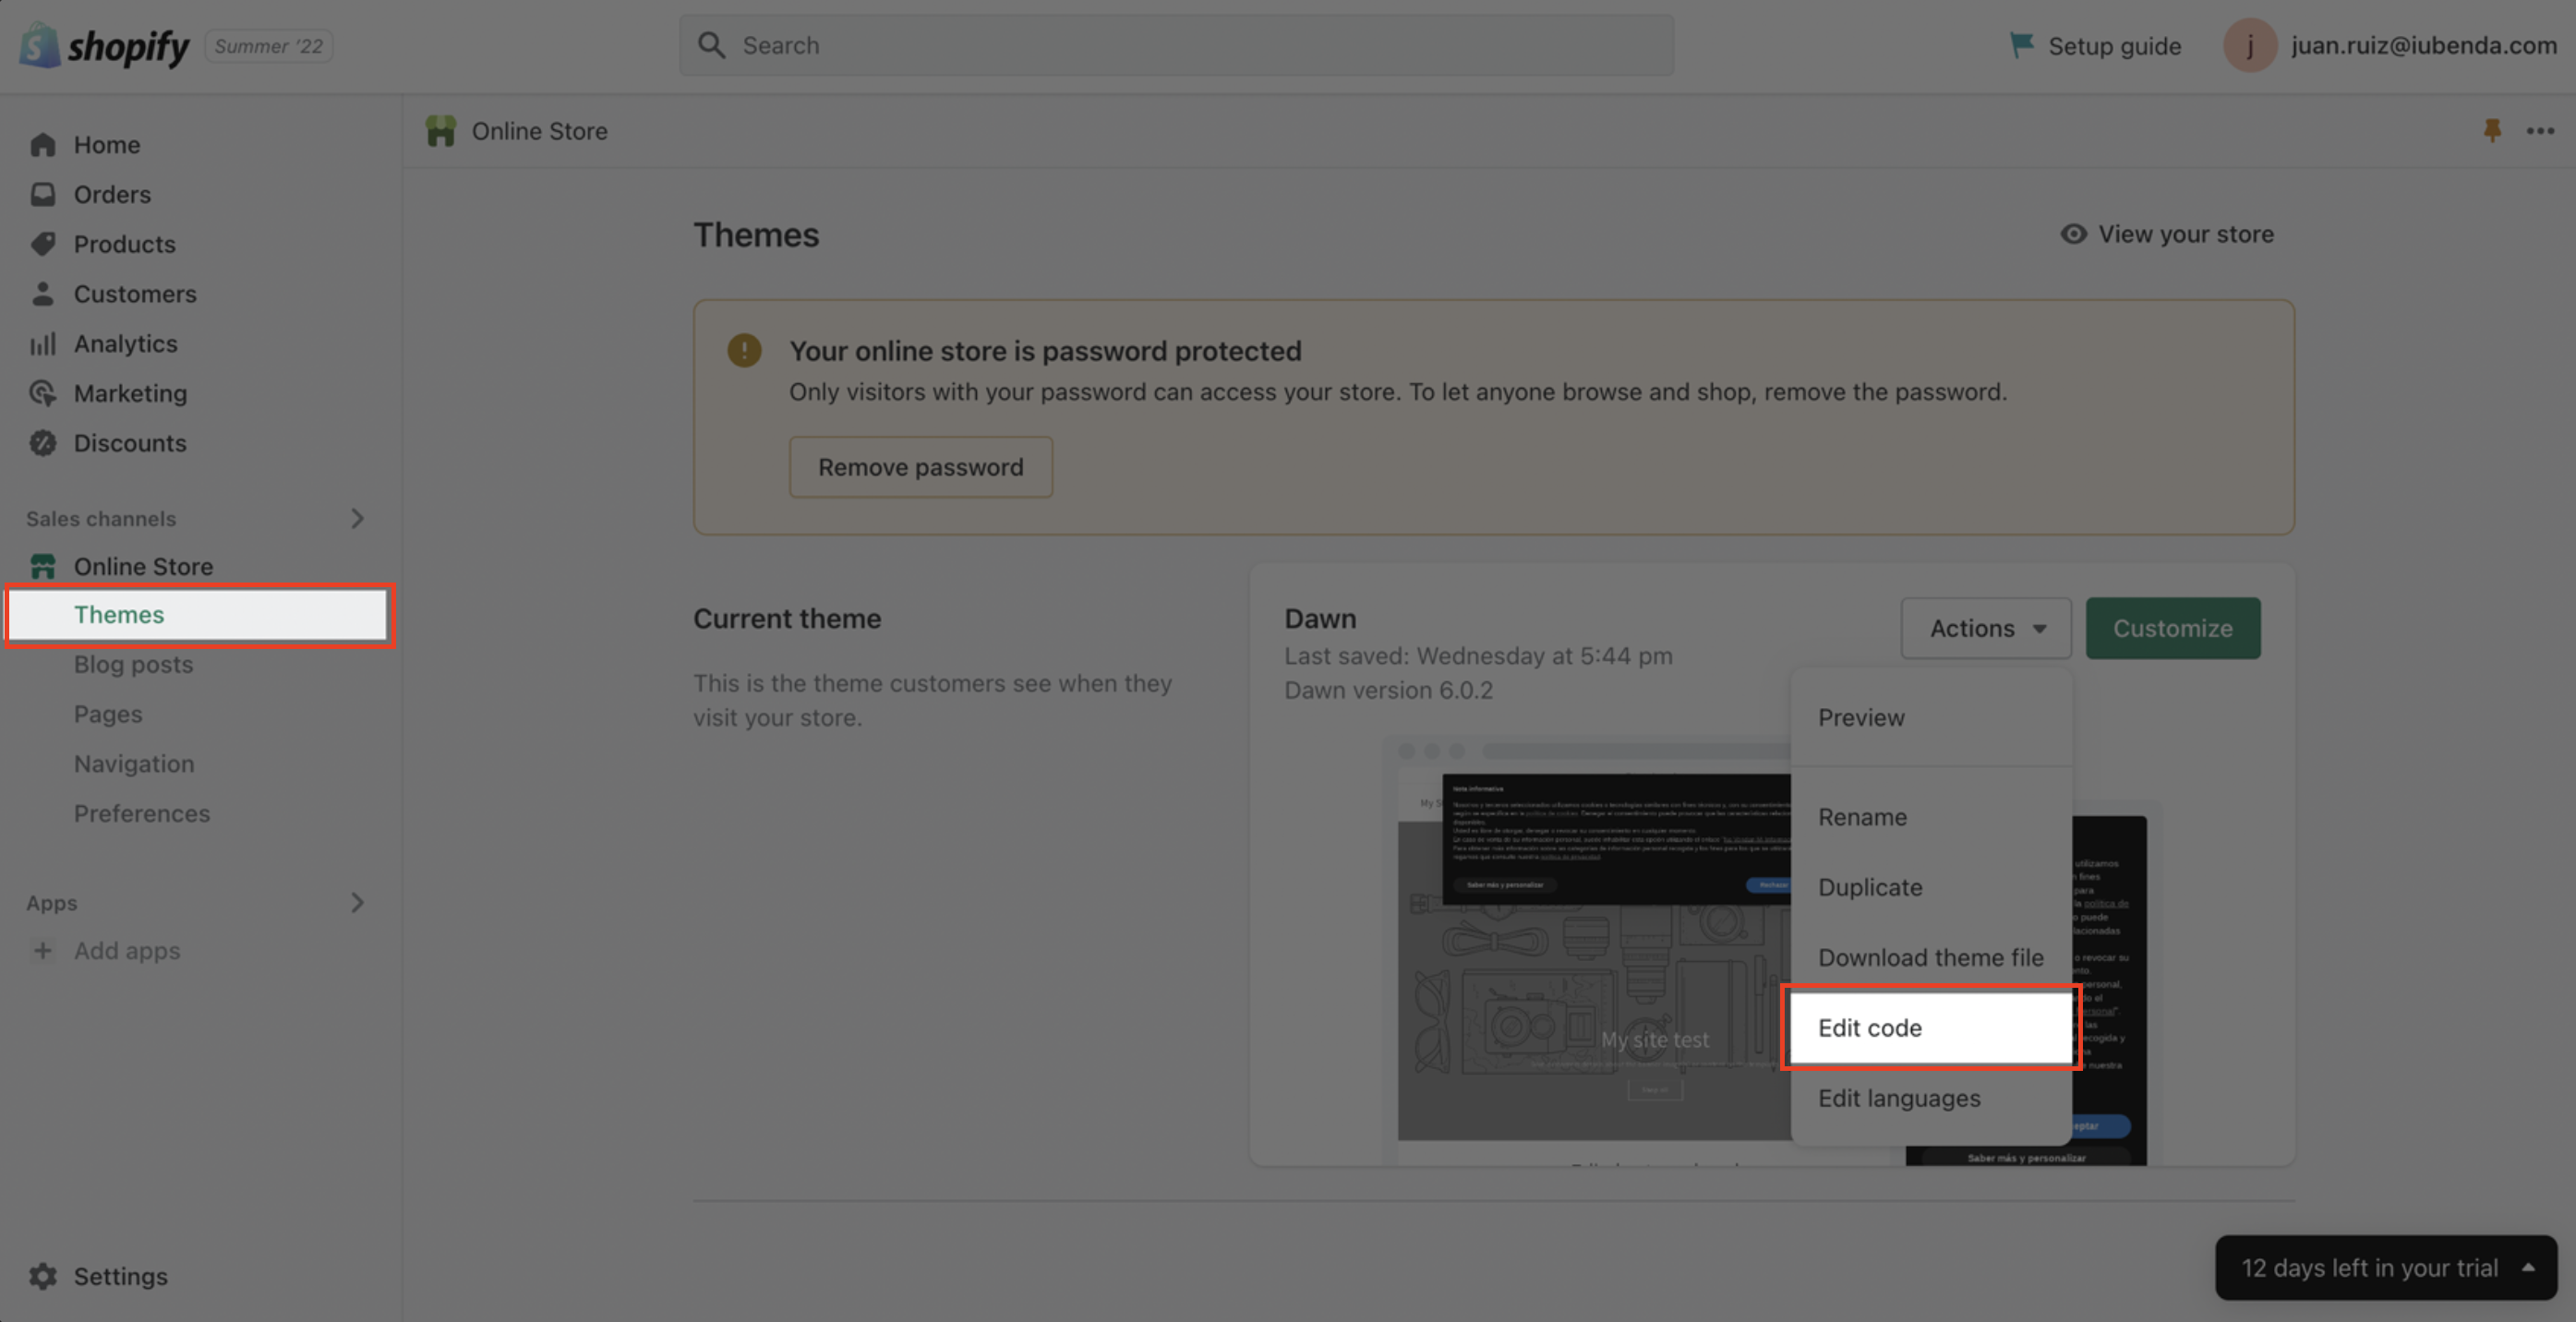
1. Access your Shopify store’s admin panel and go to Online Store > Themes. Once there, click on Actions on the right, then Edit Code.
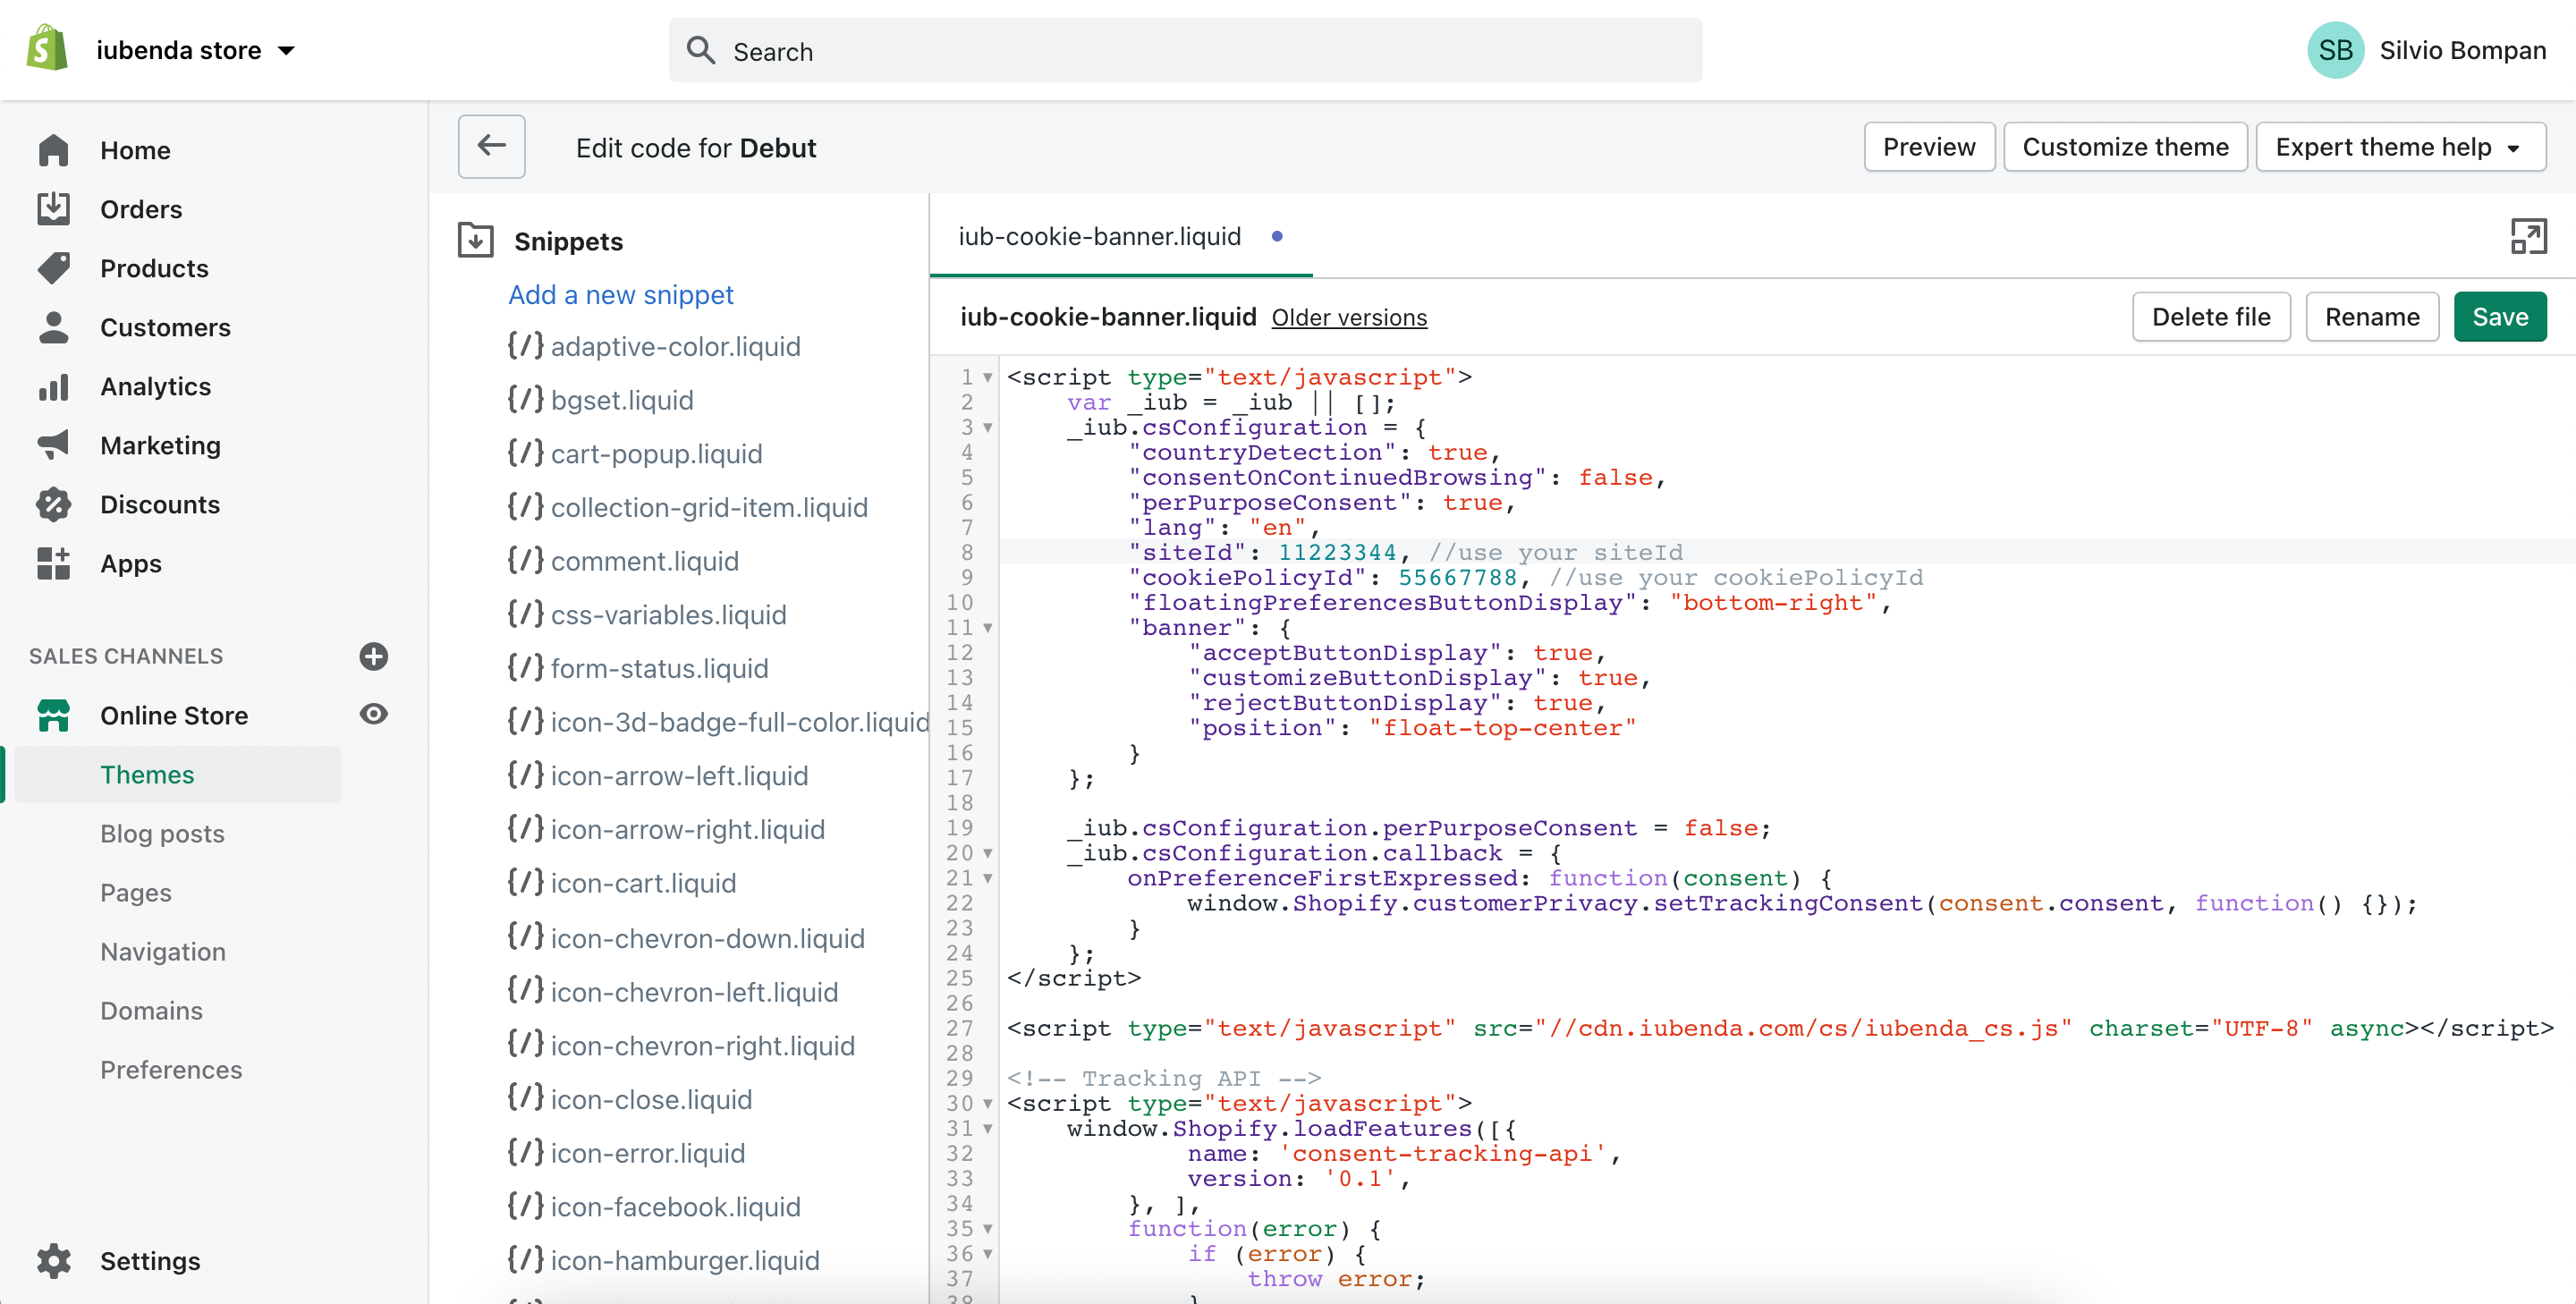
2. Create a new snippet in the Snippets folder and name it iub-cookie-banner.liquid
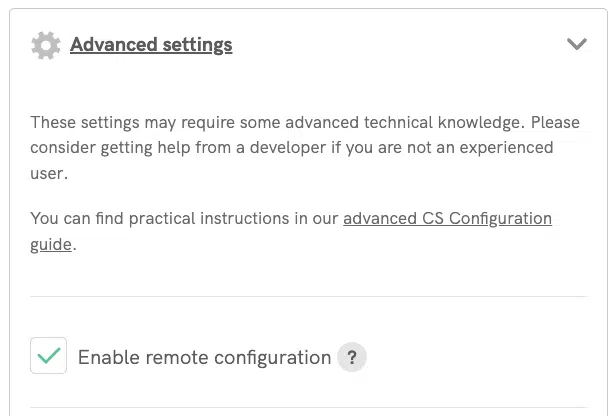
3. Disable remote configuration: In your Privacy Controls and Cookie Solution settings, make sure to uncheck the “Enable remote configuration” option.
4. After disabling remote configuration, copy the updated snippet. It will look similar to this:
<script type="text/javascript">
  var _iub = _iub || [];
  _iub.csConfiguration = {
    "countryDetection": true,
    "consentOnContinuedBrowsing": false,
    "perPurposeConsent": true,
    "lang": "en",
    "siteId": 11223344, //use your siteId
    "cookiePolicyId": 55667788, //use your cookiePolicyId
    "floatingPreferencesButtonDisplay": "bottom-right",
    "banner": {
      "acceptButtonDisplay": true,
      "customizeButtonDisplay": true,
      "rejectButtonDisplay": true,
      "position": "float-top-center"
    }
  };
</script>
<script type="text/javascript" src="//cdn.iubenda.com/cs/iubenda_cs.js" charset="UTF-8" async></script>
5. Before pasting the snippet into your Shopify theme, you need to modify your Privacy Controls and Cookie Solution script to add some necessary Shopify-specific callbacks that ensure your Privacy Controls function correctly (note the two “code for Shopify” parts, with the onPreferenceExpressedOrNotNeededCallback, _iub.csConfiguration.callback and Tracking API lines):
<script type="text/javascript">
    var _iub = _iub || [];
    _iub.csConfiguration = {
        "countryDetection": true,
        "consentOnContinuedBrowsing": false,
        "perPurposeConsent": true,
        "lang": "en",
        "siteId": 11223344, //use your siteId
        "cookiePolicyId": 55667788, //use your cookiePolicyId
        "floatingPreferencesButtonDisplay": "bottom-right",
        "banner": {
            "acceptButtonDisplay": true,
            "customizeButtonDisplay": true,
            "rejectButtonDisplay": true,
            "position": "float-top-center"
        }
    };
<!-- code for Shopify (1 of 2) -->
    var onPreferenceExpressedOrNotNeededCallback = function(prefs) {
        var isPrefEmpty = !prefs || Object.keys(prefs).length === 0;
        var consent = isPrefEmpty ? _iub.cs.api.getPreferences() : prefs;
        var shopifyPurposes = {
          "analytics": [4, 's'],
          "marketing": [5, 'adv'],
          "preferences": [2, 3],
          "sale_of_data": ['s', 'sh'],
        }
        var expressedConsent = {};
        Object.keys(shopifyPurposes).forEach(function(purposeItem) {
          var purposeExpressed = null
          shopifyPurposes[purposeItem].forEach(item => {
            if (consent.purposes && typeof consent.purposes[item] === 'boolean') {
              purposeExpressed = consent.purposes[item];
            }
            if (consent.uspr && typeof consent.uspr[item] === 'boolean' && purposeExpressed !== false) {
              purposeExpressed = consent.uspr[item];
            }
          })

          if (typeof purposeExpressed === 'boolean') {
            expressedConsent[purposeItem] = purposeExpressed;
          }
        })
        window.Shopify.customerPrivacy.setTrackingConsent(expressedConsent, function() {});
    }
    if (typeof _iub.csConfiguration.callback === 'object') {
        _iub.csConfiguration.callback.onPreferenceExpressedOrNotNeeded = onPreferenceExpressedOrNotNeededCallback;
    } else {
        _iub.csConfiguration.callback = {
            onPreferenceExpressedOrNotNeeded: onPreferenceExpressedOrNotNeededCallback
        };
    }
</script>
<script type="text/javascript" src="//cdn.iubenda.com/cs/iubenda_cs.js" charset="UTF-8" async></script>
<!-- code for Shopify (2 of 2) - Tracking API -->
<script type="text/javascript">
window.Shopify.loadFeatures(
  [
    {
      name: 'consent-tracking-api',
      version: '0.1',
    },
  ],
  function(error) {
    if (error) {
      throw error;
    }
  }
);
</script>
6. Paste the Privacy Controls and Cookie Solution snippet (complete with the two “code for Shopify” parts) into the iub-cookie-banner.liquid template and save it.
7. Open the theme.liquid layout (inside the Layout folder) and add {% include 'iub-cookie-banner' %} between {{ content_for_header }} and </head>.
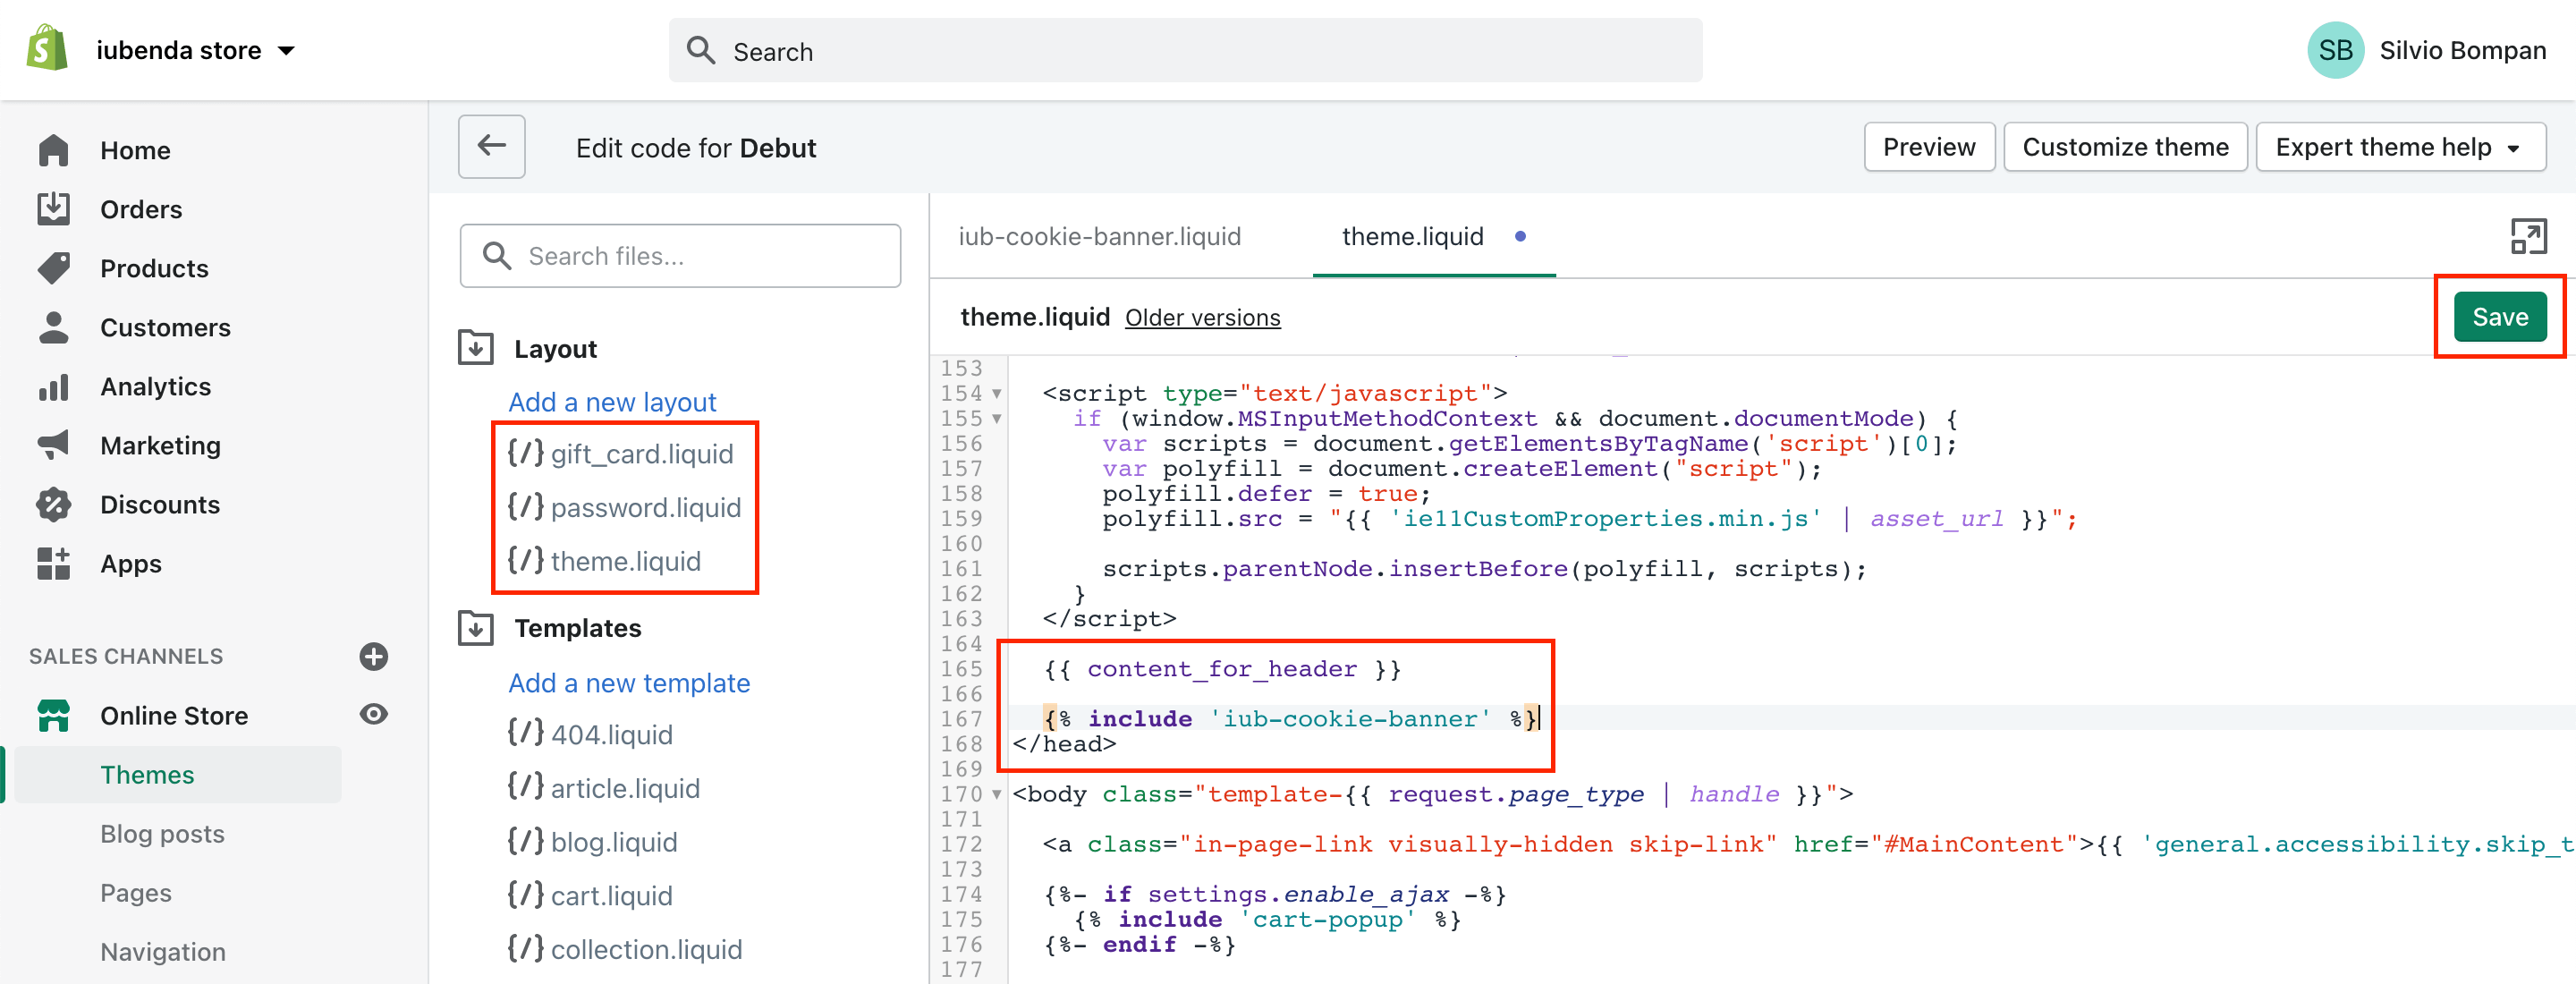
8. Repeat step #7 for the gift_card.liquid and password.liquid layouts.
🎥 How can you check that iubenda is correctly updating consent in Shopify’s Customer Privacy API? (Video Guide)
4. Set up prior blocking of cookie scripts
Few categories of cookies are exempt from the consent requirement. Therefore, you’ll need to block scripts from running until you get valid user consent.
How to implement prior blocking via manual tagging on your Shopify store
Manual tagging is the method of prior-block we’ll be using for the tutorial below. You can view other methods here.
To set up prior blocking, you’ll need to make some minor changes to your site’s scripts. But it’s simple; just do the following:
- Identify the script/iframe for any additional services that are running on your website (e.g., Pinterest button)
- Add some simple text to the HTML code (we’ll show you how below!)
- Save!
In this tutorial, we are going to block a Pinterest “Pin It” Button.
💡 Not sure which services you need to block? If you’re using a Cookie Policy generated by iubenda, the services listed in your Cookie Policy are most likely the ones you need to modify now.
Step 1: Identify the script
In your Shopify admin, click Online store, and then click Themes. In the theme drop-down, click Edit Code
Then, open your Snippets folder to find the script you need to modify (simply search for the service you want to block, in this case, it is Pinterest’s “Pin It” Button) You can do this using the search bar in the top left corner of the page

Step 2: Modify your script
- add this class:
_iub_cs_activateto the script tags, and change the “type” attribute fromtext/javascript→text/plain - replace the src with
data-suppressedsrcorsuppressedsrc - specify the categories of the scripts/iframes with a special comma-separated
data-iub-purposesattribute, e.g.data-iub-purposes="2"ordata-iub-purposes="2, 3"
More about categories and purposes
Purposes are your legal reasons for processing the particular type of user data. Different scripts on your site will fall into different categories and serve different purposes. For example, Google Analytics may be used for Measurement, while the Pinterest button may be used for Experience (Purpose 3 below). Purposes are grouped into 5 categories each with an id (1, 2, 3, 4, and 5):
- Necessary (id:
1) - Functionality (id:
2) - Experience (id:
3) - Measurement (id:
4) - Marketing (id:
5)
For even more detailed info on categories and purposes, see our guide here.
Let’s take the Pinterest “Pin It” Button as an example:
We need to 1. Add the class and change the “type” attribute, 2. replace the src and 3. specify the categories.
And the code structure should be like this:
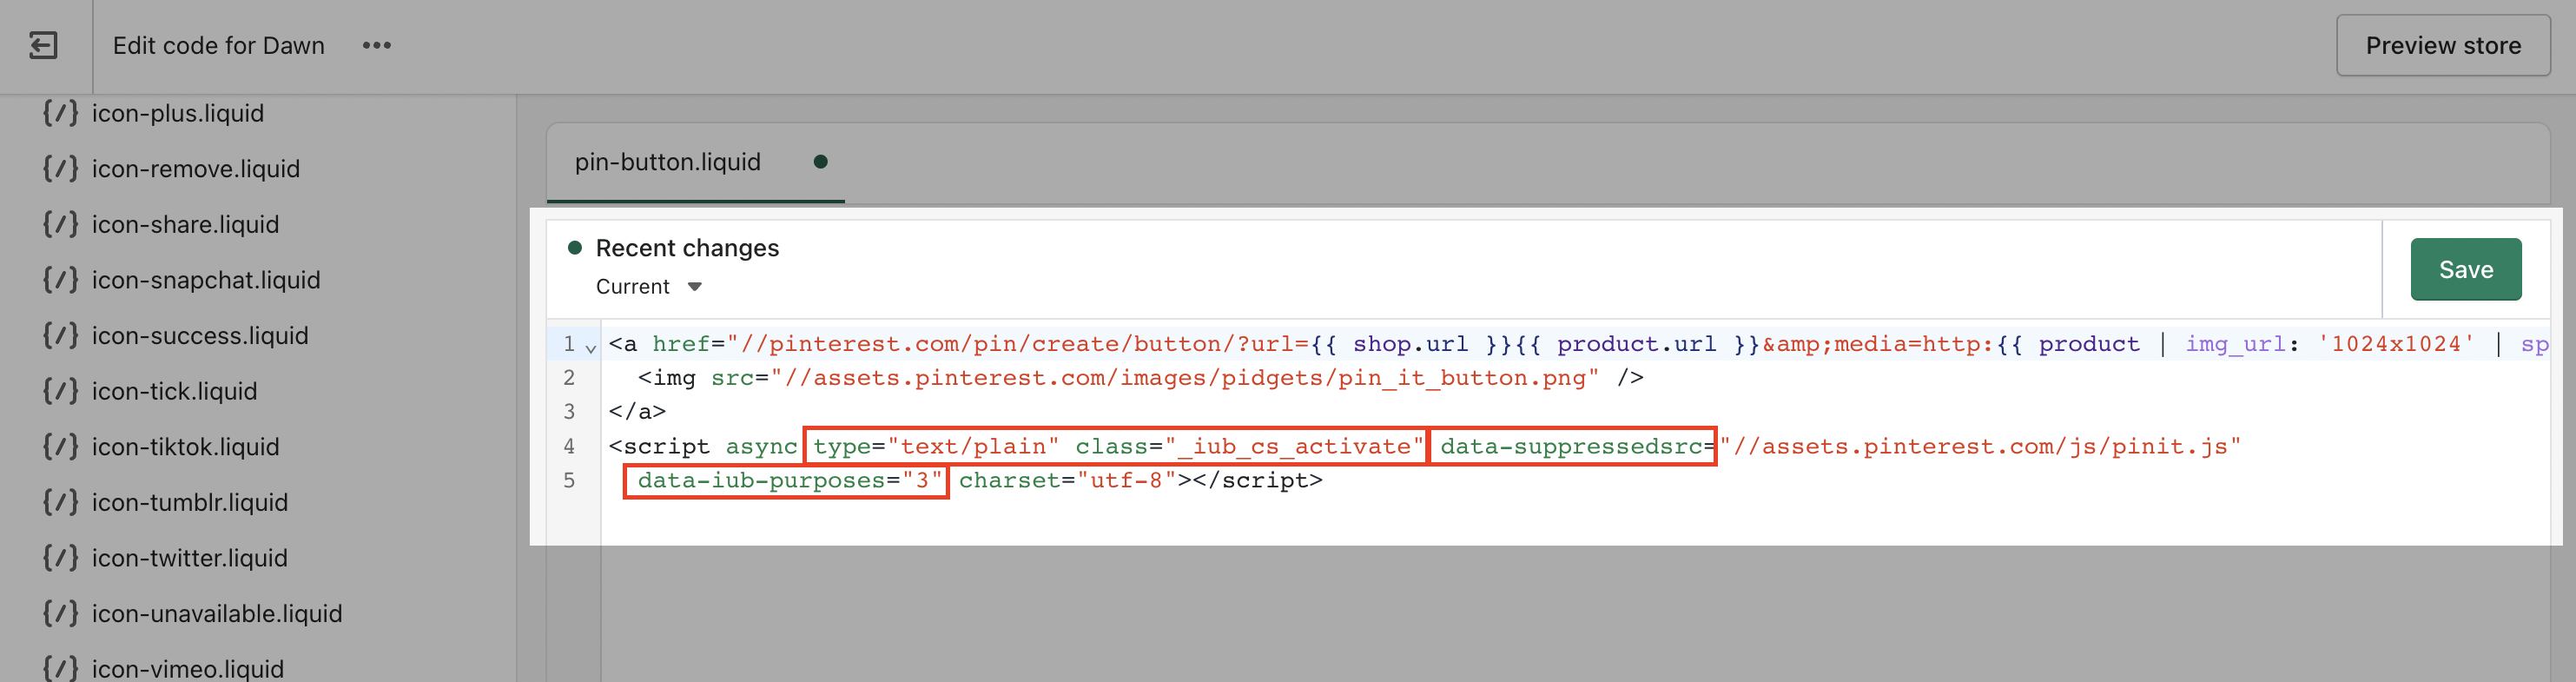
<p>Pinterest "Pin It" Button:</p>
a <a href="//pinterest.com/pin/create/button/?url={{ shop.url }}{{ product.url }}&media=http:{{ product | img_url: '1024x1024' | split: '?' | first }}&description={{ product.title | strip_html | truncate: 200, '' | url_param_escape }}{% for tag in product.tags limit: 3 %}{{ tag | replace: ' ', '-' | prepend: ' #' | url_param_escape }}{% endfor %}" data-pin-do="buttonPin" data-pin-config="none">
<img src="//assets.pinterest.com/images/pidgets/pin_it_button.png" />
</a>
<script async type="text/plain" class="_iub_cs_activate" data-suppressedsrc="//assets.pinterest.com/js/pinit.js" data-iub-purposes="3" charset="utf-8"></script>
Step 3: Save!
Not sure if you’ve set up correctly? Check out the live example and FAQs below
Live example
This is an example that shows everything we have described above, you can use this code pen as a guide to see what happens before and after blocking scripts via manual tagging.
To demonstrate the cookie blocking feature, we’ve embedded a YouTube video, and a Twitter follow button:
Follow @iubenda
Both scripts are blocked through manual tagging. Since both the YouTube video widget and the Twitter follow button are part of the Experience purpose (id 3) we’ve added data-iub-purposes="3" to their scripts so that the Privacy Controls and Cookie Solution can properly identify them for release.
Click on the Accept button – or just activate the “Experience” toggle – to release these scripts (refresh the page to return to the starting point).
How can I tell if I’ve set prior blocking up properly?
As you can see in the code pen example, the Youtube and Twitter scripts do not load if you do not consent. (You can test this function again by opening this link (https://codepen.io/iubenda/pen/KKKxmVO/?editors=1000) in incognito mode in your browser)
After you have saved, open your site in an incognito mode and check if the scripts you have blocked via manual tagging stay blocked until you consent.
Please refer to this dedicated article if you’d like to know how to block cookies before consent using other options available. ➔ Take a look at Google Consent Mode as an alternative to prior blocking, Google Tag Manager to Simplify the Blocking of Cookies, or the IAB Transparency & Consent Framework and how to enable it.
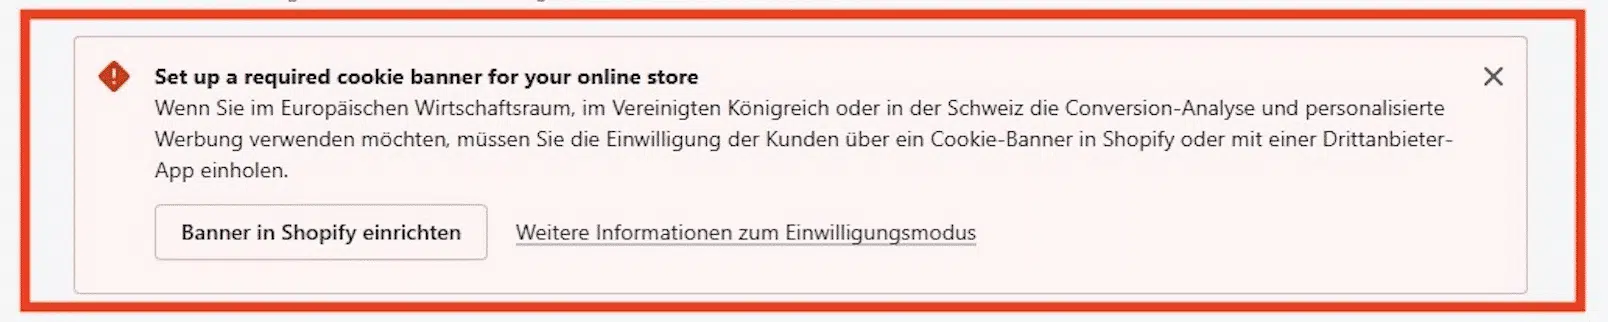
‼️ Important Note About the “Google & YouTube” App Warning
If you’ve recently added a cookie banner to your Shopify store using iubenda—or you’ve already implemented it—you might see a red warning in the “Google & YouTube” app indicating that no cookie banner is active. Rest assured, this warning is a false alarm.
The warning is triggered because the app expects the Shopify native cookie banner to be active. It doesn’t recognize third-party banners like the one provided by iubenda. However, this does not mean that your cookie banner isn’t working properly.
Your iubenda cookie banner remains fully functional and compliant with cookie consent requirements. This warning will not interfere with your ability to use Google services, such as conversion tracking or personalized advertising.
You can safely ignore this warning. For reference, here’s an example of how it might look: