In addition to displaying a cookie banner and in accordance with laws like the GDPR, you must obtain consent for any cookies that are not essential for the technical functions of a website. This means that any cookie that is not considered strictly necessary should not be placed on users’ browsers until they have given their consent.
In this guide, we will show you how to automate the process of setting your cookies, scripts, and tags to respond to the preferences selected by your site visitors.
❗️ We’re continually fine-tuning the auto-blocking feature to provide the best possible experience. However, please be aware that it remains experimental, and its accuracy may not be flawless. For a safer approach, consider relying on other methods for prior blocking.
In short
Until users have provided their consent, all non-exempt cookies should be blocked, and no data should be collected from them. Similarly, if users reject the use of cookies, the cookies should not be set.
What is Automatic Blocking?
Auto-blocking is a feature that automatically blocks the scripts that may install cookies/trackers on the website until the user gives consent. It’s required for compliance with privacy laws such as the GDPR by preventing the setting of third-party cookies.
The purpose of auto-blocking is to ensure that only strictly necessary cookies are set by a website. This is crucial because regulations like the GDPR require opt-in consent before placing any cookies on a user’s device, unless they are considered strictly necessary or essential.
Our Privacy Controls and Cookie Solution takes care of automatically blocking third-party scripts that install cookies, so you don’t have to do it manually.
How to install the iubenda Privacy Controls and Cookie Solution
For an installation guide, please see our introduction to the Privacy Controls and Cookie Solution. For WordPress, please read our dedicated post for WordPress that teaches you how to use the iubenda Privacy Controls and Cookie Solution plugin for WordPress to automate the blocking of scripts.
Which Cookie-installing Scripts Should be blocked?
This depends on the legal jurisdiction applicable to your site. In Europe, you’re legally required to block cookie scripts and similar technologies until informed user consent is obtained. Almost all cookies must be blocked, however, there are a few specific exemptions, the so-called strictly necessary cookies.
If you’re not sure if the cookies running on your site falls into this category, it’s always better to take a safe approach and block until consent is received.
How Automatic Blocking Works
The iubenda scanner crawls your website, identifying all cookies, services, scripts, iframes, videos, images, and other tracking methods employed to track users and set cookies. Using this information, the automatic blocking feature loads domains associated with these services and prevents requests from them until the user provides consent.
iubenda automatically blocks selected sources from setting cookies on the user’s browser based on the results from the site scanner with consideration to the cookie classifications listed in the Cookie Policy, as well as commonly used scripts and tracking technologies.
In cases where there are cookies that are not automatically blocked, you have the option to block custom domains by directly adding them or choosing to exempt specific domains from being blocked.
How to Implement Automatic Blocking
❗️Please note that for new installations of the Privacy Controls and Cookie Solution, auto-blocking is enabled by default with the stricter approach (Basic implementation of “Google Consent Mode”). With this method, Google services are blocked completely until the user provides consent. This ensures that no data processing occurs without explicit user permission. Once consent is granted, Google services are unblocked and data processing activities commence.
This means that the checkbox ‘Do not block Google’s services that adhere to Consent Mode‘ and ‘Do not block vendors that adhere to the TCF when the TCF is enabled‘ are NOT checked by default.
If instead, you want to use the Advanced implementation of “Google Consent Mode”, and allow Google services to dynamically adapt based on changes in consent set by the user, simply follow these steps:
⚠️ Note that this method offers flexibility, but requires careful consideration to ensure privacy compliance.
Once the site/project is selected in the “Dashboard”, you can configure automatic blocking by clicking on the settings icon located in the site info panel:
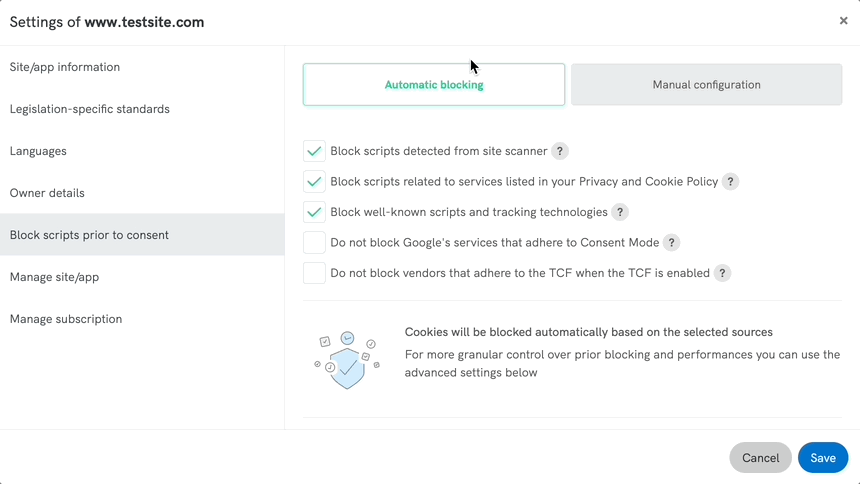
Next, in the tab: “Block scripts prior to consent“, you will find the configuration option for Automatic blocking:
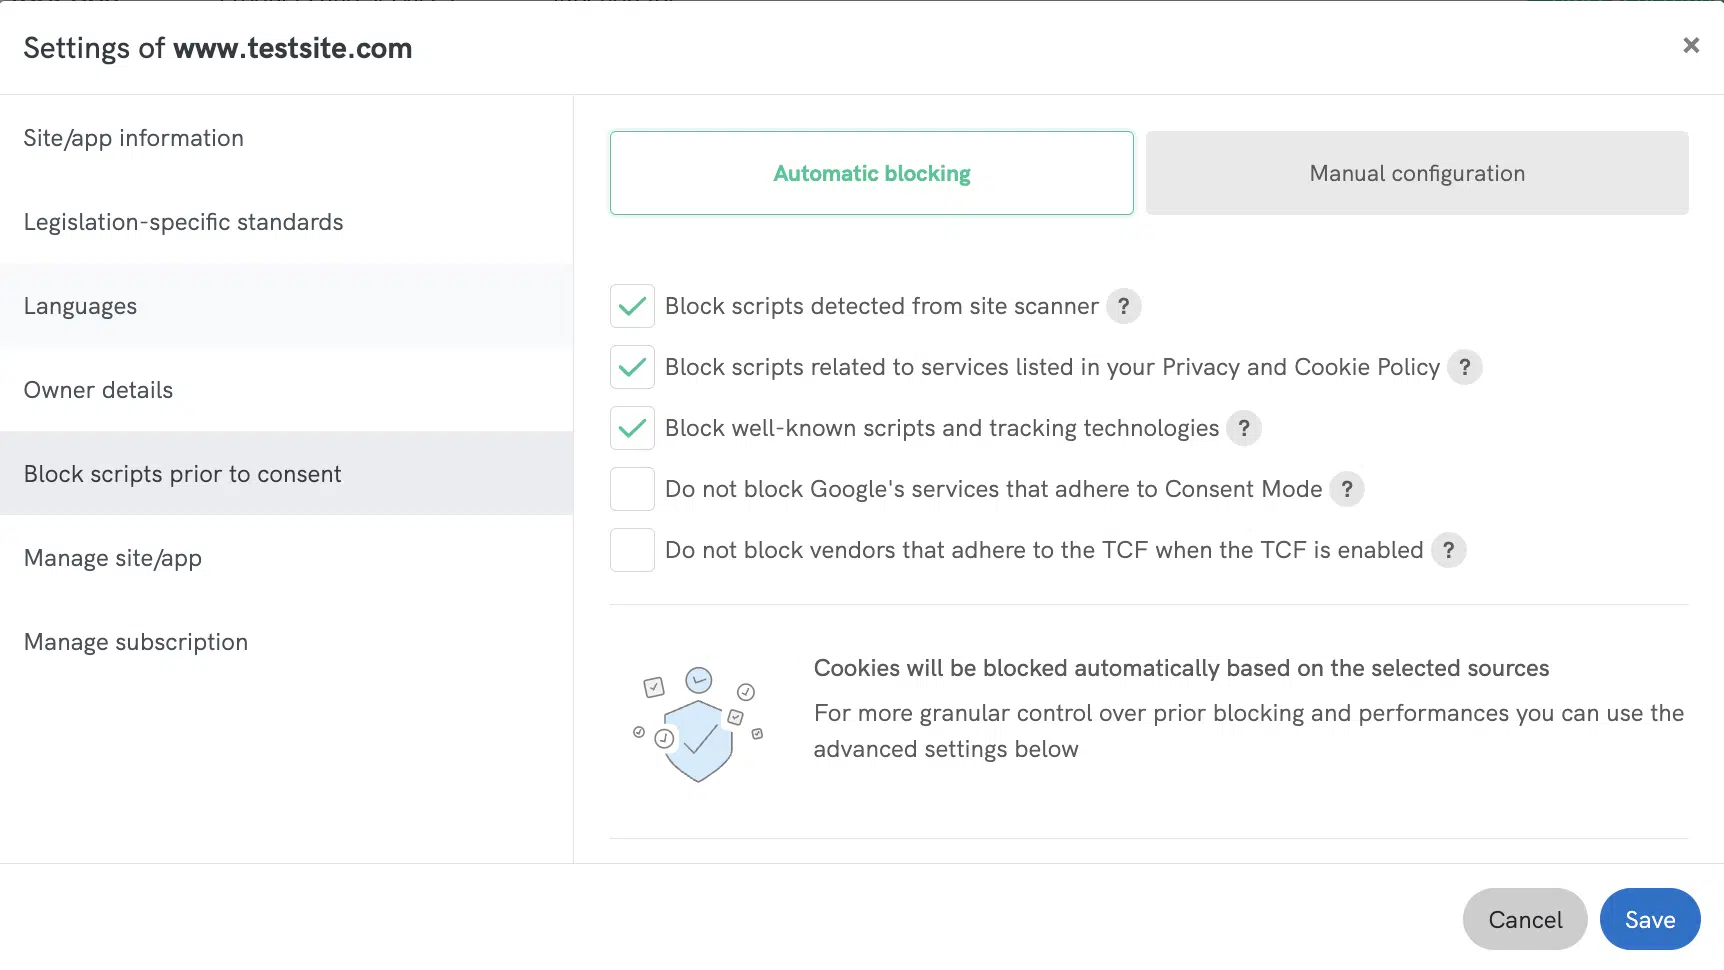
Once you activate “Automatic blocking,” you can choose to enable or disable the pre-set toggles, allowing you to block cookies from selected sources according to your specific requirements and the legal jurisdiction applicable to your site:
✅ Block scripts detected from site scanner:
When this option is enabled, “perfect match” third-party scripts identified by our site scanner will be automatically blocked to prevent them from installing cookies on your site.
✅ Block scripts related to services listed in your Privacy and Cookie Policy:
Enable this option to automatically block scripts linked to services listed in your Privacy and Cookie Policy. Exclusively available for policies created with the Privacy and Cookie Policy Generator.
To fine-tune how these services are categorized and influence how they are blocked, check out Customize Service Categorization.
✅ Block well-known scripts and tracking technologies:
Enable this option to block widely recognized scripts and tracking technologies. Note: if a script is blocked in this manner, it may not be loaded by the Privacy Controls and Cookie Solution, making it impossible to associate it with the relevant purpose. If you are using one of these technologies on your website, we highly recommend that you add them to your iubenda Privacy and Cookie Policy.
✅ Do not block Google’s services that adhere to Consent Mode:
When this option is enabled, our Privacy Controls and Cookie Solution will automatically activate advanced implementation of Google’s Consent Mode. This method allows Google services to adapt dynamically based on changes in consent set by the user.
For example, if a user initially denies consent for certain data processing activities, Google services will respect this choice and adjust their behavior accordingly. Even if consent is denied, certain user data, such as IP addresses, may still be processed by Google services. ⚠️ Please note that this method offers flexibility but requires careful consideration to ensure compliance with privacy regulations.
✅ Do not block vendors that adhere to the TCF when the TCF is enabled:
When this feature is enabled, ad delivery is driven by the TCF consent string, reflecting the user’s preferences. We recommend that you check with your associated vendors to find the best strategy that balances optimal performance with compliance.
❓ What well-known scripts and tracking technologies are automatically blocked?
The services for which scripts and tracking technologies are blocked by default are:
- Google Fonts
- Font Awesome
- Google Analytics
- Google Analytics 4
- Facebook Ads conversion tracking
- YouTube video widget
- Video Vimeo
- Google Ads conversion tracking
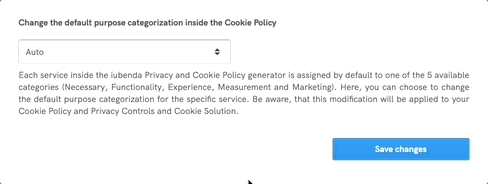
Customize Service Categorization
Our Privacy and Cookie Policy Generator now lets you customize how services are categorized in your Privacy and Cookie Policy, giving you more control over auto-blocking behavior within the Privacy Controls and Cookie Solution (Cookie Banner), and automatically updating your cookie policy to reflect these changes.
Why It Matters
Auto-blocking: Auto-blocking prevents third-party cookies and trackers from loading until users give explicit consent, as required by laws like GDPR. By adjusting a service’s category, you decide which consent is needed to unblock it.
Legal documents (Cookie Policy): Your Cookie Policy dynamically reflects these categorizations, and any changes you make are automatically updated in your cookie policy.
How It Works
- Services are grouped into five categories: Necessary (1), Functionality (2), Experience (3), Measurement (4), and Marketing (5).
- By default, iubenda assigns categories, but you can now reassign them.
- A service under Marketing (5) stays blocked until marketing cookies are accepted.
- If you change it to Experience (3), it requires only experience cookies.
- If moved to Necessary (1), it loads immediately without consent.
Simply open the Privacy and Cookie Policy Generator, select a service, click the edit icon, update its category in the “Change the default purpose categorization inside the Cookie Policy” section, and save—your policy and cookie banner behavior will update accordingly.
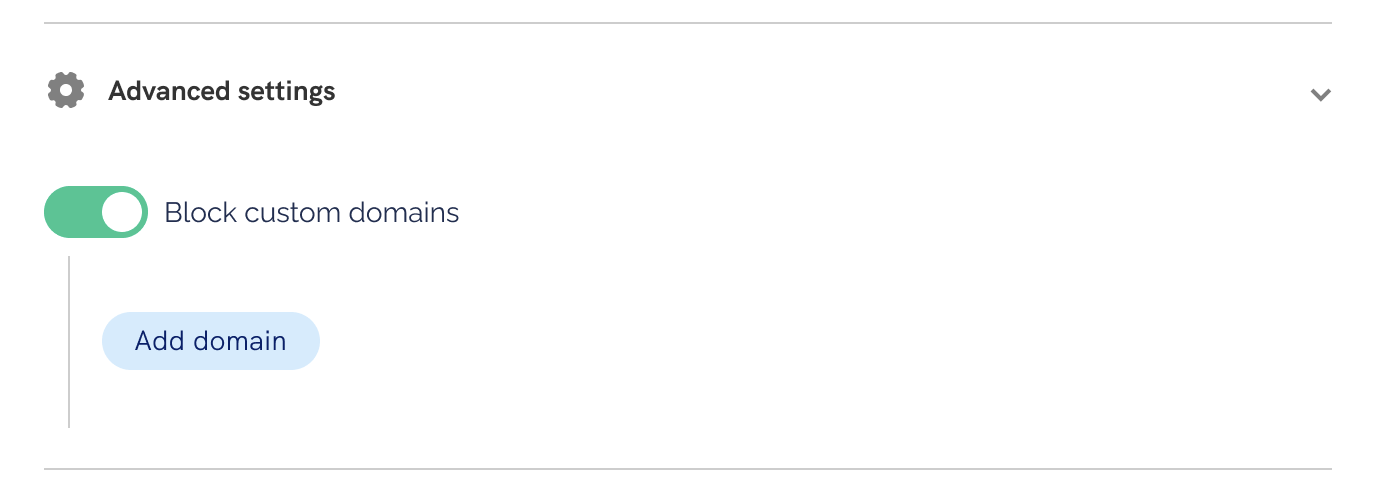
Advanced settings
Block Custom Domains
❗️ Please note that if you want to use the “Advanced Settings” you will need to upgrade your plan.
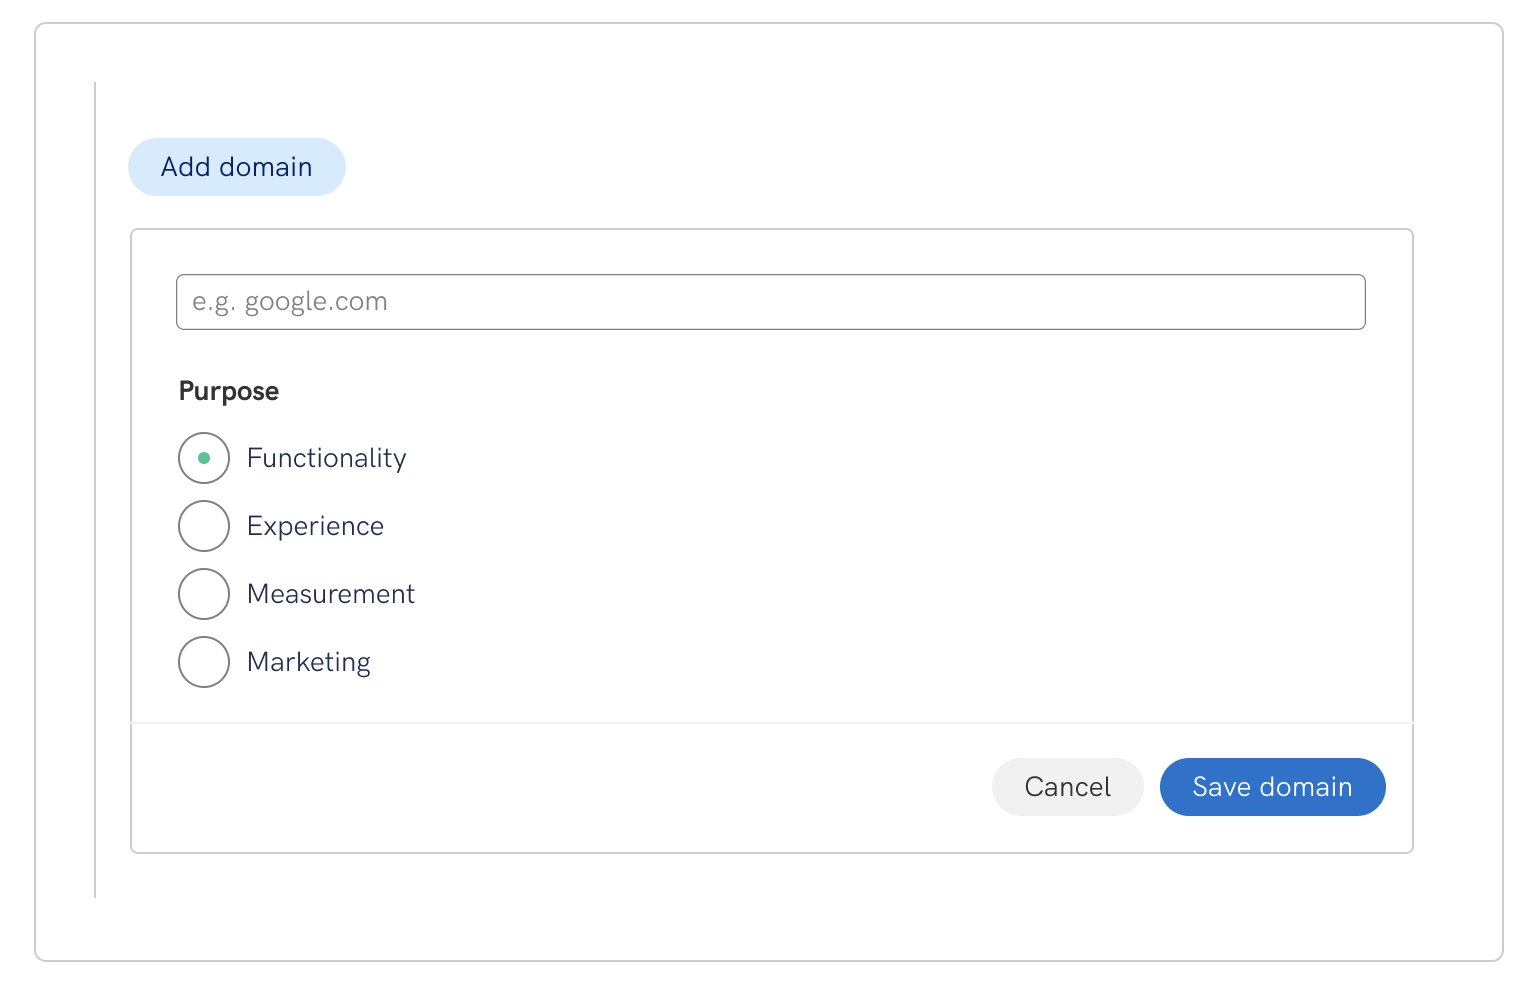
You can manually add a domain that may contain a script that installs cookies or trackers, if this domain has not been detected by our system. This way, requests from that domain will be restricted until consent is given for the specific purpose mentioned.
In this case, you’ll need to specify the relevant purpose (e.g. Necessary, Functionality, Experience, Measurement, Marketing) that must be accepted by the user when collecting consent for the manually added script. This is because manually add scripts are not initially categorized under one of the predefined purposes.
To do this, enable the “Block custom domains” toggle and select “Add domain”. At this point, you can specify the domain and indicate the purpose. Finally, click “Save domain” to block any requests until consent is given for the specified purpose.
Additional settings
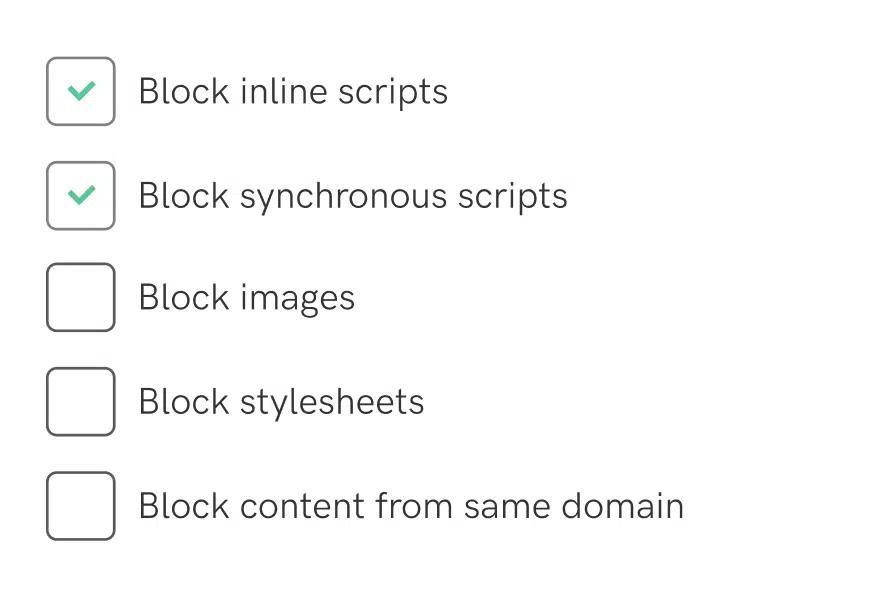
- Block inline scripts: When this option is enabled, scripts that are directly integrated within your website’s HTML will be blocked prior to consent
- Block synchronous scripts: When this option is enabled, synchronous scripts will be blocked on your website prior to consent.
- Block images: When this option is enabled, images from third-party sources will be blocked on your website
- Block stylesheets: When this option is enabled, third-party stylesheets will be blocked on your website
- Block content from same domain: When this option is enabled, content from your own domain will be blocked on your website. This includes scripts, images, stylesheets, and other resources originating from your own domain. Please use caution when enabling this option, as it may impact the functionality and appearance of your site.
👉 Note that the default configuration of the checkboxes will be set as shown below:
Ignore specific domains from automatic blocking
Enable this option to exempt specific domains from being blocked, allowing their scripts, resources, and content to remain unaffected on your website. This feature ensures that selected domains are exempted from the blocking mechanism, maintaining their intended functionality.
Embedding section
⚠️ Once you click “Save changes“, you will be redirected to the embedding section, where you can verify the activation of “Prior Blocking of Cookies“. From there, you can easily copy and paste the code snippet at the very beginning of the <head> tag of your pages.

Remember, in the event that you make changes to the automatic blocking status (enabled/disabled), the embedded code snippet will be modified accordingly. Therefore, it is necessary to copy and embed your code again.
And you’re done! ✅ Get started implementing iubenda’s automatic blocking now for effortless legal compliance.