In this guide, we’ll walk you through how to integrate Make (Integromat) with iubenda’s Consent Database. The process is designed to be no programming experience required, making it easy for anyone to get started. To help you find what you’re looking for, please see the table of contents.
1. Introduction
What is Make (Integromat)?
Make (formerly known as Integromat) allows you to create, build, and automate workflows visually. You can connect apps with a few clicks with the creative drag-and-drop interface, and create endless workflows which Make call ‘scenarios’. It’s similar to Zapier, but with additional customization options, and no programming experience required.
Disclaimer
The Make integration allows for several specific scenarios, most notably how to treat consent preferences. For example, for the “Create a consent” and “Update preferences of a subject” actions, we have included four different preference options (newsletter, privacy policy, terms, and marketing); if you require additional preferences you will need to perform an API call (and refer to our API HTTP guide).
Furthermore, all activities offered in the Make integration will need you to sync your iubenda legal documents with the Consent Database for the time being.
2. Test the integration
Here’s the link to the iubenda Make integration. After clicking on “Install” you’ll be able to see iubenda amongst the different services available on Make. The integration is designed for users without programming experience, so getting started is simple!
3. Authentication
Important
If you use Make for integrating your Consent Database, make sure you add it to your Privacy Policy.
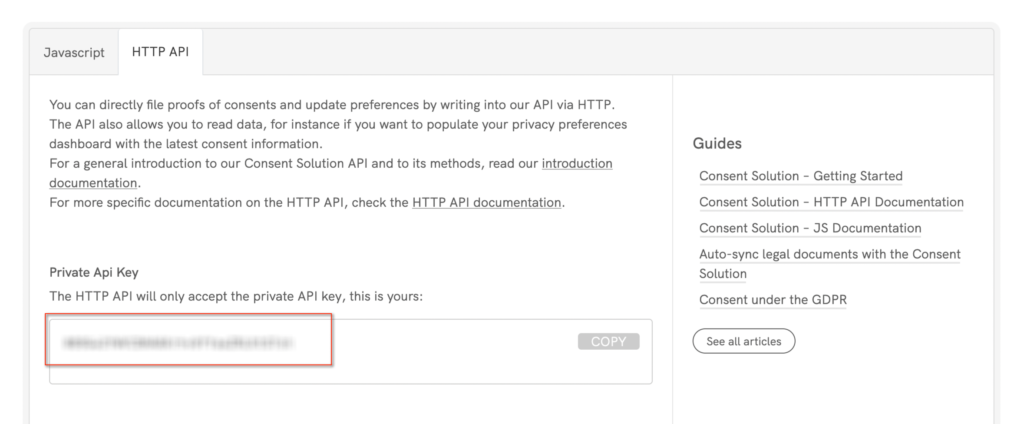
The Make authentication requires you to provide your private iubenda API key, available in the HTTP section of the embedding options for the Consent Database.
Once a Make scenario has been created, you can use iubenda to search for its name in the services list.
Then, select one of the actions and add your private API key in the “Connections” field when asked. No programming skills are required to follow this process—everything is designed to be straightforward and user-friendly. See the video below to see how it works!
4. Actions available
4.a Create a consent
This action is based on the CREATE consent HTTP request and will create a new consent in the iubenda Consent Database.
The new consent automatically creates a new subject, available in the relative section of your Consent Database dashboard.
Each consent action contains all the information necessary to uniquely identify that specific consent, the subject who performed it, the preferences expressed with that consent, the legal notices your user has accepted, and the proof (e.g. the form your user was presented with).
- Timestamp: if blank, it will be auto-filled
- Subject fields
- Email (required)
- First Name
- Last Name
- Full Name
- Verified (select “True” if users are not verified with double opt-in. If users are identified with double opt-in select “False.” To verify users who double opted-in, you’ll need to create a Zap with the “Verify a subject” action).
- Proofs fields
- Content
- Form (you can put the Form ID or simply an HTML of the form as a static field).
- Preferences fields
- Consent to Privacy Policy (true/false)
- Consent to Newsletter (true/false)
- Consent to Terms and Conditions (true/false)
- Consent to Marketing (true/false)
- IP address
The action also provides four different consent types available for four different use cases:
- Consent to Privacy Policy
- Consent to Newsletter
- Consent to Terms
- Consent to Marketing
If you are not asking for one of these consents can just leave the relative field blank. Those wanting to create additional preferences need to use the HTTP API method.
The output data of the action are:
- Timestamp
- Consent ID
- Subject ID
The data can be used to update the user DB with user-related data (e.g., Subject ID).
4.b Verify a subject
This action is based on the UPDATE subjects HTTP request (with the only verified = “true” attributes in its request body). Use this action to update a subject when verified, for instance via the double-opt-in method. This action requires the subject has already been created.
The only field requested is the Subject ID (required).
The action requires the Subject ID has already been stored by the triggering service. For instance, if you are trying to verify a Mailchimp user who’s just double opted-in, the subject ID has to be available in the Mailchimp attributes of the user.
The output data of the action are:
- Timestamp
- Subject ID
4.c Update a subject
This action is based on the UPDATE subjects HTTP request and can be used whenever there’s a need to update a subject (e.g. change in the email address of the user). Keep in mind that if the intent is changing the user’s preferences, this can be done with the “Update preferences of a subject” action. Blank fields won’t update the previous entry.
- Subject fields
- Subject ID (required)
- First Name
- Last Name
- Full Name
The action requires that the Subject ID has already been stored by the triggering service. For instance, if you are trying to verify a Mailchimp user who’s just double opted-in, the subject ID must be available in the Mailchimp attributes of the user.
The output data of the action are:
- Timestamp
- Subject ID
4.d Update preferences of a subject
This action updates the preferences of a given subject. Any change in preferences requires a new consent, therefore this action will create a new consent for an existing subject. Information not meant to be updated require the relative fields to be blank.
- Subject ID (required)
- Preferences fields
- Consent to Privacy Policy (true/false)
- Consent to Newsletter (true/false)
- Consent to Terms and Conditions (true/false)
- Consent to Marketing (true/false)
If you are not asking for one of the preferences consent, you can leave the relative field blank. Those who want to create additional preferences need to use the HTTP API method.
output data of the action are:
- Timestamp
- Subject ID
5. Example of a scenario
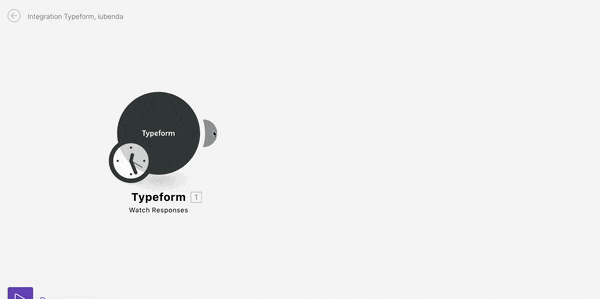
The following scenario will create a new consent in the iubenda Consent Database starting from a new entry on Typeform.
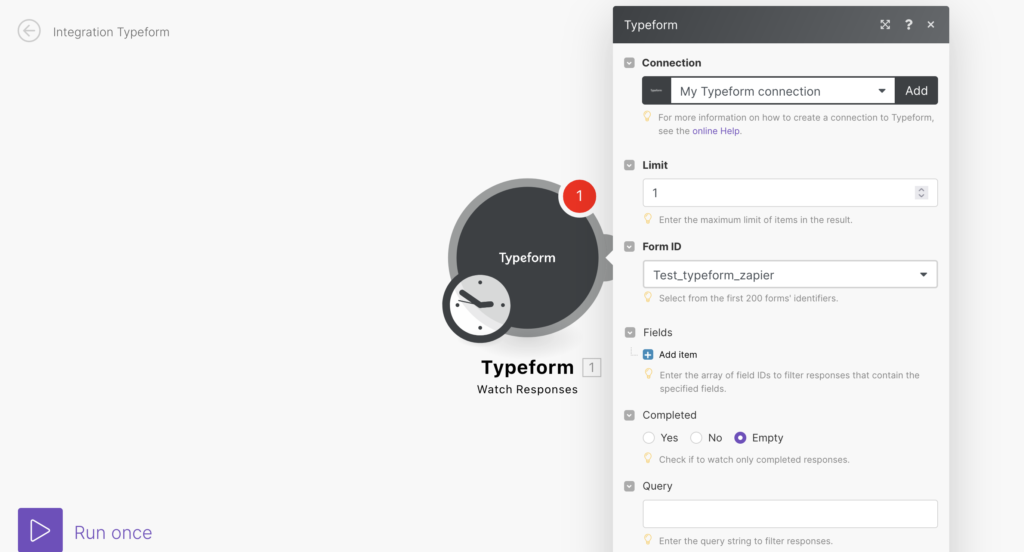
First, connect Typeform to Integro and make it a trigger. Then, select the starting form and test the account. It should pick up the very last entry in the form you’ve selected.
After that, click on “Add another module” add search for iubenda in the services list.
Next, select “Create a new consent” in the available actions menu.
Now you need to connect the iubenda account to Make, as described in Authentication.
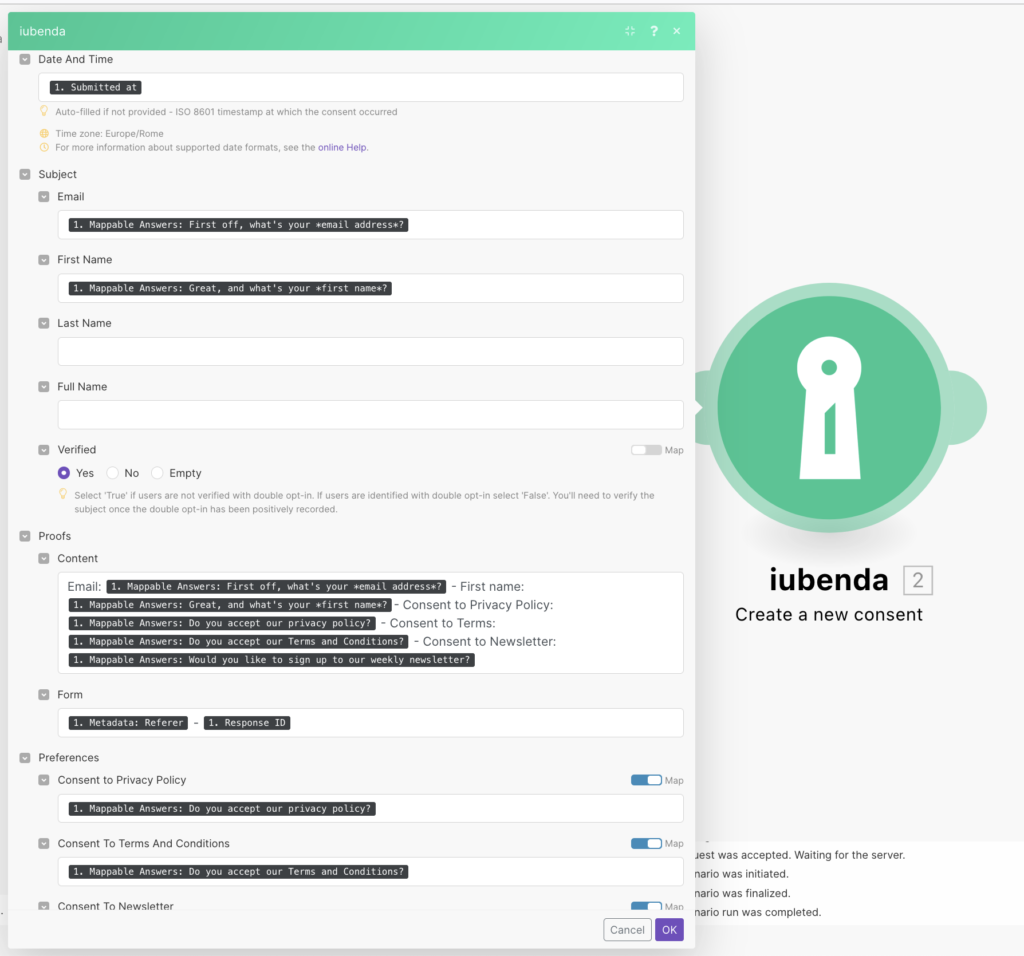
Once you’ve connected the accounts, fill the fields with the variables coming from Typeform. Leave blank the fields you don’t need.
After that, click on “Ok” and test your scenario.
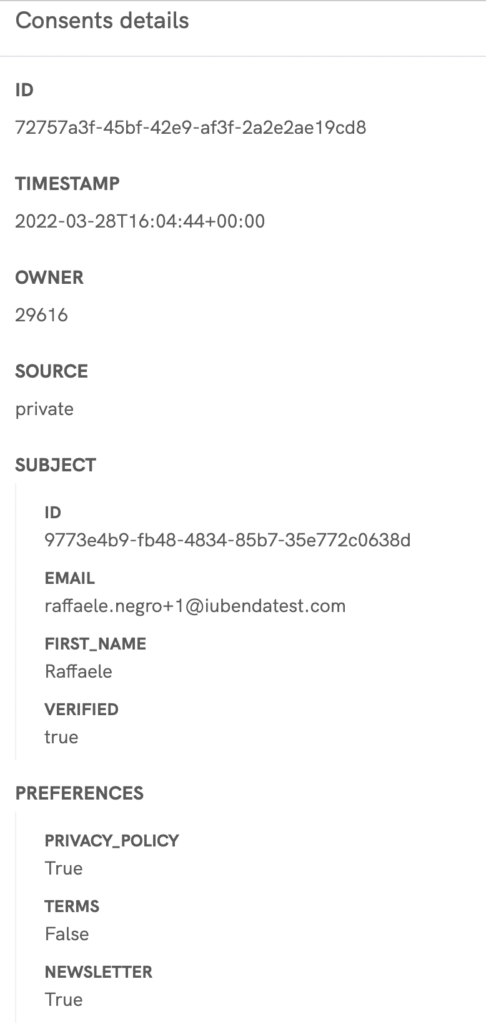
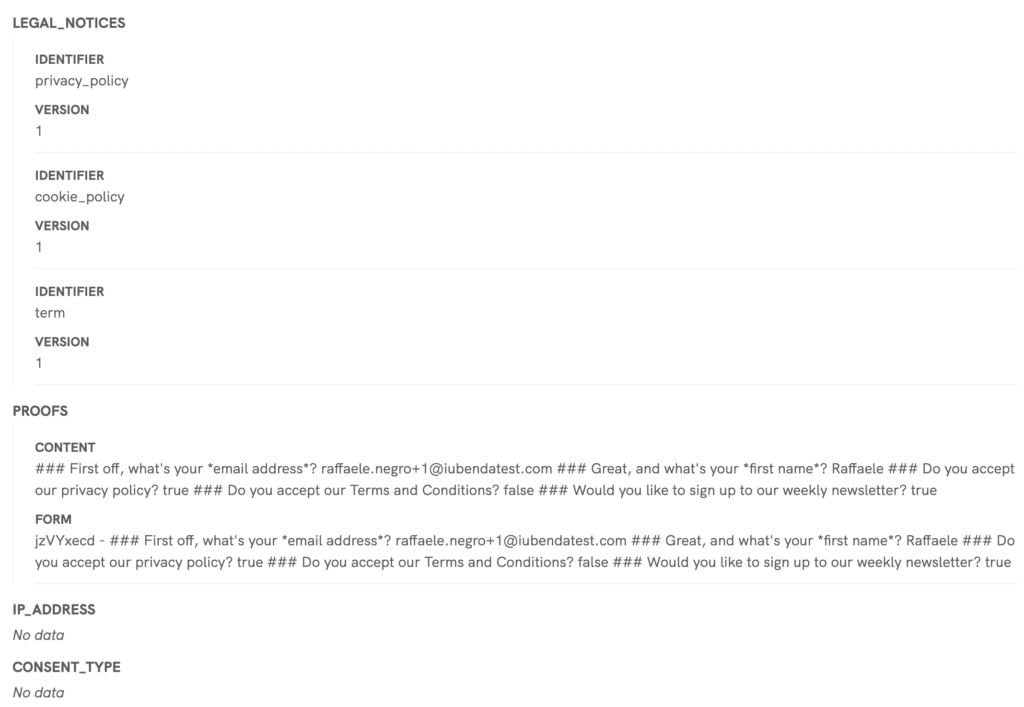
Then, check if the dashboard in the Consent Database is showing the right information.
If yes, turn the scenario on and you’re done.
Congratulations, you’ve successfully set up Make (Integromat) with iubenda’s Consent Database—and all without needing programming experience. Now, you can automate and manage your consent data seamlessly!