Caution
If you’re looking to simplify the blocking of cookies and trackers using Google Tag Manager together with the auto-blocking feature, it’s important to note that the related snippet cannot be loaded directly via GTM. However, you can still refer to the following guide to streamline the cookie-blocking process using GTM.
Below we’ll explain how to integrate Google Tag Manager with the iubenda Privacy Controls and Cookie Solution for CCPA, GDPR and per-category consent.
Important
Using Google Tag Manager is highly recommended given that it drastically simplifies the adoption of the Cookie Law requirements. However, it’s only effective for scripts that aren’t “positional”. “Non-positional” scripts are all scripts that don’t visualize a specific element at a given place in the page. In short, you can use this solution for all analytics tools, but not for AdSense banners, Youtube videos or social buttons or widgets of any kind.
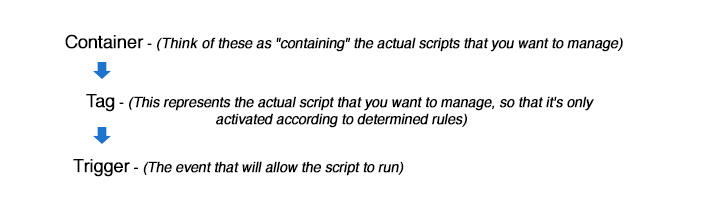
Some quick definitions
See the official Google documentation for more information on Google Tag Manager. With that said, let’s start the tutorial!
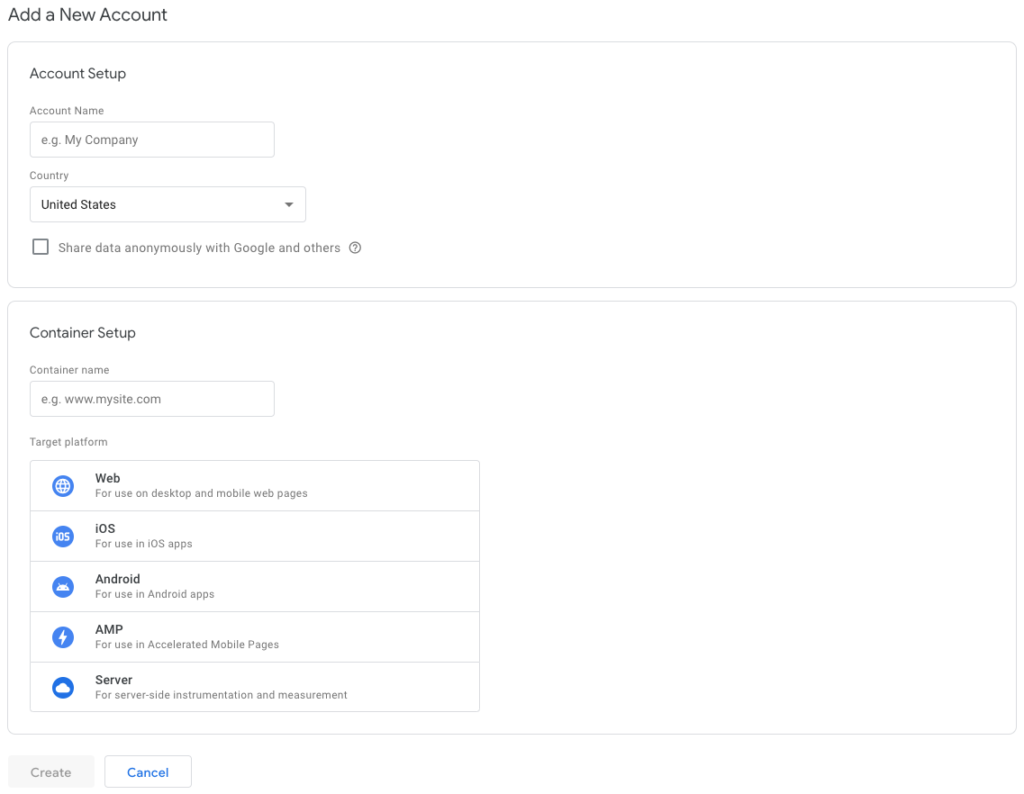
Create an account and set up a container
To start with Google Tag Manager, you’ll need to create a free account and to set up a container.
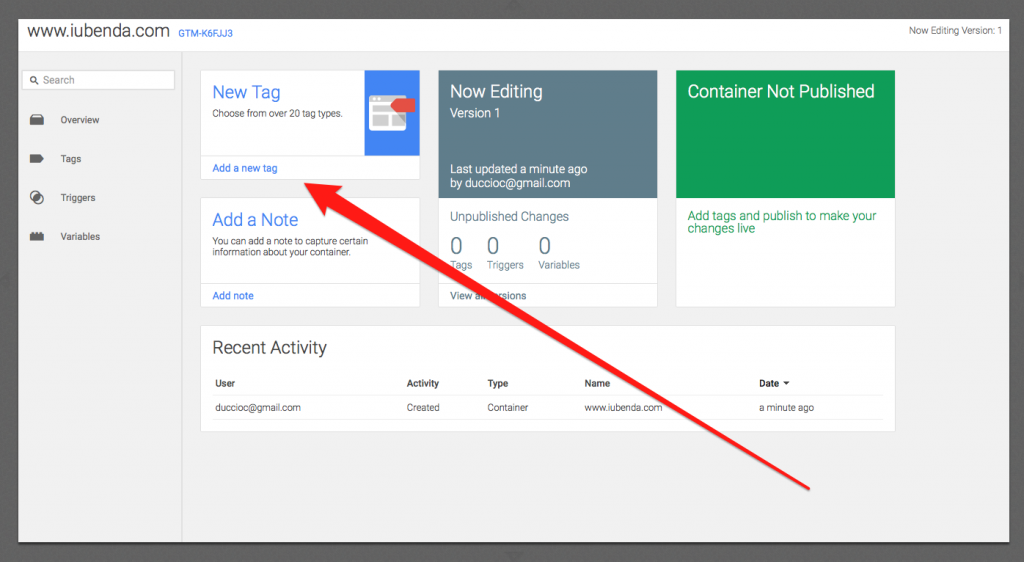
Create the tag
Once the container has been created we can move on to the creation of the tag. Once again, the tag represents the script that will only be activated according to determined rules, in our case the user’s consent to the use of cookies.
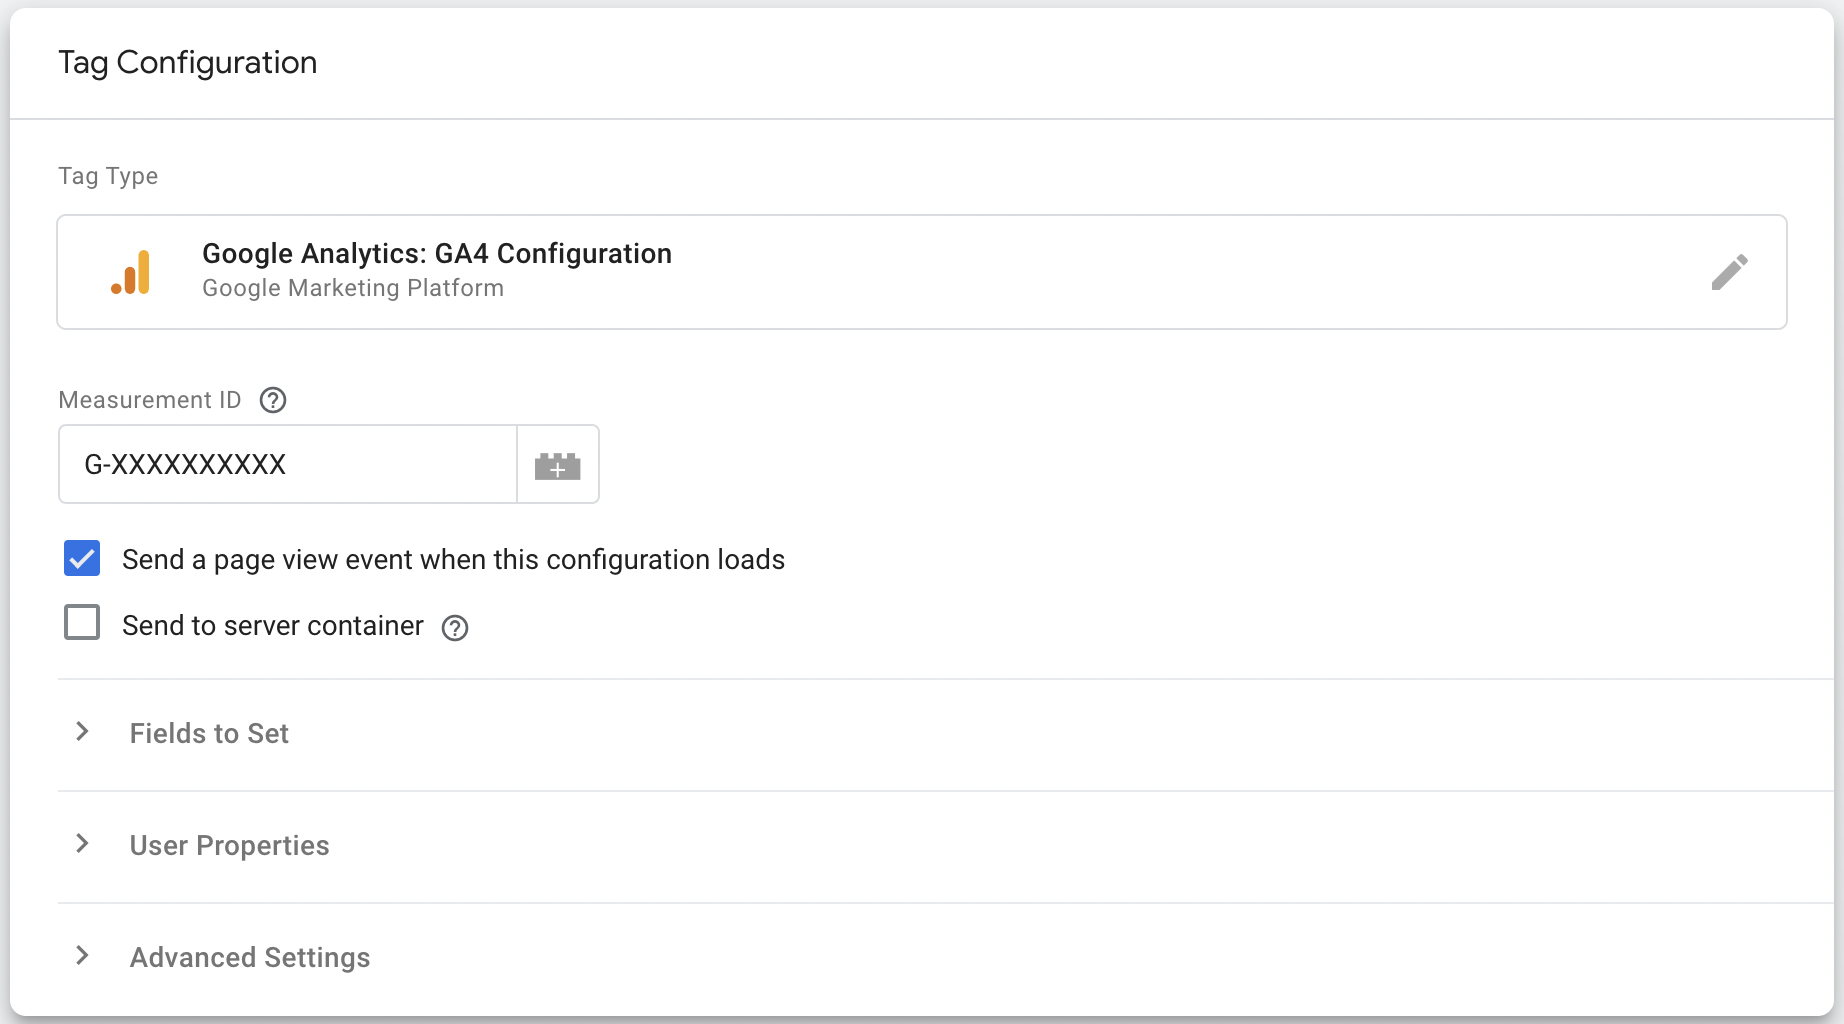
The tag that we will create will be related to Google Analytics 4:
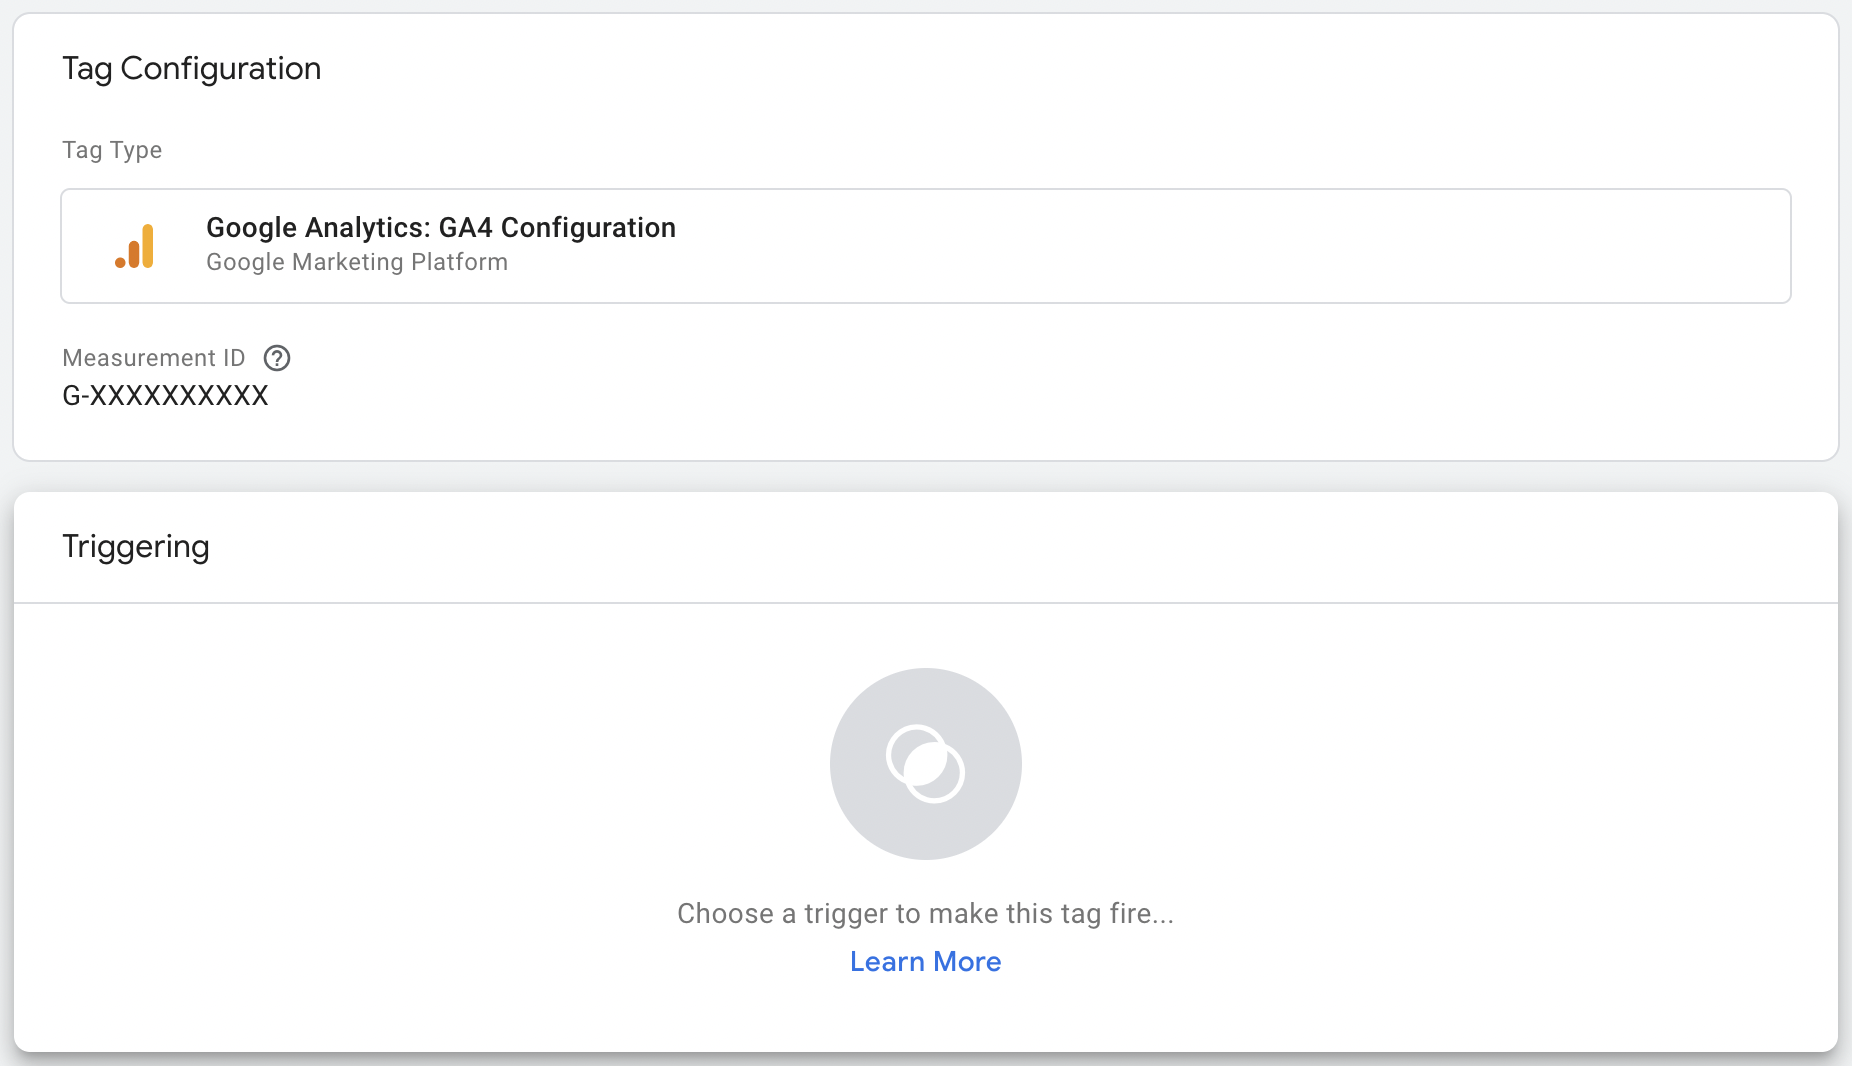
Click on the Tag configuration window as seen in the image below:

Select the Google Analytics: GA4 Configuration tag type.

Now, you can set up the rules for the activation of the tag. Let’s see how to do it.
Set up rules for the activation of the tag
After having filled in the above parameters, we must set the triggers (the rules that will allow the scripts to fire):
iubenda_consent_givenor, if you’ve enabled the per-category consent feature on your Privacy Controls and Cookie Solution,iubenda_consent_given_purpose_1...5iubenda_preference_not_needediubenda_ccpa_opted_out- If you have enabled USPR,
iubenda_consent_given_purpose_s,iubenda_consent_given_purpose_sh,iubenda_consent_given_purpose_adv, andiubenda_consent_given_purpose_sd8
Google Tag Manager and Consent Mode
If you’re implementing Google Consent Mode, skip this step and jump to installation.
1.1 iubenda_consent_given
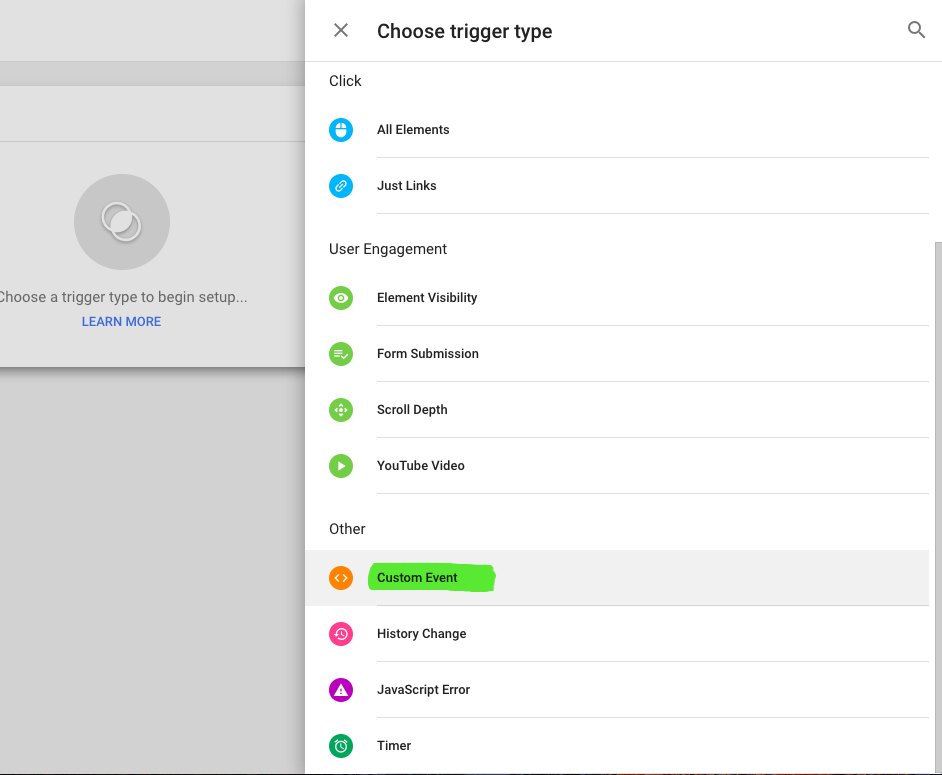
Click on the “Triggering” section below:
and then click on the little plus sign on the top right to add a new Trigger. Now, in the trigger configuration window, select Custom Event (quick note here: please be sure NOT to select “All Pages” as a trigger).
For event name please input the following value: iubenda_consent_given. This will activate the trigger on All Custom Events labeled Consent Given.
Save the trigger by clicking on Save:

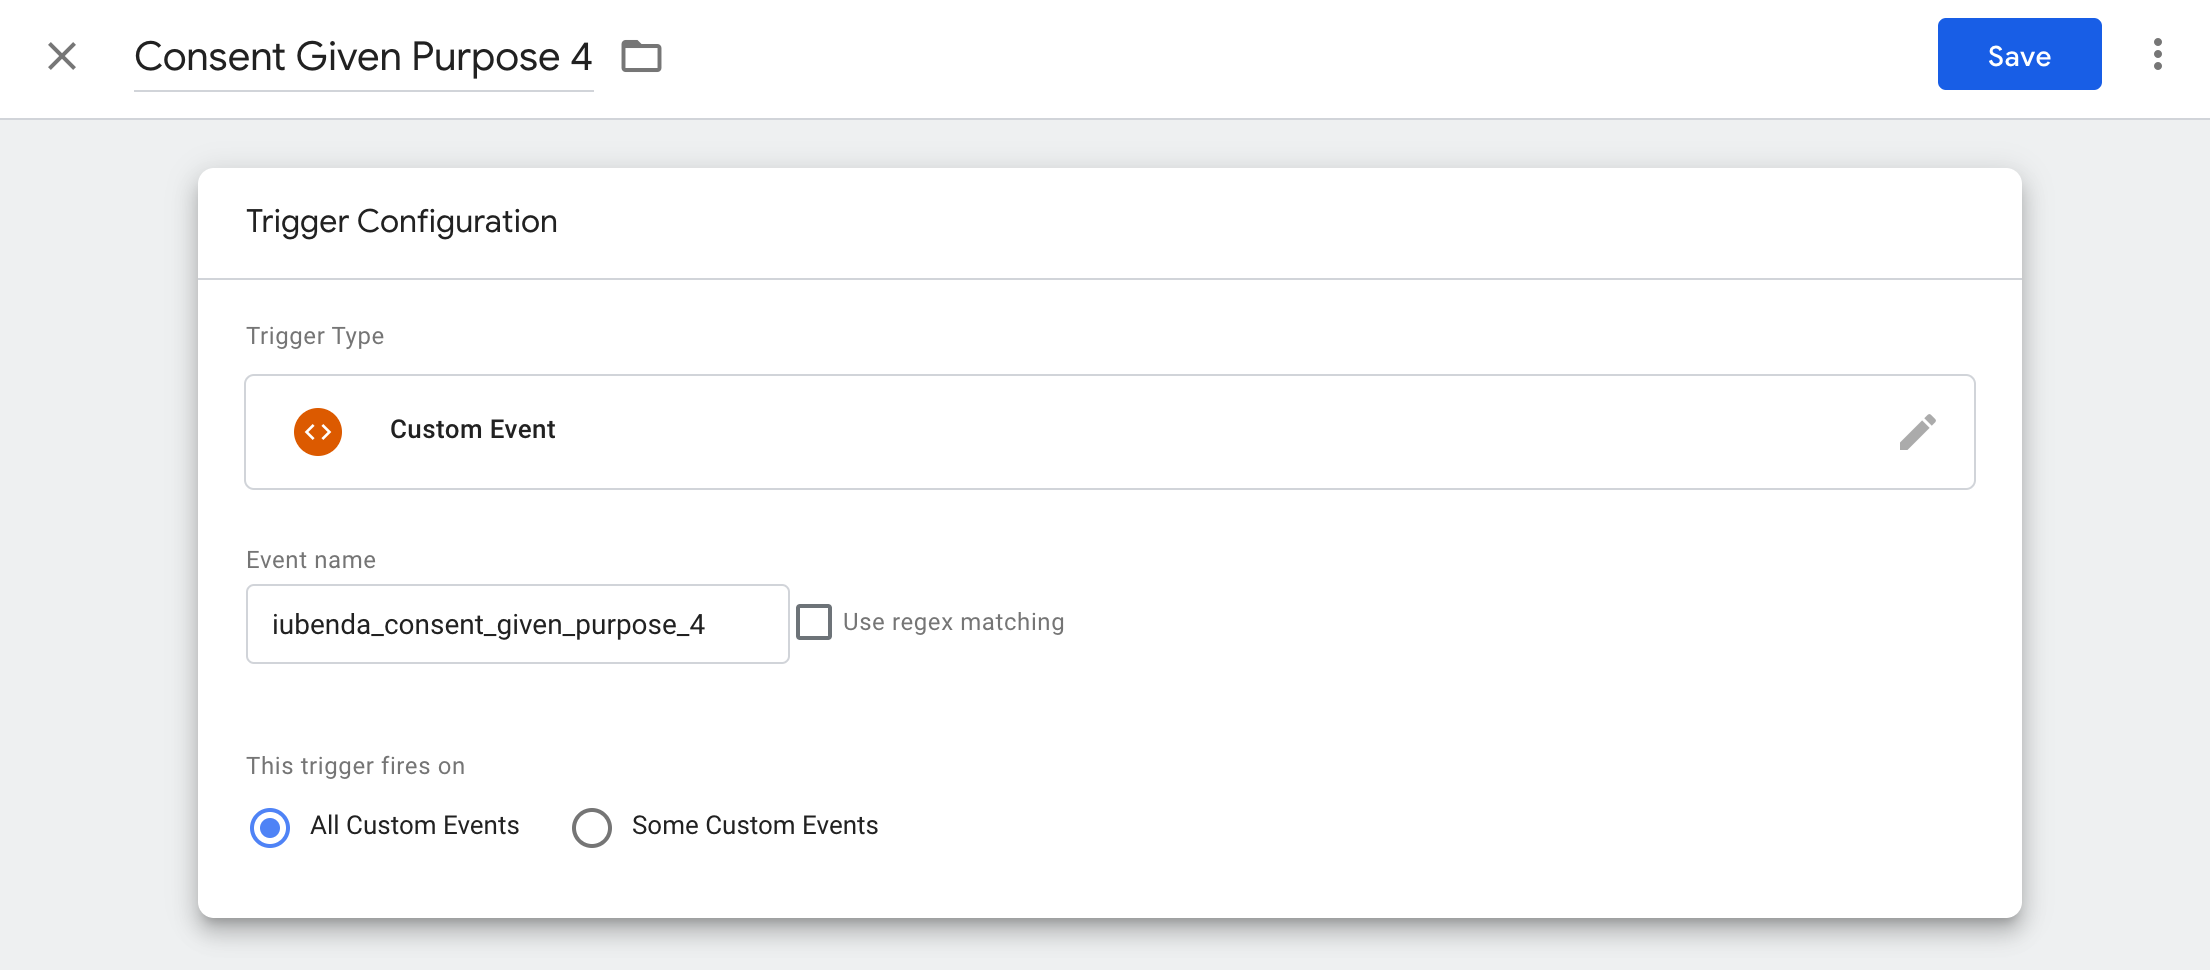
1.2 iubenda_consent_given_purpose_1…5
If you’ve enabled the per-category consent feature on your Privacy Controls and Cookie Solution, instead of the iubenda_consent_given event, you’ll have to create a custom event for each purpose you display on your cookie banner/policy (with the exception of the “Necessary” purpose).
If you’re not sure which purpose/category the services running on your site belong to, you can simply reference the subheadings they fall under in your iubenda cookie policy.
Here are the 5 purposes (and the custom event values):
- Necessary (no need to create a custom event)
- Functionality (
iubenda_consent_given_purpose_2) - Experience (
iubenda_consent_given_purpose_3) - Measurement (
iubenda_consent_given_purpose_4) - Marketing (
iubenda_consent_given_purpose_5)
Since Google Analytics is part of the “Analytics” category included in the “Measurement” purpose, you’ll have to create a custom event with the following value: iubenda_consent_given_purpose_4. This will activate the trigger on All Custom Events labeled Consent Given Purpose 4.
For US state privacy laws use the following events:
iubenda_consent_given_purpose_s: Sale of my personal informationiubenda_consent_given_purpose_sh: Sharing of my personal informationiubenda_consent_given_purpose_adv: Processing of my personal information for targeted advertisingiubenda_consent_given_purpose_sd8: Processing of my precise geolocation data
Once done, save the trigger as usual.
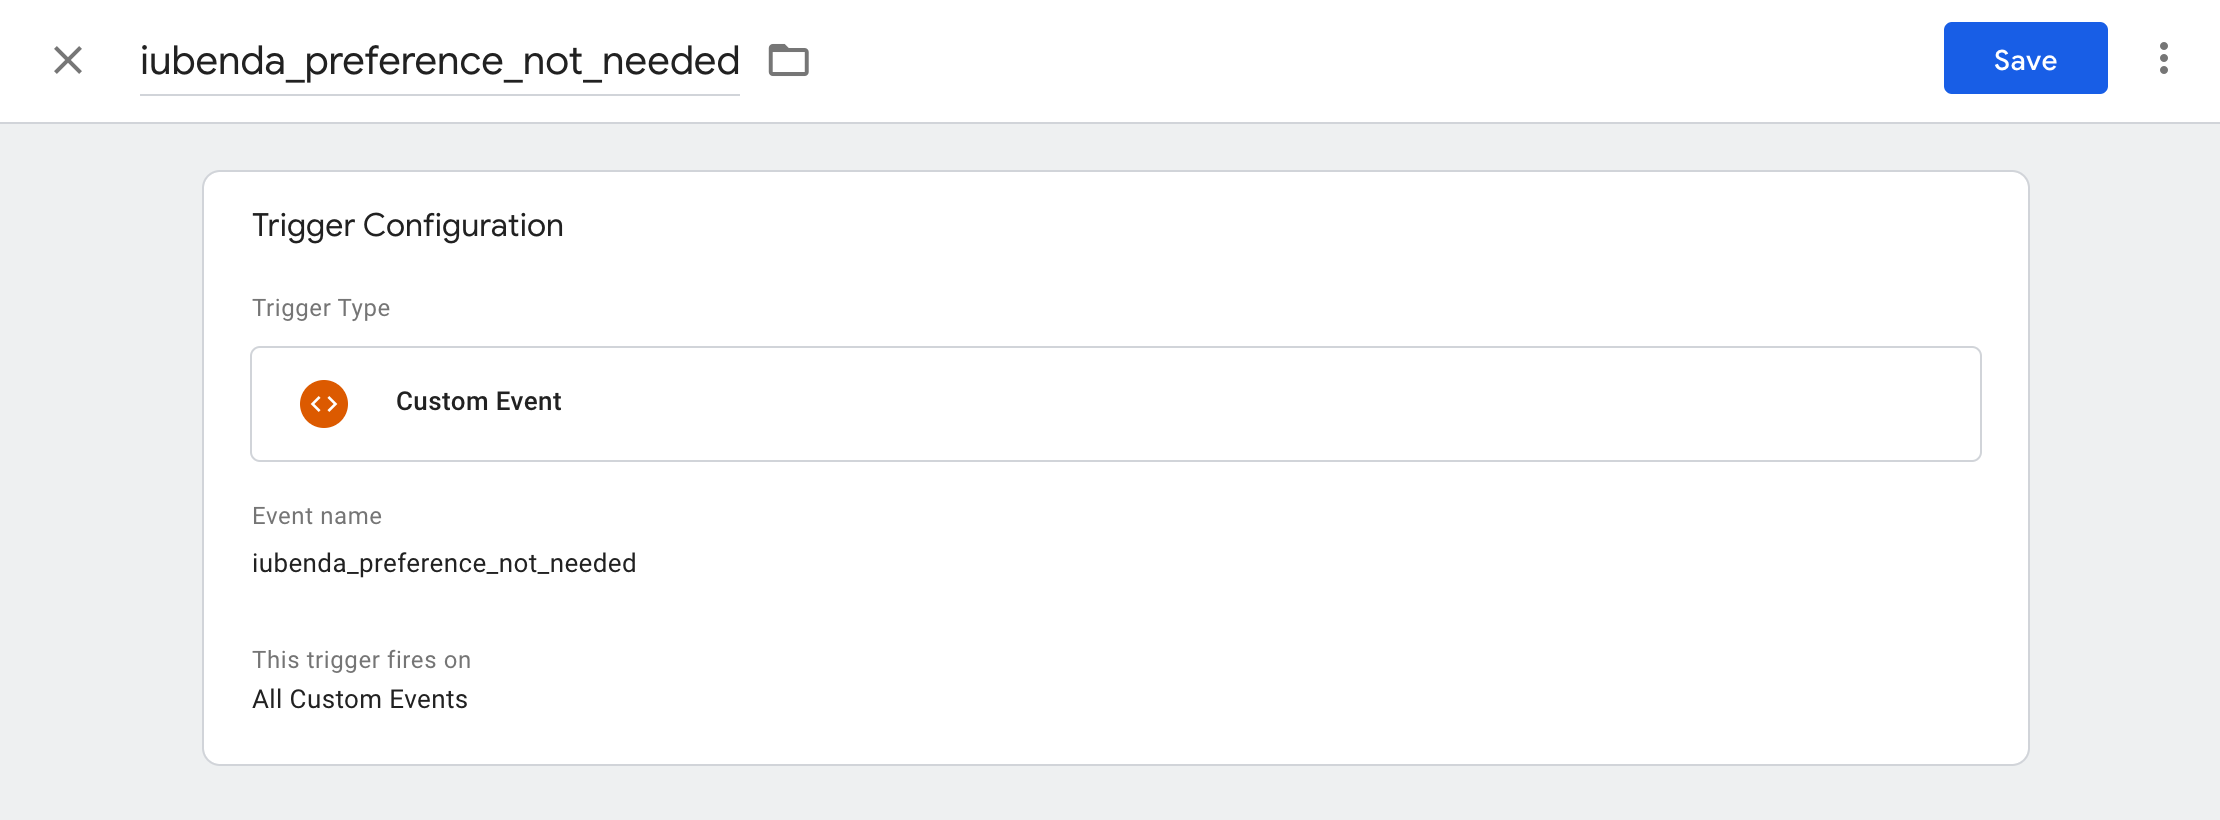
2. iubenda_preference_not_needed
Use the same procedure to create another custom event called iubenda_preference_not_needed, invoked whenever a preference is not needed (for example when gdprApplies:false, or gdprAppliesGlobally:false, countryDetection:true and the user is based outside the EU):
3. iubenda_ccpa_opted_out
If the CCPA applies to you and – like in this case – the tag/service is considered a sale, it should be disabled when the user opts out. To do so, you’ll have to create an exception called iubenda_ccpa_opted_out.
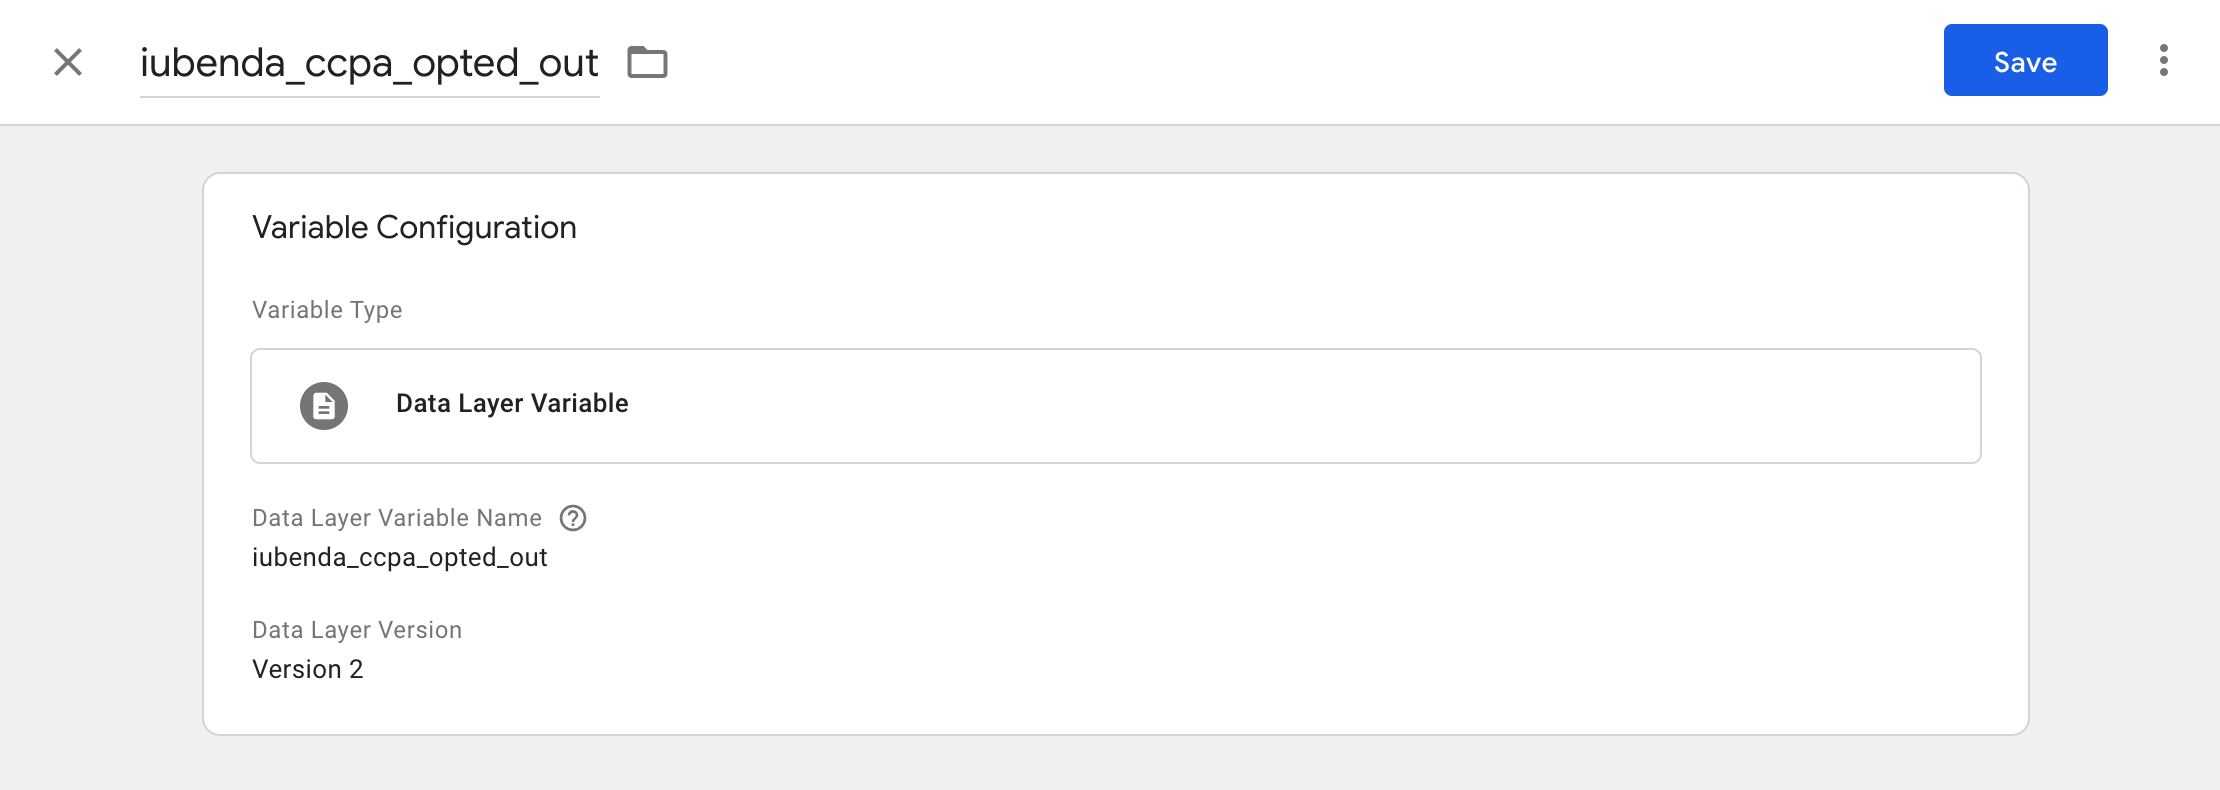
Before creating this event, you’ll have to define a filter for it. Click on Variables, then New (next to User-Defined Variables). Name it iubenda_ccpa_opted_out, click on the Variable Configuration box and choose Data Layer Variable, use iubenda_ccpa_opted_out as Data Layer Variable Name and select Version 2 as Data Layer Version. Then click on Save.
Now that you’ve defined the variable, create a new trigger called iubenda_ccpa_opted_out. Under Trigger Configuration:
- choose Custom Event as Trigger Type;
- input
.*as Event name and select Use regex matching; - under This trigger fires on choose Some Custom Events, select
iubenda_ccpa_opted_out, equals and true
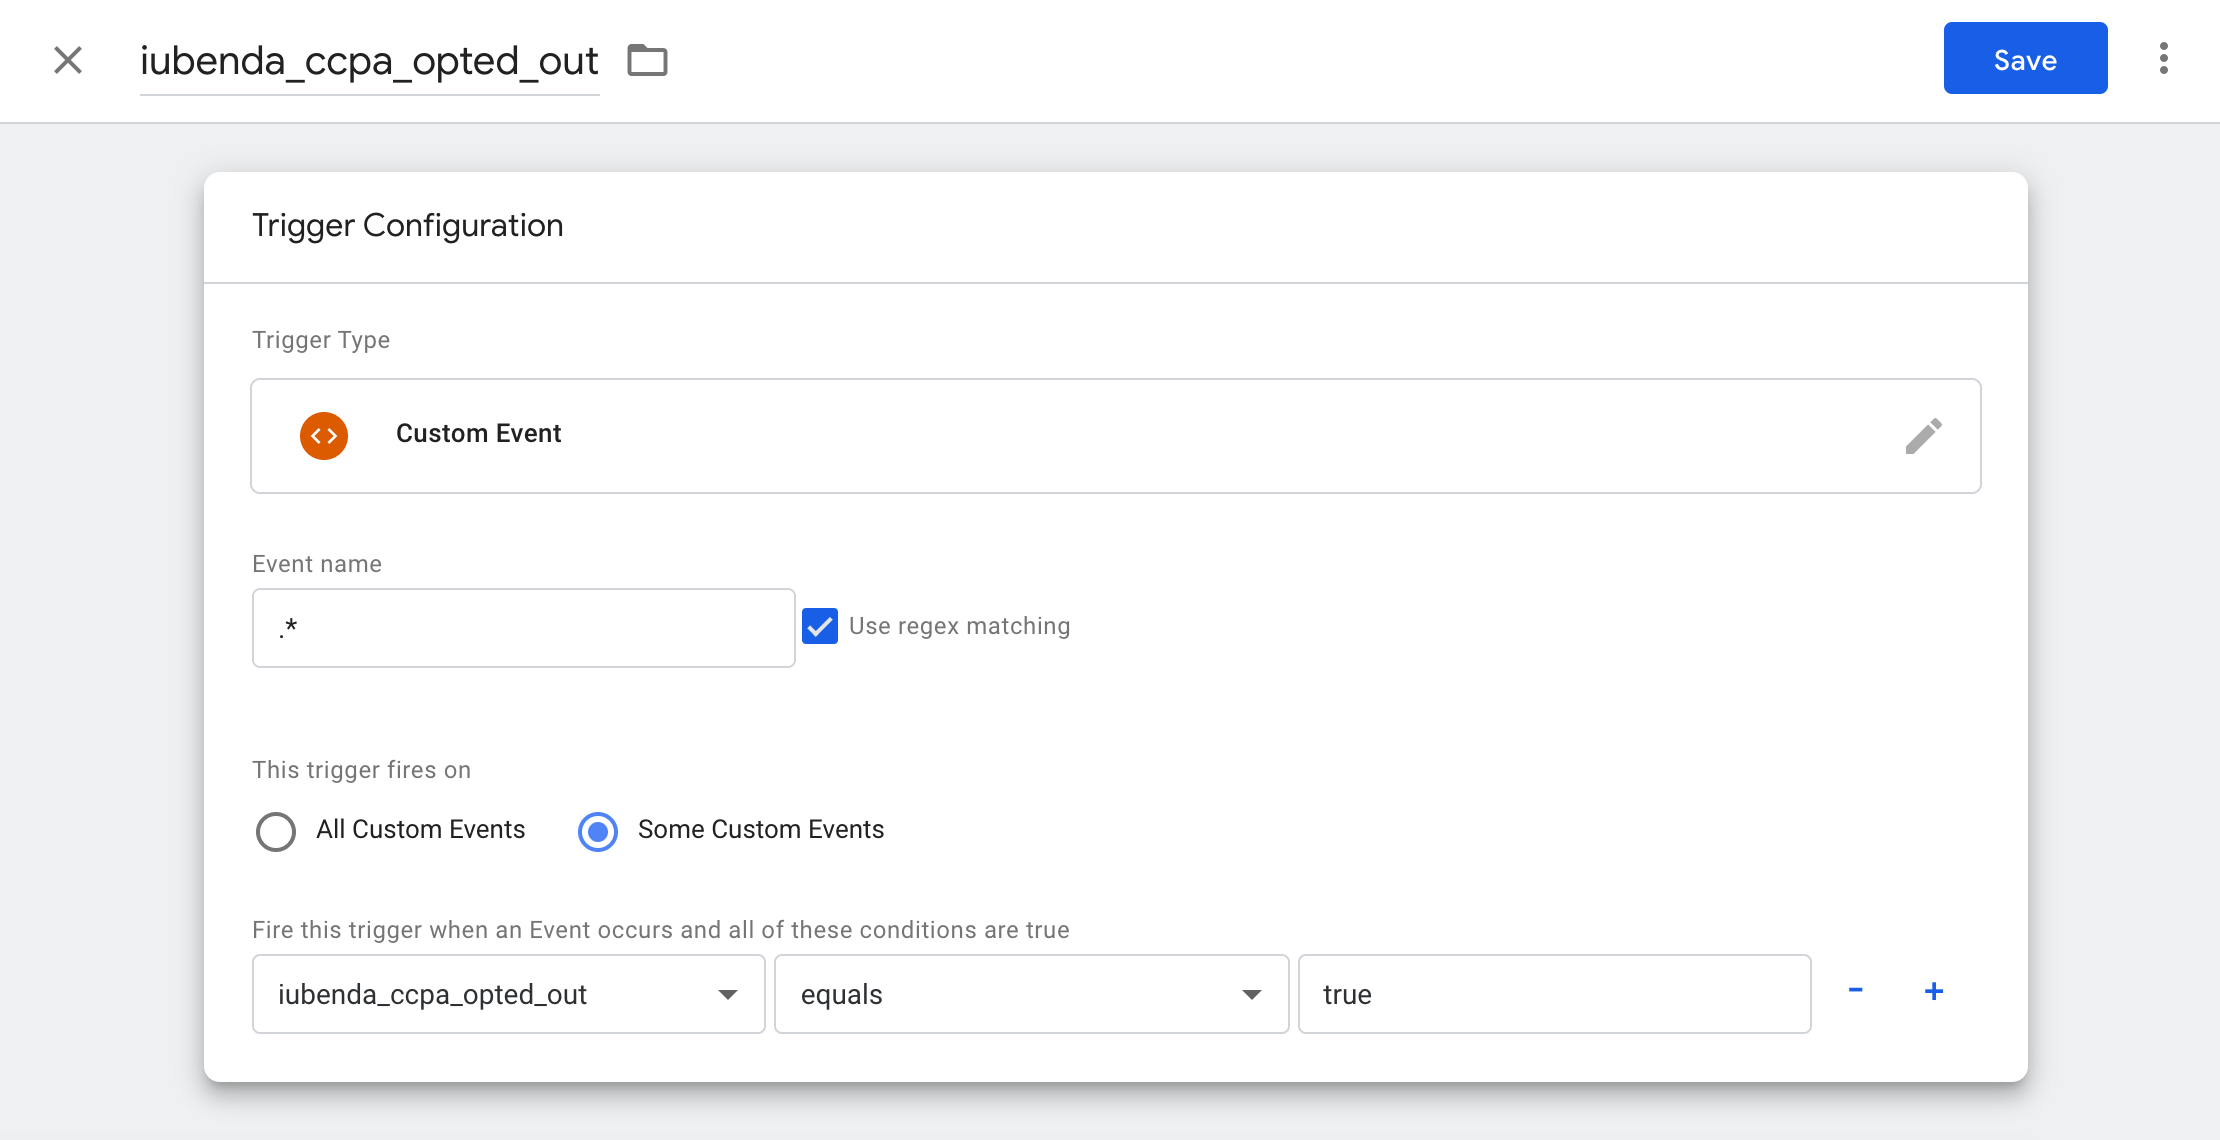
and click Save.
In the end, your Google Analytics: GA4 Configuration tag will look like this:

Click on Save to save the tag.
There’s no harm in adding both the iubenda_consent_given and iubenda_consent_given_purpose_4 triggers, even if you don’t use the per-category consent feature. Setting both now will prevent you from editing all your tags if you decide to enable that feature in the future.
By setting up this rule, Google Tag Manager will activate the Google Analytics GA4 Configuration tag that we’ve created above, only when this rules are true. That means that it will fire every time Google Tag Manager receives an event with the value iubenda_consent_given or iubenda_consent_given_purpose_4 or iubenda_preference_not_needed.
Note
- The previous example assumes that you’re firing the tag on all pages of your site, if you’d like to have a tag fire on just one page (eg. Shopping Cart page) see the advanced section here.
- On adding multiple containers on the same page: Google recommends to keep the number of containers on the page minimal for the best performance. If you take advantage of it (e.g. creating a container for each purpose when using per-category consent), ensure that you use the same
dataLayername on all containers as explained here. - Remember, if you’d like to track more than one event on the same page (eg. Tracking page views as well as a form submission), you’ll need to create the additional tags and specify the tracking type. See the specifics in the advanced section here.
Install Google Tag Manager on your own site
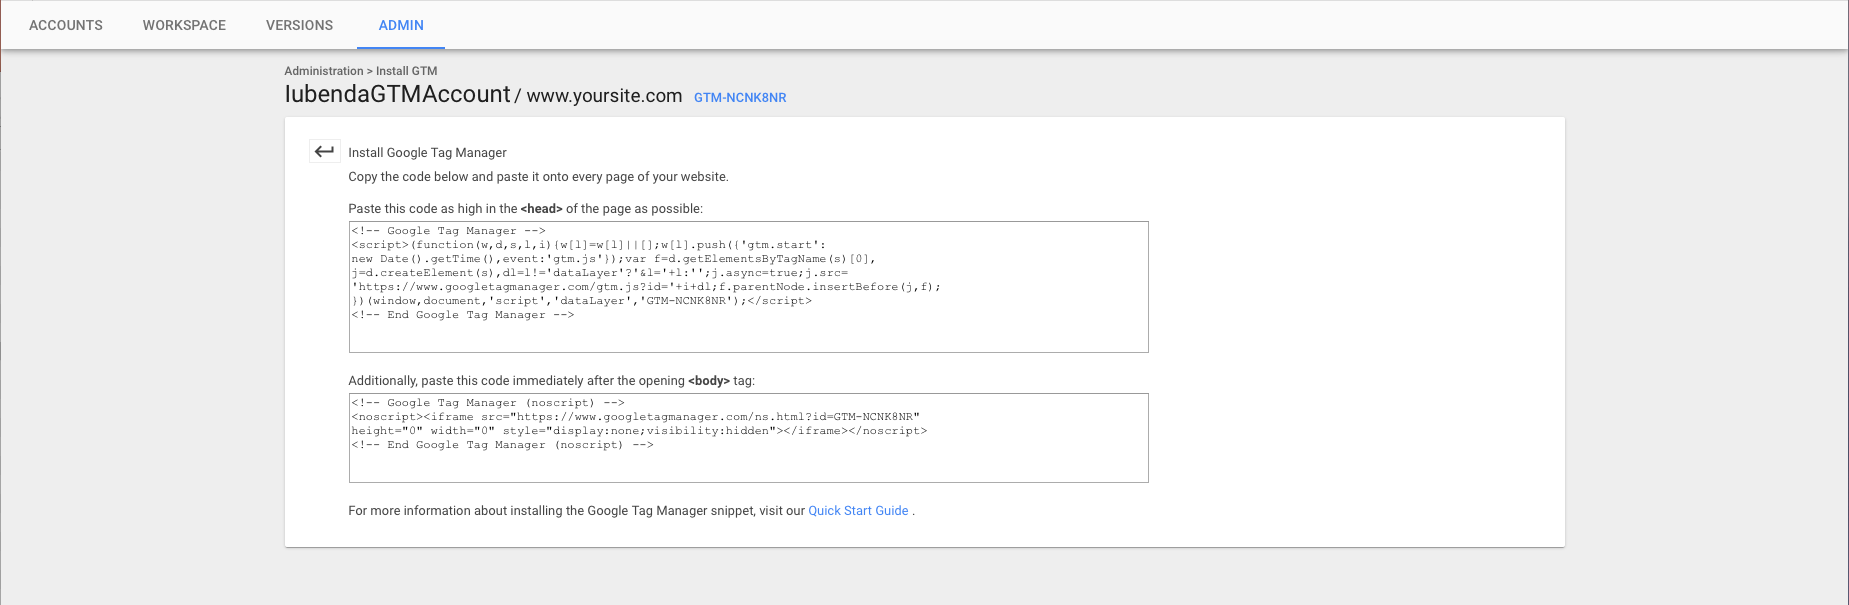
To install Google Tag Manager please visit the GTM admin, copy the code that Google provides and insert it into all the pages of your own website as per the instructions provided – if you’re using a CMS that pulls the page header from one header template file (eg. header.php), then simply pasting it in that file should be enough.
Note: you’ll need to remove your own Google Analytics code.
Google Analytics will be activated automatically by the Google Tag Manager script only after the user/visitor consents to the use of cookies.
Install the iubenda script
Go to your iubenda dashboard > [your website] > Privacy Controls and Cookie Solution, click on the Embed button to get to the embed section:
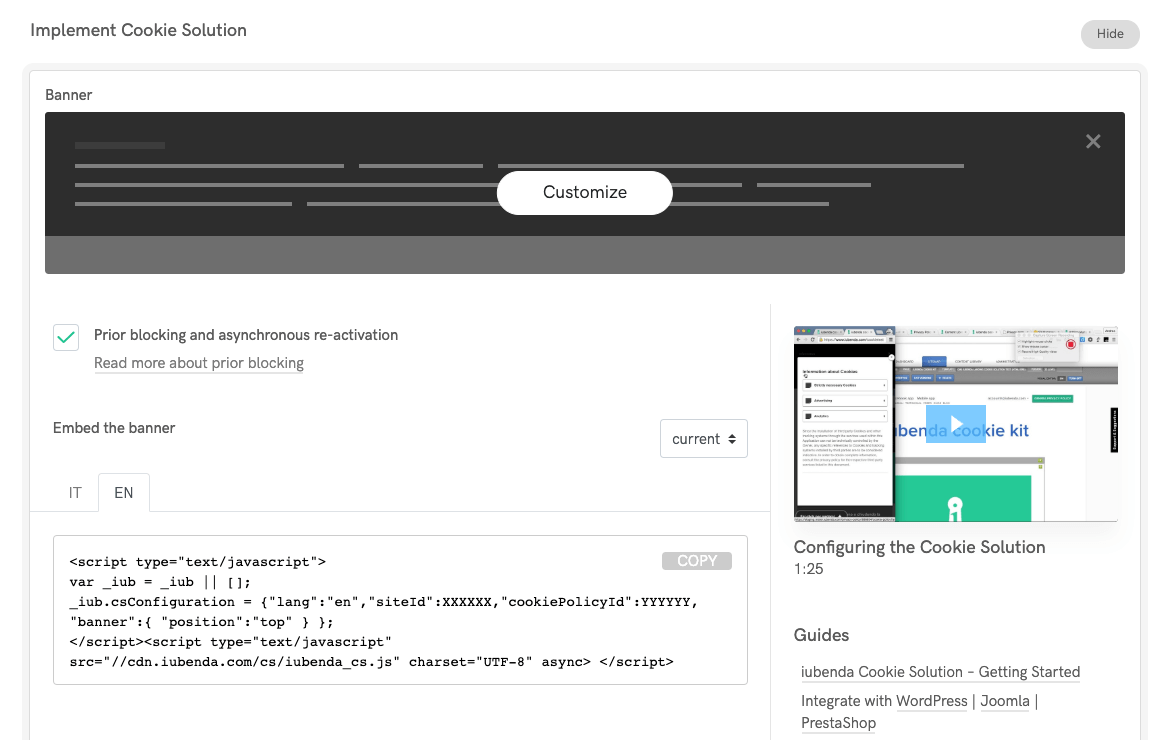
and retrieve the code to your cookie banner (if you haven’t already activated the Privacy Controls and Cookie Solution, then simply click on Activate, set up then head to the embed section to retrieve the code as described).
Now, your code will look something like the following:
<script type="text/javascript">
    var _iub = _iub || [];
    _iub.csConfiguration = {
        "lang": "en",
        "siteId": XXXXXX, //use your siteId
        "cookiePolicyId": YYYYYY, //use your cookiePolicyId
        "banner": {
            "position": "float-top-center",
            "acceptButtonDisplay": true,
            "customizeButtonDisplay": true
        }
    };
</script>
<script type="text/javascript" src="//cdn.iubenda.com/cs/iubenda_cs.js" charset="UTF-8" async></script>
It has to be edited as follows:
<script type="text/javascript">
    var _iub = _iub || [];
    _iub.csConfiguration = {
        "lang": "en",
        "siteId": XXXXXX, //use your siteId
        "cookiePolicyId": YYYYYY, //use your cookiePolicyId
        "banner": {
            "position": "float-top-center",
            "acceptButtonDisplay": true,
            "customizeButtonDisplay": true
        },
        "callback": {
                  onPreferenceExpressedOrNotNeeded: function (preference) {
                    dataLayer.push({
                      iubenda_ccpa_opted_out: _iub.cs.api.isCcpaOptedOut(),
                    });

                    // preferences parameter may be undefined if both GDPR and LGPD do not apply
                    // we may need the line below to find USPR preferences instead of relying
                    // on preferences parameter
                    var otherPreferences = _iub.cs.api.getPreferences();

                    if (otherPreferences) {
                      var usprPreferences = otherPreferences.uspr;
                      if (usprPreferences) {
                        for (var purposeName in usprPreferences) {
                          if (usprPreferences[purposeName]) {
                            dataLayer.push({
                              event: 'iubenda_consent_given_purpose_' + purposeName,
                            });
                          }
                        }
                      }
                    }

                    if (!preference) {
                      dataLayer.push({
                        event: 'iubenda_preference_not_needed',
                      });
                    }
                    else if (preference.consent === true) {
                      dataLayer.push({
                        event: 'iubenda_consent_given',
                      });
                    }
                    else if (preference.consent === false) {
                      dataLayer.push({
                        event: 'iubenda_consent_rejected',
                      });
                    }
                    else if (preference.purposes) {
                      for (var purposeId in preference.purposes) {
                        if (preference.purposes[purposeId]) {
                          dataLayer.push({
                            event: 'iubenda_consent_given_purpose_' + purposeId,
                          });
                        }
                      }
                    }
                  }
        }
    };
</script>
<script type="text/javascript" src="//cdn.iubenda.com/cs/iubenda_cs.js" charset="UTF-8" async></script>
We have therefore added a callback that, at the moment consent is given by the user, calls the code by Google Tag Manager to unlock the event we’ve set up for the activation of Google Analytics.
Now that we’ve adapted the code for the integration with Google Tag Manager, we’ll include it into our pages before the closing of the BODY tag.
If you’re all done, jump directly to Publish otherwise, read on for Advanced Configuration (these settings allow you to accelerate the activation of the tags, fire tags only on specific pages and set multiple tracking types on the same page by adding additional parameters to your GTM configuration).
Advanced Configurations
In this section, we’ll be using “Variables” and “Trigger Exceptions” to get even more specific. Google Tag Manager allows variables to be created and for exceptions to be set into the trigger conditions of the tag.
You can think of exceptions as “blocking triggers”. For example, if you’d only like your Google Analytics tag to fire on your shopping cart page, you can set an exception to the firing rule that states that the tag does not fire on any page that is not your shopping cart page; setting this exception, blocks the tag from firing on pages other than the shopping cart page. Similarly, you can set a trigger to only fire if conditions related to a particular variable are met.
In this way, both variables and exceptions allow for greater flexibility in your tag management (you can read what Google has to say about exceptions here and variables here).
As mentioned above, if you’d only like your Google Analytics tag to fire on your shopping cart page, you can set an exception to the firing rule that states that the tag does not fire on any page that is not your shopping cart page. Here’s how to do this:
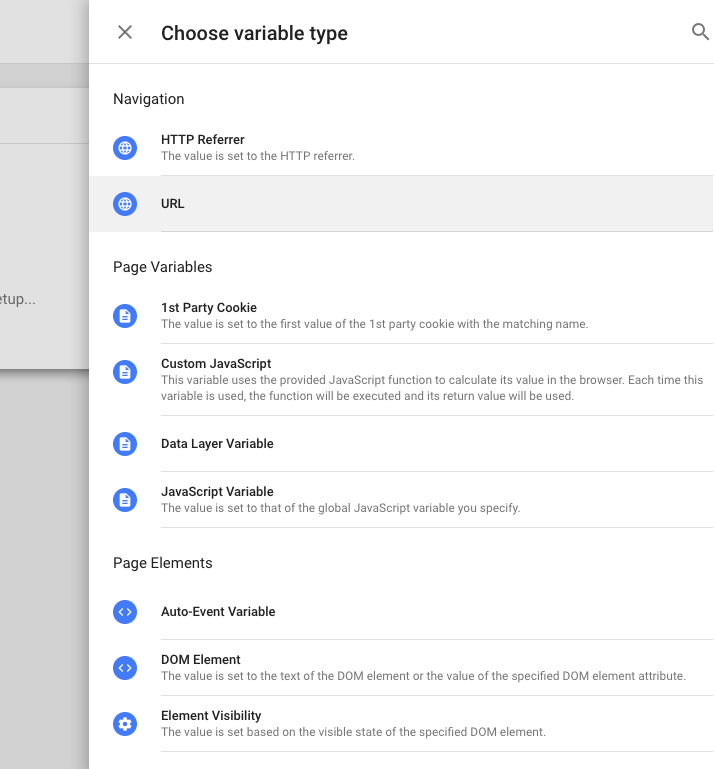
Create a Page URL variable (click on “Variables” in the left panel, then “New Variable”). Next click within the variable configuration box to choose the variable type, then select URL.
Now click save and name the variable something related to the page you want the tag to fire on. In our example, we’ve named the variable “Shopping Cart”.
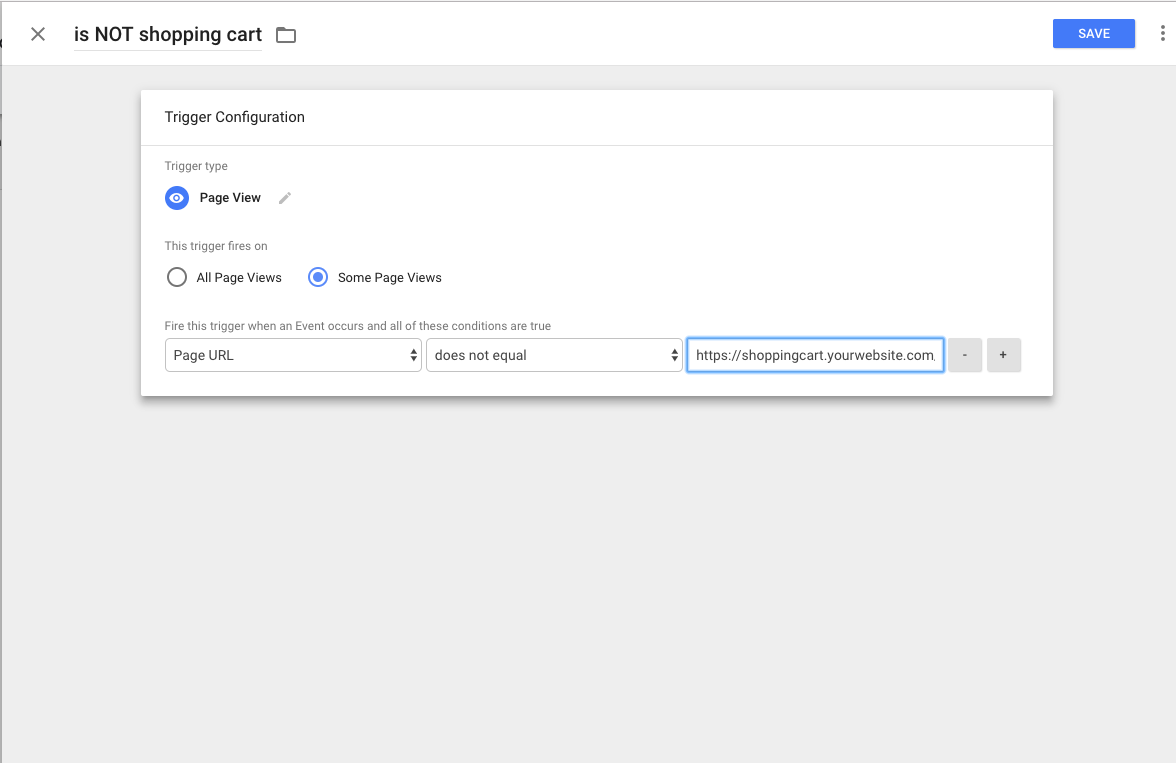
Next, create the new blocking trigger or Exception you’d like to add (click on “Triggers” in the left panel, then “New”). Try to name your exception something relevant. In this example we’ve named ours: “is NOT shopping cart”
Next click within the trigger configuration box to choose the trigger type, in this case “Page View”.
- Now select the “Some Pages” option.
- Indicate the variable (in this case the “Shopping Cart” variable we just created) as the associated variable and configure: “does not equal”* and type in your page url as an activation condition (eg. https://shoppingcart.yourwebsite.com)
*One other option here is to select “starts with” (instead of “does not equal”) if you want the tag to fire on pages that start with the shopping cart url etc. You can configure the settings here in the way that best fits your particular site.
Click Save.
Lastly, go back to your tag and in addition to the “iubenda consent given” activator, you also need to associate the exception that we just created. You can do this by clicking on the pencil in the “Triggering” section,
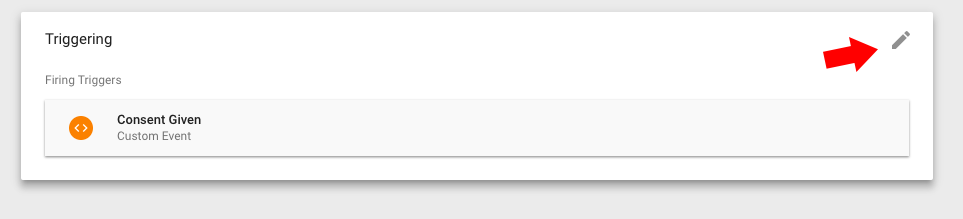
then click on the “Add Exception” link that appears.
Next select the exception we just created, save and you’re done! Now the tag will still only fire after consent to cookies is attained (as legally required) but will not fire on pages that are not your “Shopping Cart” page.

If you’d like to track more than one event on the same page (eg. tracking page views as well as a purchase form submission), you’ll need to create the additional tags and specify the varied tracking type. While setting multiple tracking types is simple to do in Tag Manager, in order to comply with the law, you must make sure that the other triggering events only occur after consent has been received. Here’s how to do this:
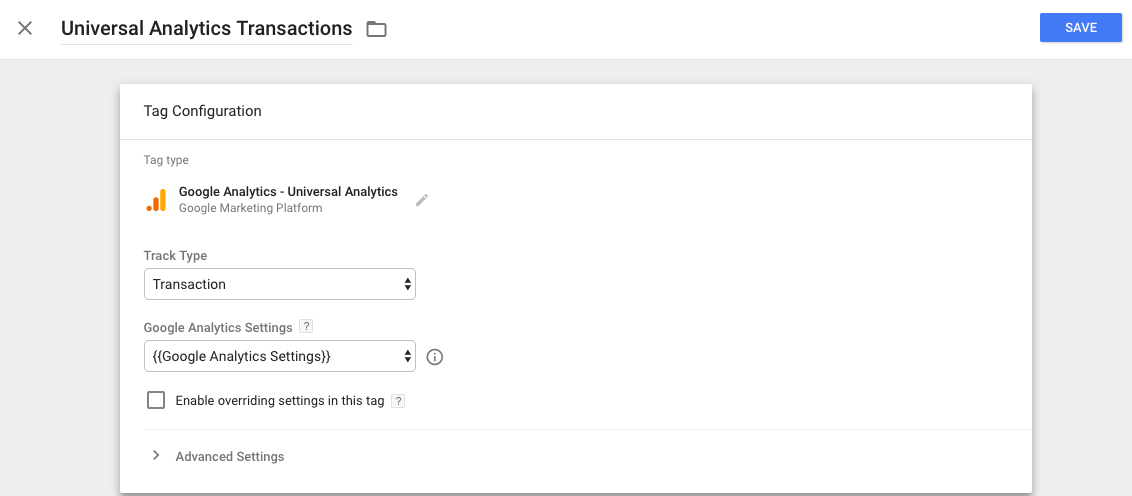
For this example, let’s assume that in addition to tracking page views in Google Analytics (as set in the tag we created in the first section), you’d like to track transactions as well.
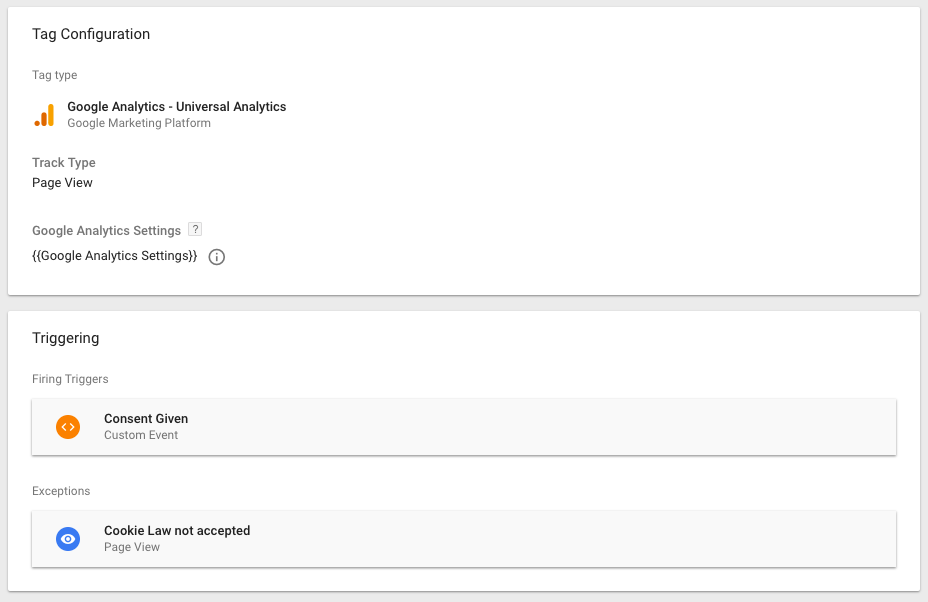
In order to do that, we’ll need to create another Google Analytics tag, set the Track type as “Transaction”, and click save (you can name this something descriptive like “Universal Analytics Transactions”).
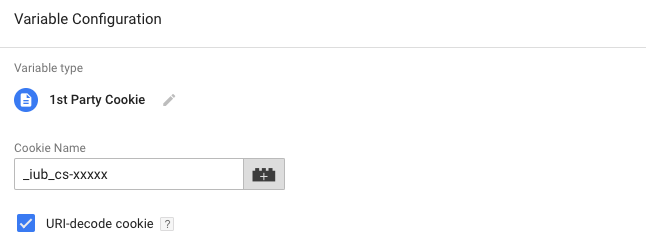
Next, create a first-party cookie variable (click on “Variables” in the left panel and add a new custom variable)
- Specify the variable’s name in the following format: “_iub_cs-XXXXXX” (XXXXXX will have to be substituted with your own cookiePolicyId number).
- Select the following option: “URI-Decode cookie”.
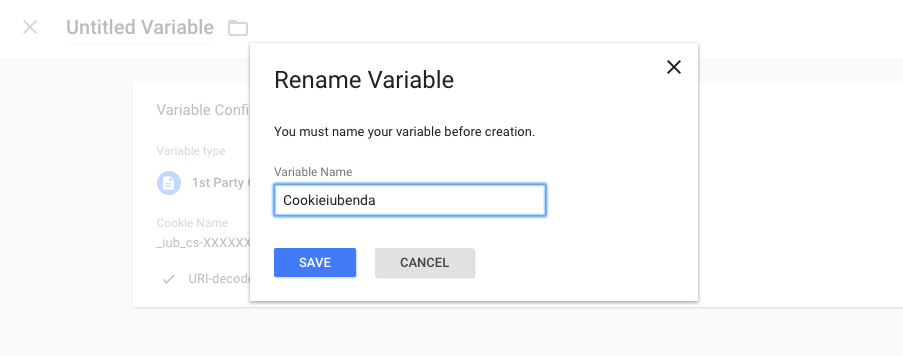
Hit the “Save” button and name this something like “Cookieiubenda”
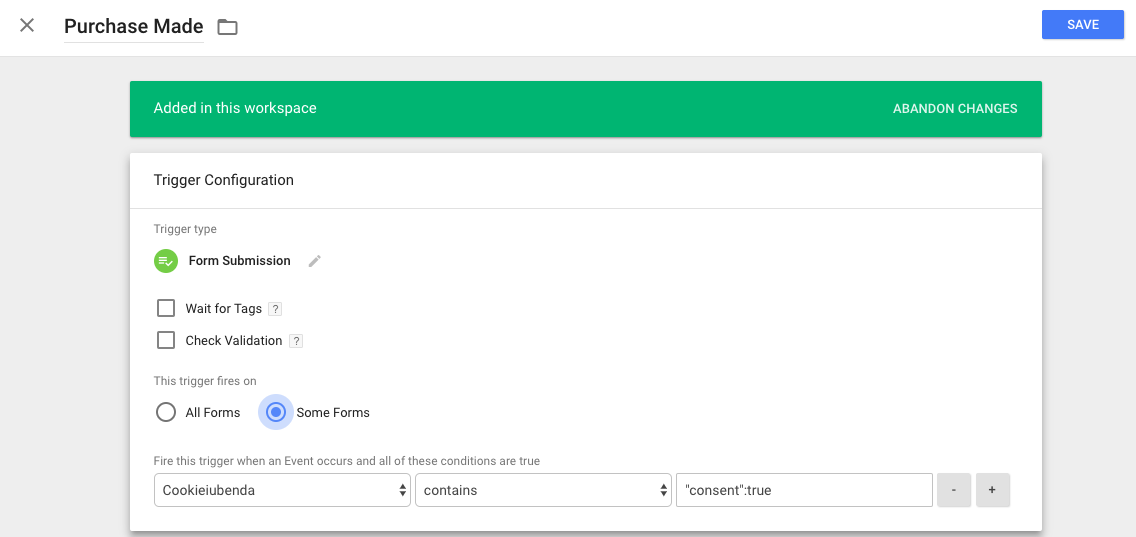
Next, create the new trigger you’d like to add: eg. “Purchase Made”; type “Form submission”.
- Now select the option that starts “Some” – so in the case of “Form submission” example above, we’ll need to select “Some Forms” (as see picture below).
- Indicate the iubenda cookie (the variable you just created) as the associated variable and configure: “contains” and “consent”:true as an activation condition
Per-category consent
If you’ve set perPurposeConsent to true, the “Cookieiubenda” variable will not contain the value “consent”:true, but the values referred to the single accepted purposes (i.e. “1”:true, “2”:true, “3”:true, “4”:true etc). Adapt the suggested steps accordingly.
Lastly, go back to your “Universal Analytics Transaction” tag and associate the trigger that we just created. You can do this by clicking in the “Triggering” section and simply selecting the “Purchase Made” trigger that we just created.
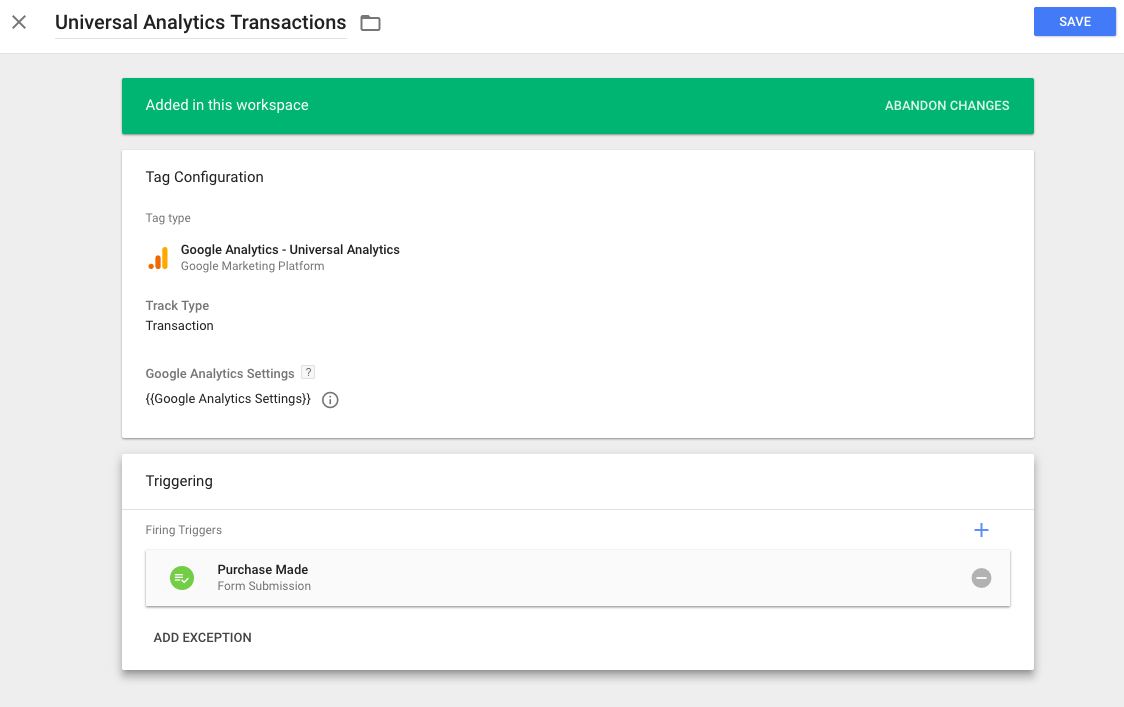
Save and you’re done!
Note: if you’d like the transaction tracking to only occur on one page (eg. shopping cart page), see the tutorial on how to do this in the tutorial in the first tab of this section.
It’s possible to activate the Tags more quickly by modifying two additional parameters in GTM as such:
Create a first-party cookie variable (click on “Variables” in the left panel and add a new custom variable)
- Specify the variable’s name in the following format: “_iub_cs-XXXXXX” (XXXXXX will have to be substituted with your own cookiePolicyId).
- Select the following option: “URI-Decode cookie”.
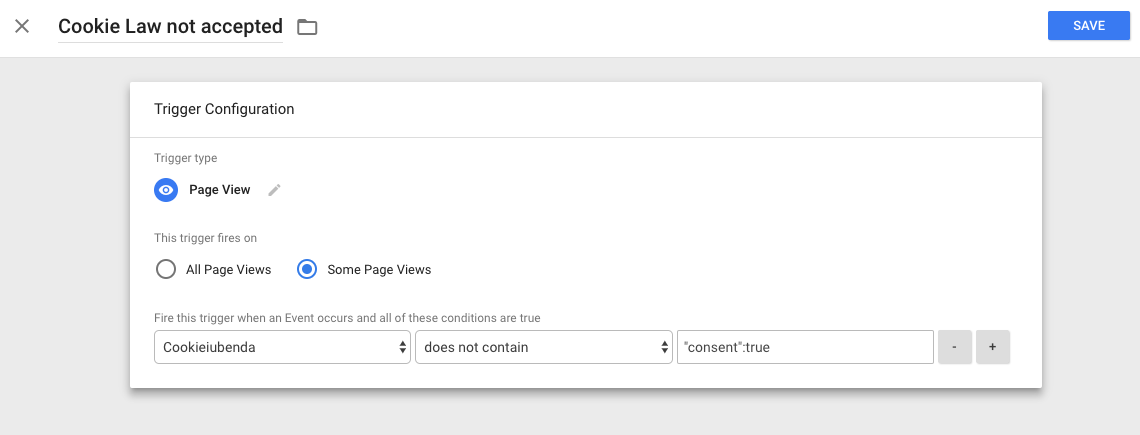
Next, create a new trigger: “Cookie Law not accepted”; type “Page View”, this new trigger will allow for the presence of iubenda’s cookie to be treated as an exception:
- select “Some Page Views”
- Indicate the iubenda cookie (the variable you just created) as the associated variable and configure: “does not contain” and “consent”:true as an activation condition (see picture below):
Lastly, go back to your tag and in addition to the “iubenda consent given” activator, you also need to associate the exception that we just created. You can do this by clicking on the pencil in the “Triggering” section,
then click on the “Add Exception” link that appears. Now select the trigger we just created and simply save.
Note
When implementing this advanced configuration remember that were the cookiePolicyId to be modified, the modification would also have to be applied in the configuration. For a correct configuration, it is not necessary nor advantageous to include iubenda code through GTM.
Source: tagmanageritalia.it/guida-base-gestire-la-cookie-law-di-iubenda-con-google-tag-manager
Publish a container
If you previously jumped to the Advanced Section direction right after creating and configuring your Tag and Triggers, please be sure to install Google Tag Manager on your own site and install the iubenda script BEFORE continuing to the Publish section below.
After having set up the rules, you’ll want to publish the container to make the modifications LIVE on your website:
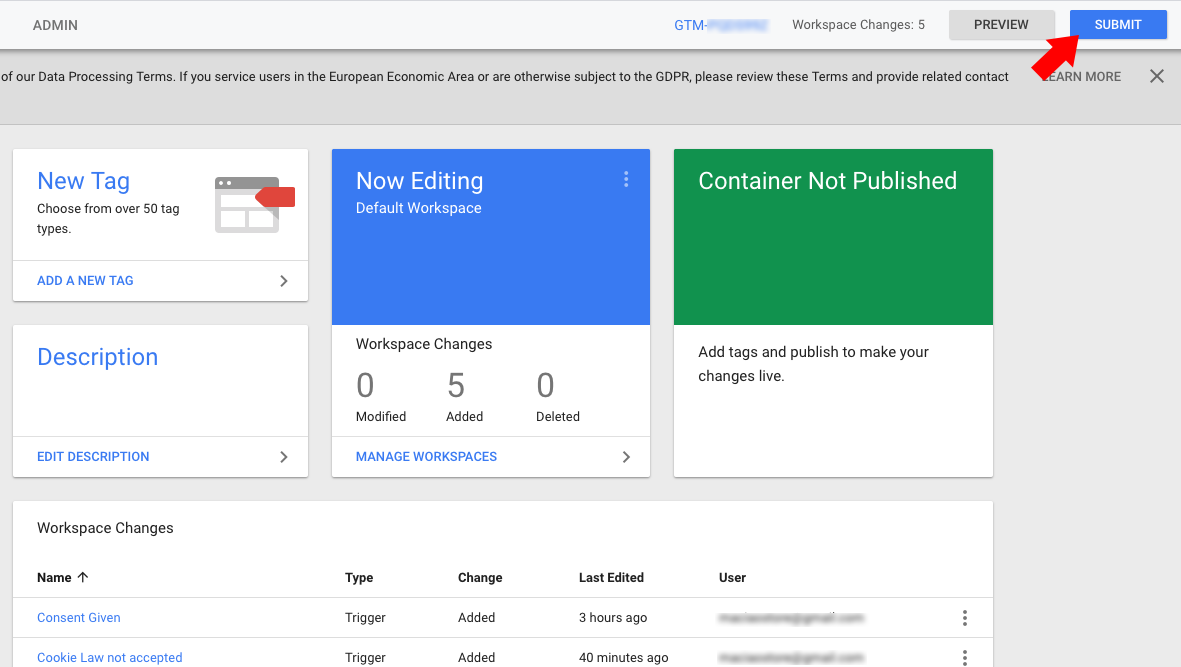
This is done by clicking the button called SUBMIT on the upper right side of the container overview page, then confirm.
These examples can be reused for any other scripts or JavaScript function.