Google Consent Mode: With Google Tag Manager (GTM), you can simplify the process of tag configuration by using pre-configured templates created specifically for your GTM configuration.
In the GTM Gallery you can choose from a library of templates that you can easily add to your installation.
⏰ Short on time? Jump straight to How To Start!
What Is Google Tag Manager?
Google Tag Manager (GTM) is a powerful tool used for efficiently managing website tracking codes, commonly referred to as GTM tags. But what is GTM, and how can you use it to your advantage?
What is GTM?
GTM stands for Google Tag Manager, a free tool offered by Google. GTM tags are snippets of code that serve various purposes, such as collecting data and facilitating communication between your website or app and external analytics and marketing platforms.
What is Google Tag Manager Used For?
Google Tag Manager is primarily used for simplifying and centralizing the management of these tags on your website or app. It eliminates the need for manual code implementation, streamlining the process and reducing the risk of errors. It’s a versatile tool that helps you manage and deploy tags more efficiently.
How to Use Google Tag Manager:
- Code Installation: GTM provides a container-specific code snippet. Insert this code into your website or app’s header or body section, as required by the tags you wish to implement.
- Tag Implementation: Begin adding tags to your container. These tags can include tracking codes for various tools, such as Google Analytics, Google Ads, and more. GTM offers pre-built templates to simplify this process.
- Trigger Definition: Determine when and where your tags should activate by creating triggers. Customize triggers based on specific events or conditions, such as user interactions or page views.
- Variable Creation: Variables are used to store and retrieve data for tags and triggers. You can use existing variables or create custom ones to capture dynamic data.
- Preview and Debug: Before making your changes live, use GTM’s preview and debug mode to test your tags and ensure they function correctly.
- Publish Your Container: Once you’re satisfied with your setup and testing, publish your container. This action makes your changes live on your website or app.
How to Set Up Google Tag Manager
Important
This guide specifically explains how to integrate Google Consent mode with the iubenda Privacy Controls and Cookie Solution template. However, if you prefer to set up Google Consent mode without using the template, you can follow this guide.
If you’re looking to simplify the blocking of cookies and trackers using Google Tag Manager together with the auto-blocking feature, it’s important to note that the related snippet cannot be loaded directly via GTM. However, you can still refer to the following guide to streamline the cookie-blocking process using GTM.
By using the Google Tag Manager Template, you can automate the following tasks:
- Adding the cookie banner script to your website.
- Managing Google Consent Mode (GCM) automatically for tags that are natively compatible with Google Consent Mode, such as Google Analytics, AdSense, Floodlight, and Conversion Linker. Currently, the template allows you to manage prior consent for Custom HTML tags using the ‘additional consent checks’ feature in a few simple steps.
- Emit GTM Events – when enabled, iubenda automatically sends the event
iubenda_gtm_consent_eventto GTM whenever user preferences change.- This option is particularly useful if you’re using Custom HTML tags (e.g. Facebook Pixel, Hotjar, LinkedIn Insight Tag) that need to fire only after consent.
- ➡️ For built-in GTM tags (Google Analytics, Ads, Floodlight, Conversion Linker), this option is not required, since they already support native consent checks.
How To Start
First, you have to create a GTM account and set up a container.
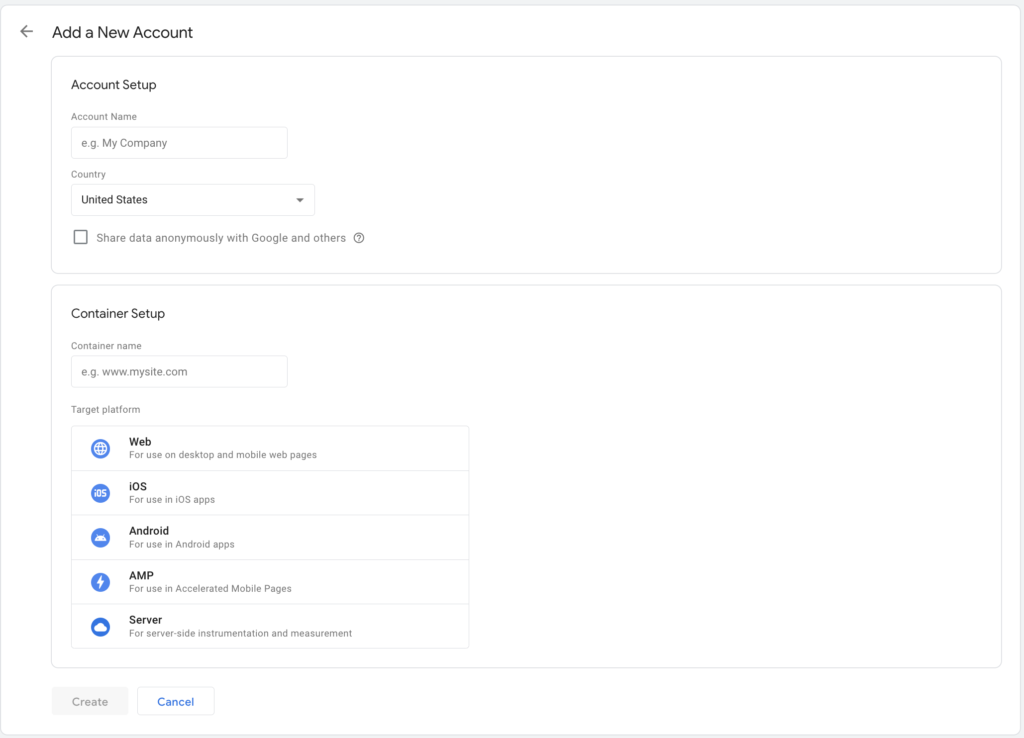
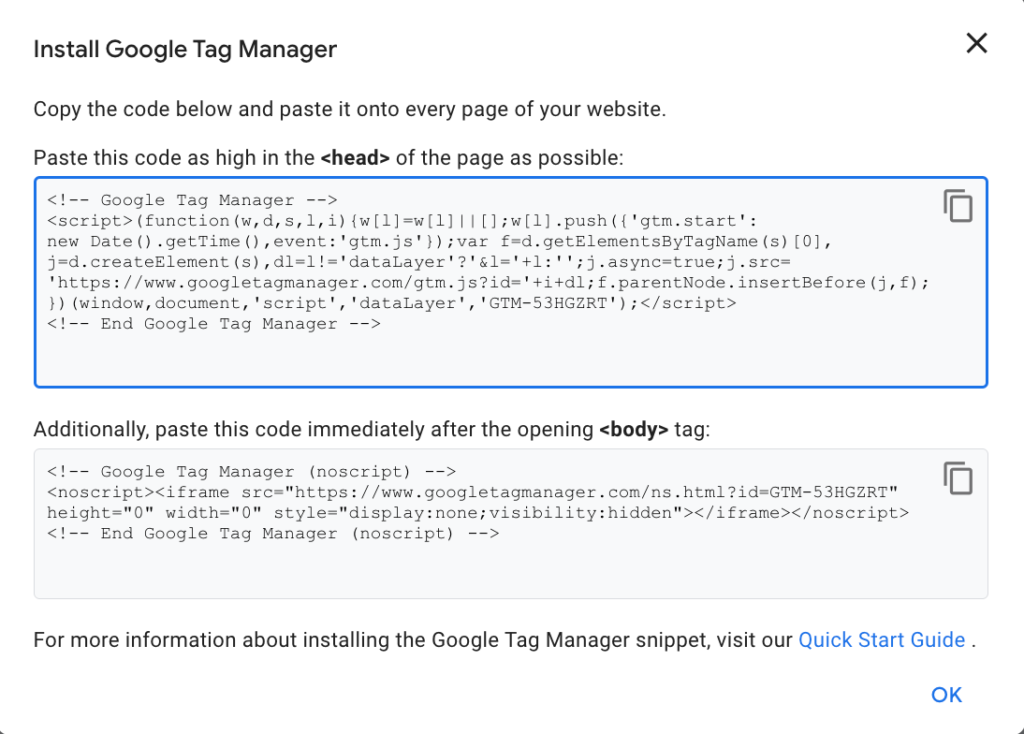
Then, you’ll be required to paste the GTM snippet into your website’s <head> section.
Finally, you’ll reach the GTM dashboard.
Adding iubenda Privacy Controls and Cookie Solution template
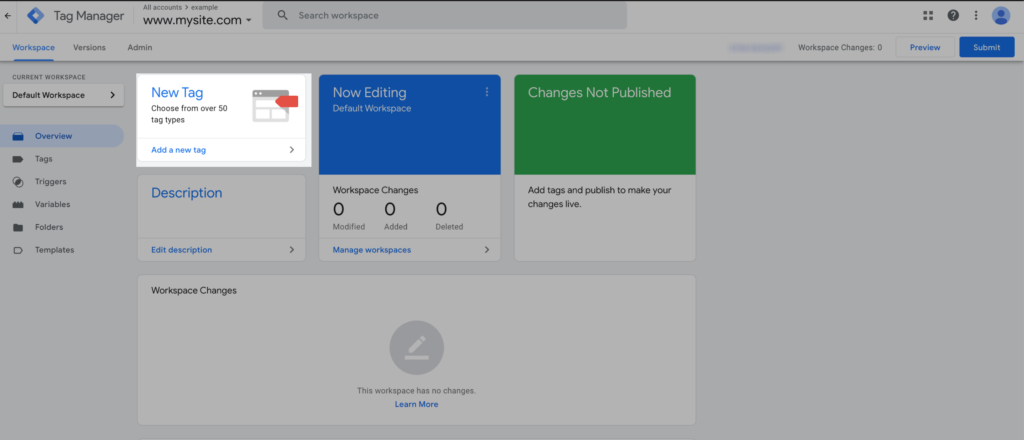
Once in the dashboard, click on Add a new tag.

Then, click on the Tag configuration area, select “Discover more tag types in the Community Template Gallery”, click on the magnifier icon, and search: iubenda
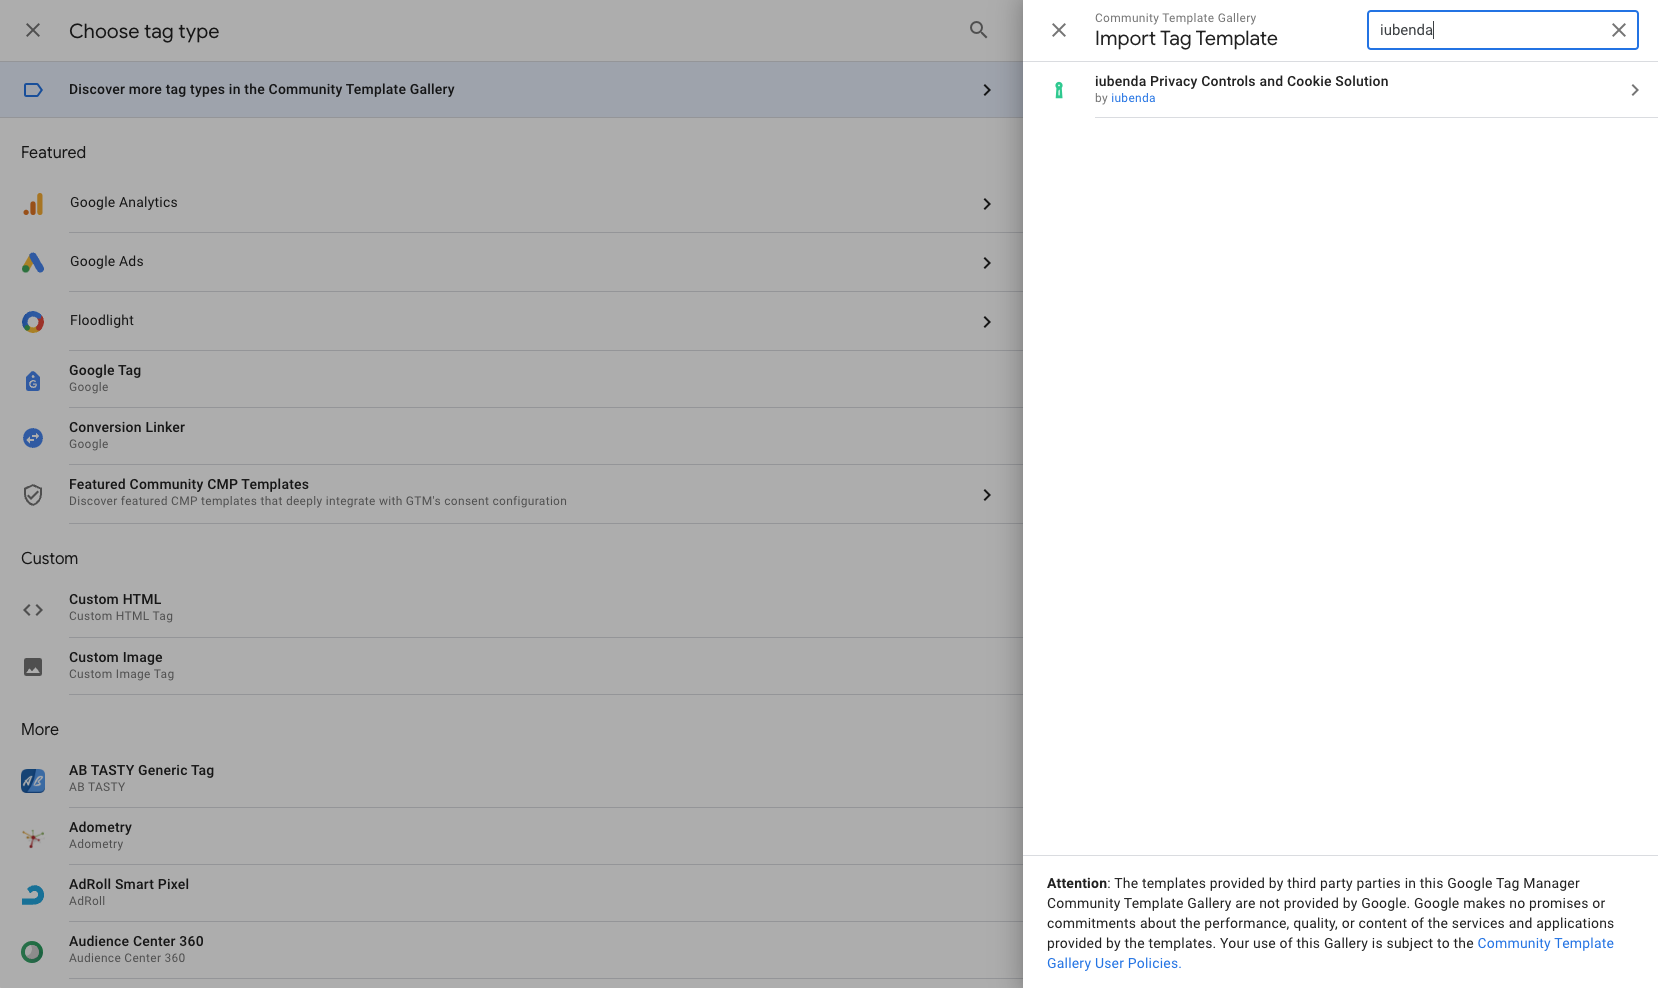
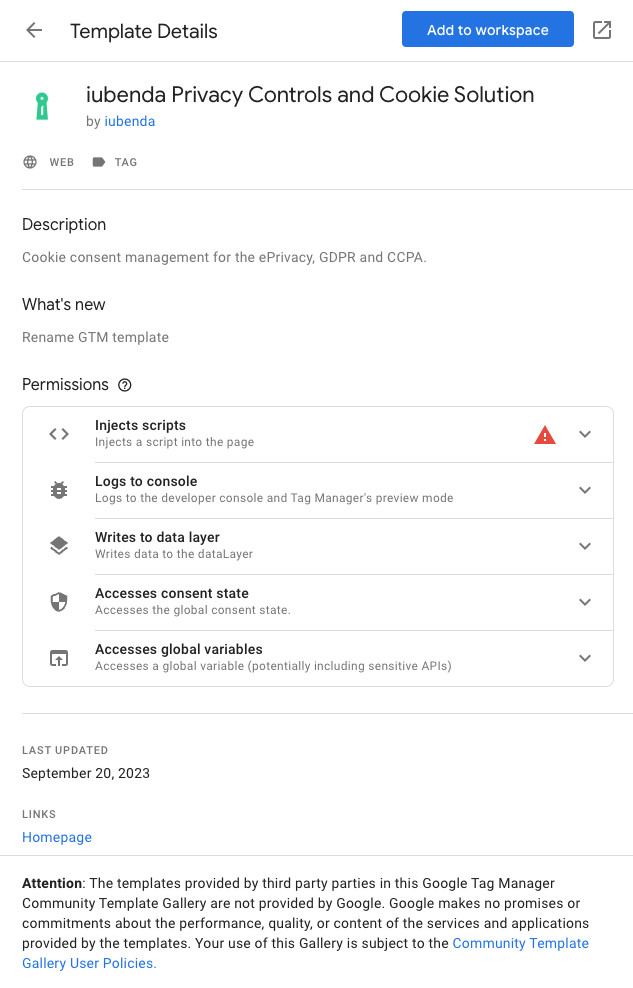
Select “iubenda Privacy Controls and Cookie Solution” and click “Add to workspace” to add it to your GTM installation.
Adding iubenda Privacy Controls and Cookie Solution template (manual method)
Import the template
Before setting up the template, you need to import it. Here’s how:
- Download the template from here
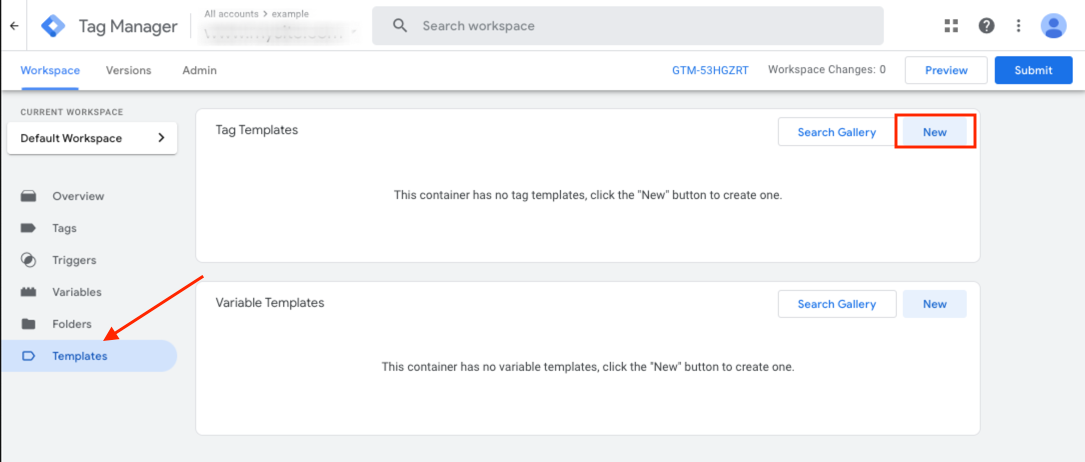
- On your GTM dashboard, click on Templates
- Under Tag Templates, click on “New.”

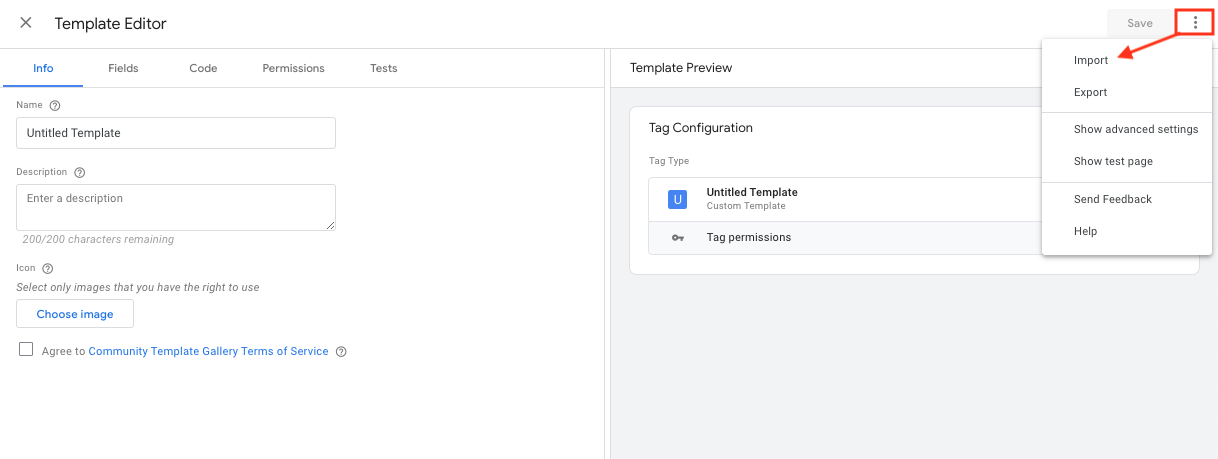
- Click on the three dots icon at the top right of the page and select Import.

- Unzip the file you downloaded and select the template.tpl file from the folder
- Click on Save at the top right of the page and close the template editor
Add the tag
Once back in the dashboard, click on Add a new tag.
Then, click on the Tag configuration area, scroll down to the Custom section, and click on iubenda Privacy Controls and Cookie Solution to add it to your GTM installation.
Tag Configuration
Once you have added the template, you will get to the Tag configuration page.
Here you will have to:
1. Set the default consent options
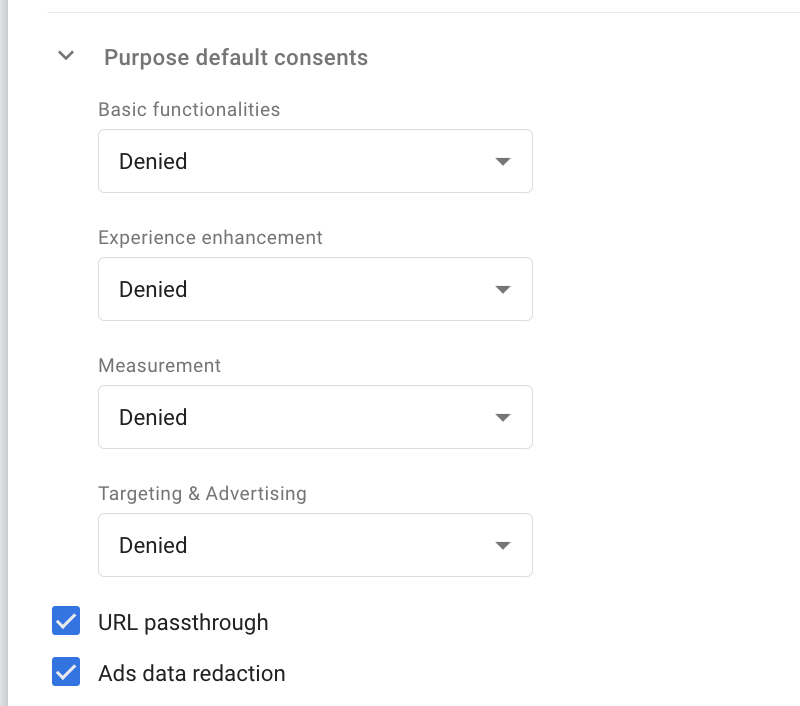
The defaults are all set to Denied to ensure the best privacy protection for your users.
We suggest being extremely careful in modifying such parameters to ensure they align with best practices for obtaining user consent through positive action.
For more information about Consent types, you can check the Google official documentation here.
Optional parameters
- URL passthrough is an optional parameter, useful to improve the quality of your measurements when
ad_storageisdenied(Targeting & Advertising purpose). It can be used to send event and session-based analytics (including conversions) without cookies across pages. - Ads data redaction is a parameter that allows redacting Ad click identifiers sent in network requests by associated Google Ads and Floodlight when
ad_storageisdenied.
You can see the official Google Tags documentation for further information about these parameters.
2. Privacy Controls and Cookie Solution embedding
There are now two main auto-embedding options for integrating the Privacy Controls and Cookie Solution in Google Tag Manager (GTM):
- Option 1: Unified Snippet (With remote configuration active) – 🎖️ Recommended option
- Option 2: Extended Snippet (Used when remote configuration is not active)
Additionally, manual embedding is still available as an alternative.
Auto embedding
Option 1: Unified Snippet (With Remote Configuration)
When remote configuration is enabled, the method uses the unified snippet. This option allows you to manage the Privacy Controls and Cookie Solution settings remotely, this means, updates and changes made in the Privacy Controls and Cookie solution will automatically apply to your website without needing to re-embed the snippet and republish in GTM.
- How it works:
- When remote configuration is enabled, the unified snippet is used. This short snippet points to a URL hosted remotely by iubenda.
- The advantage of this method is that any updates made in your iubenda Dashboard (e.g. changes to the banner design, TCF tile, or support for US laws) will automatically reflect on your website without needing to update the GTM configuration or republish the container.
- Steps to embed using the unified snippet (with remote configuration):
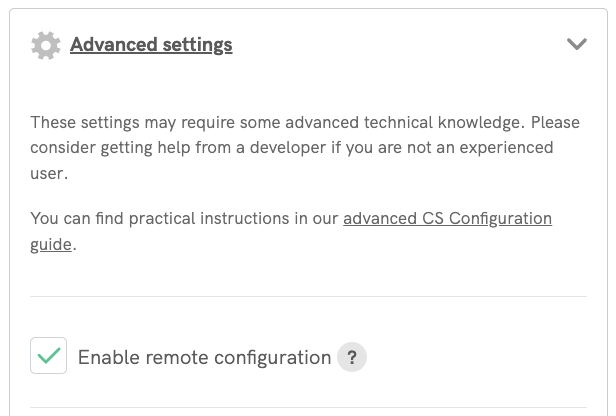
- In the Privacy Controls and Cookie Solution settings, you should have enable remote configuration.
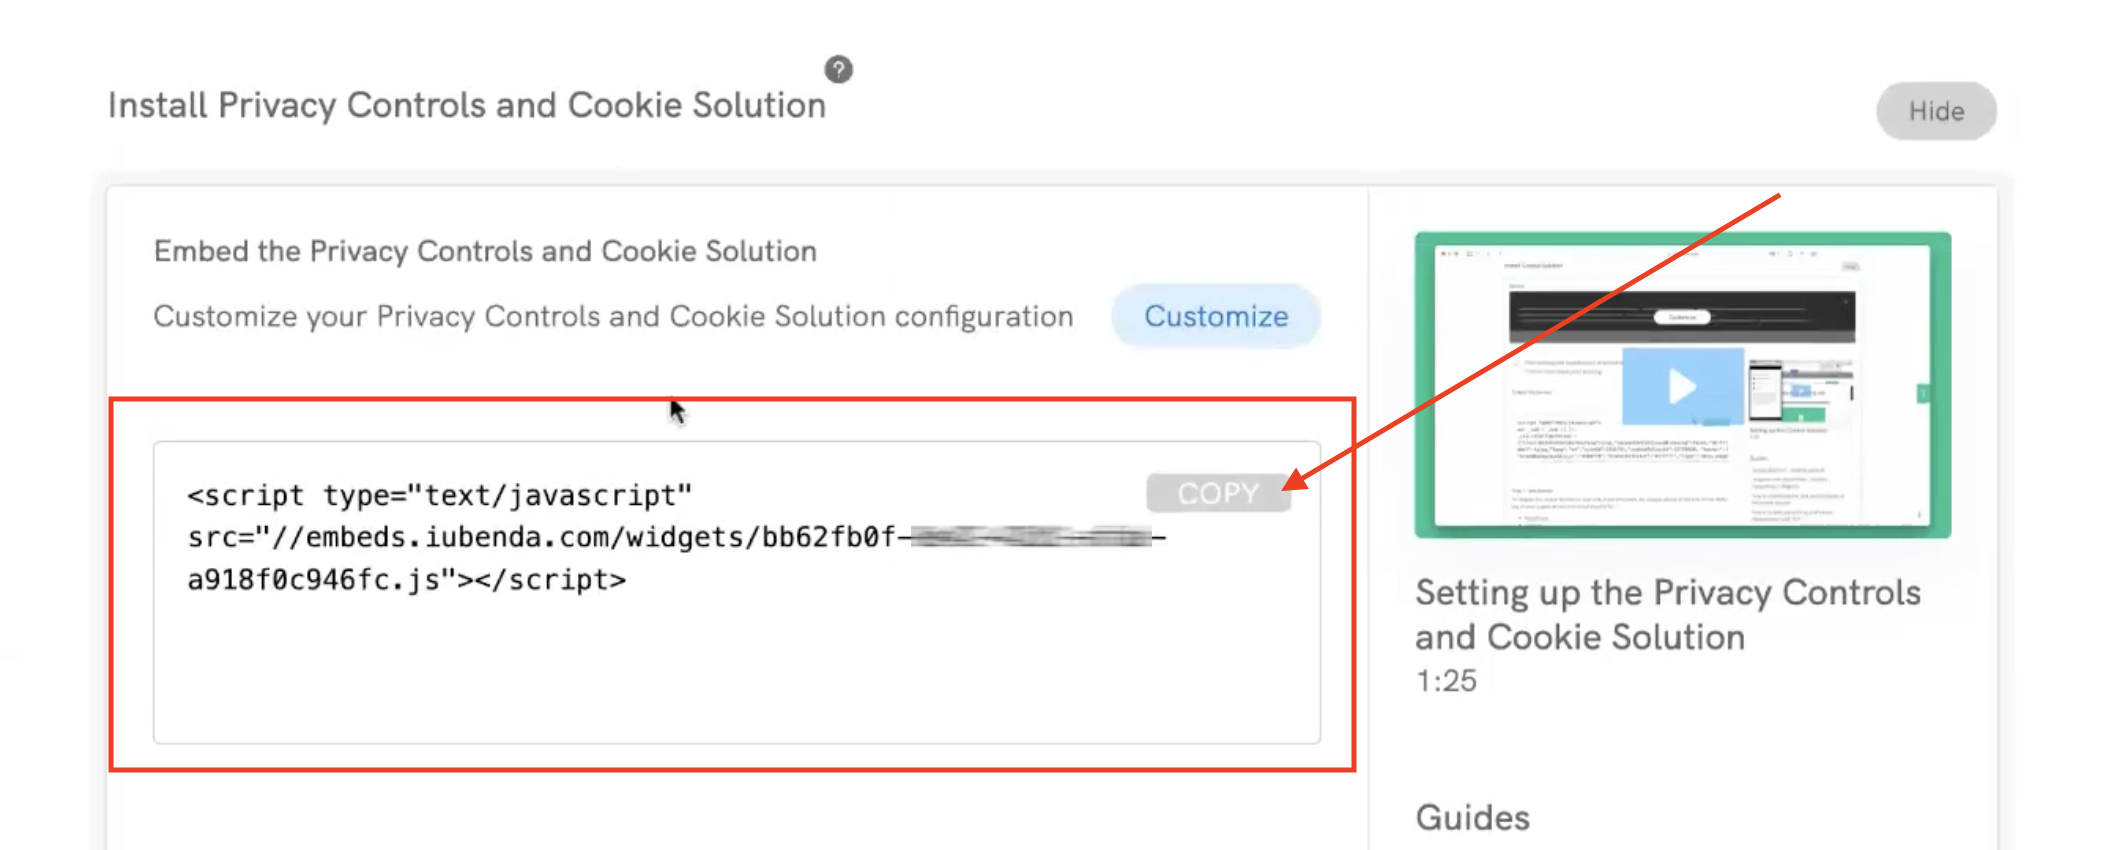
- Copy the unified snippet URL from your iubenda Dashboard. It will look something like this:
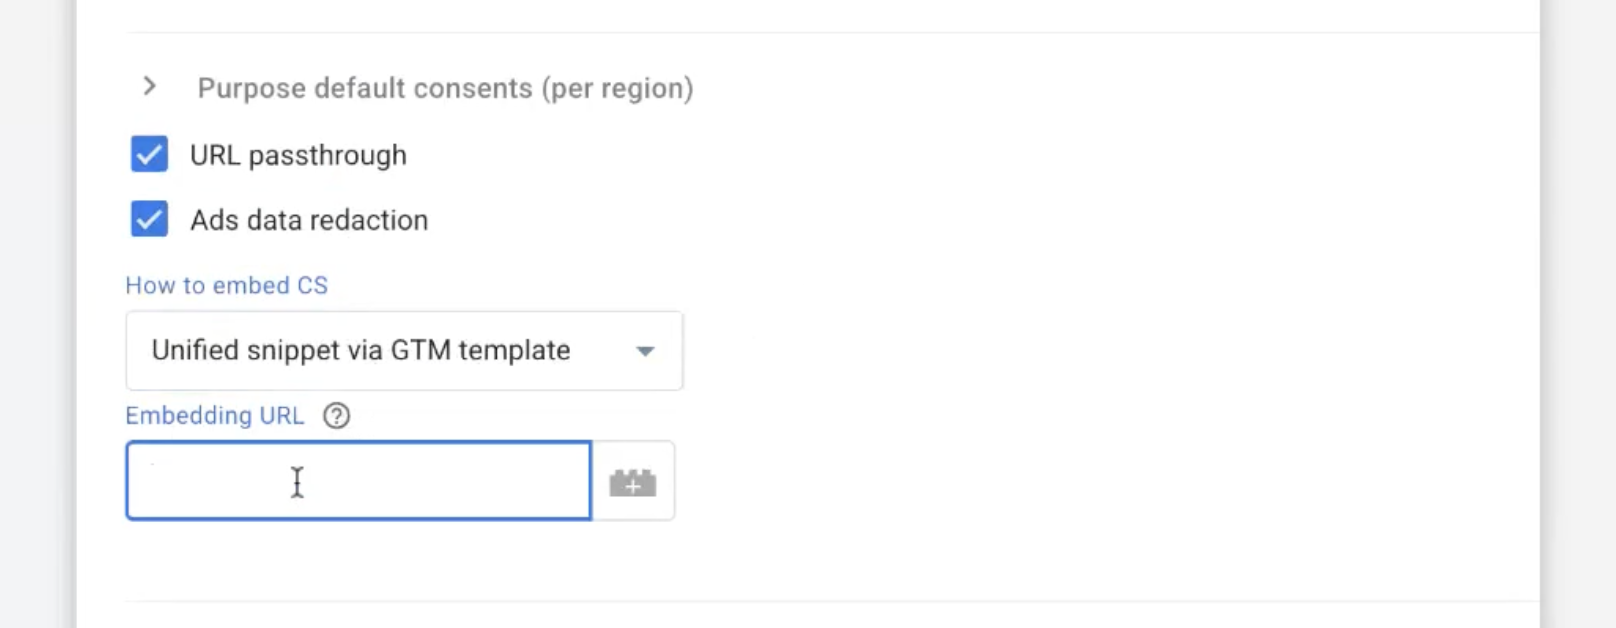
- In your GTM dashboard, choose the option “Unified snippet via GTM template,” then paste the URL
embeds.iubenda.com/widgets/[sitecode].jsinto the GTM template Embedding URL box. Make sure to addhttps://at the beginning to include the full URL.
⚠️ Important
As you may notice, the code to paste for the unified snippet is slightly different from the code included on your iubenda embedding page.
Here’s an example of the parts not to paste into the configuration box (strikethrough):
‹script type="text/javascript"src="//embeds.iubenda.com/widgets/[site-code].js"></script>
- Save the changes in GTM and publish the container.
- Once this is set up, any changes made to your configuration (like adjusting the banner appearance, enabling TCF, or updating US laws) will automatically apply to your website, with no need to re-embed or republish the tag in GTM.
Option 2: Extended Snippet (Used when remote configuration is not active)
This method uses the extended snippet and is used when remote configuration is not enabled. Updates to the Privacy Controls and Cookie Solution will require manual updates in GTM whenever changes are made to the Privacy Controls and Cookie Solution configuration.
- How it works:
- When remote configuration is not enabled, the extended snippet is used, and a portion of it with the parameters should be inserted into the GTM template. This means, any changes made to your Privacy Controls and Cookie Solution settings will require you to manually update the snippet in GTM and republish the container to apply those changes, as updates are not applied automatically.
- Steps to embed using the extended snippet (no remote configuration):
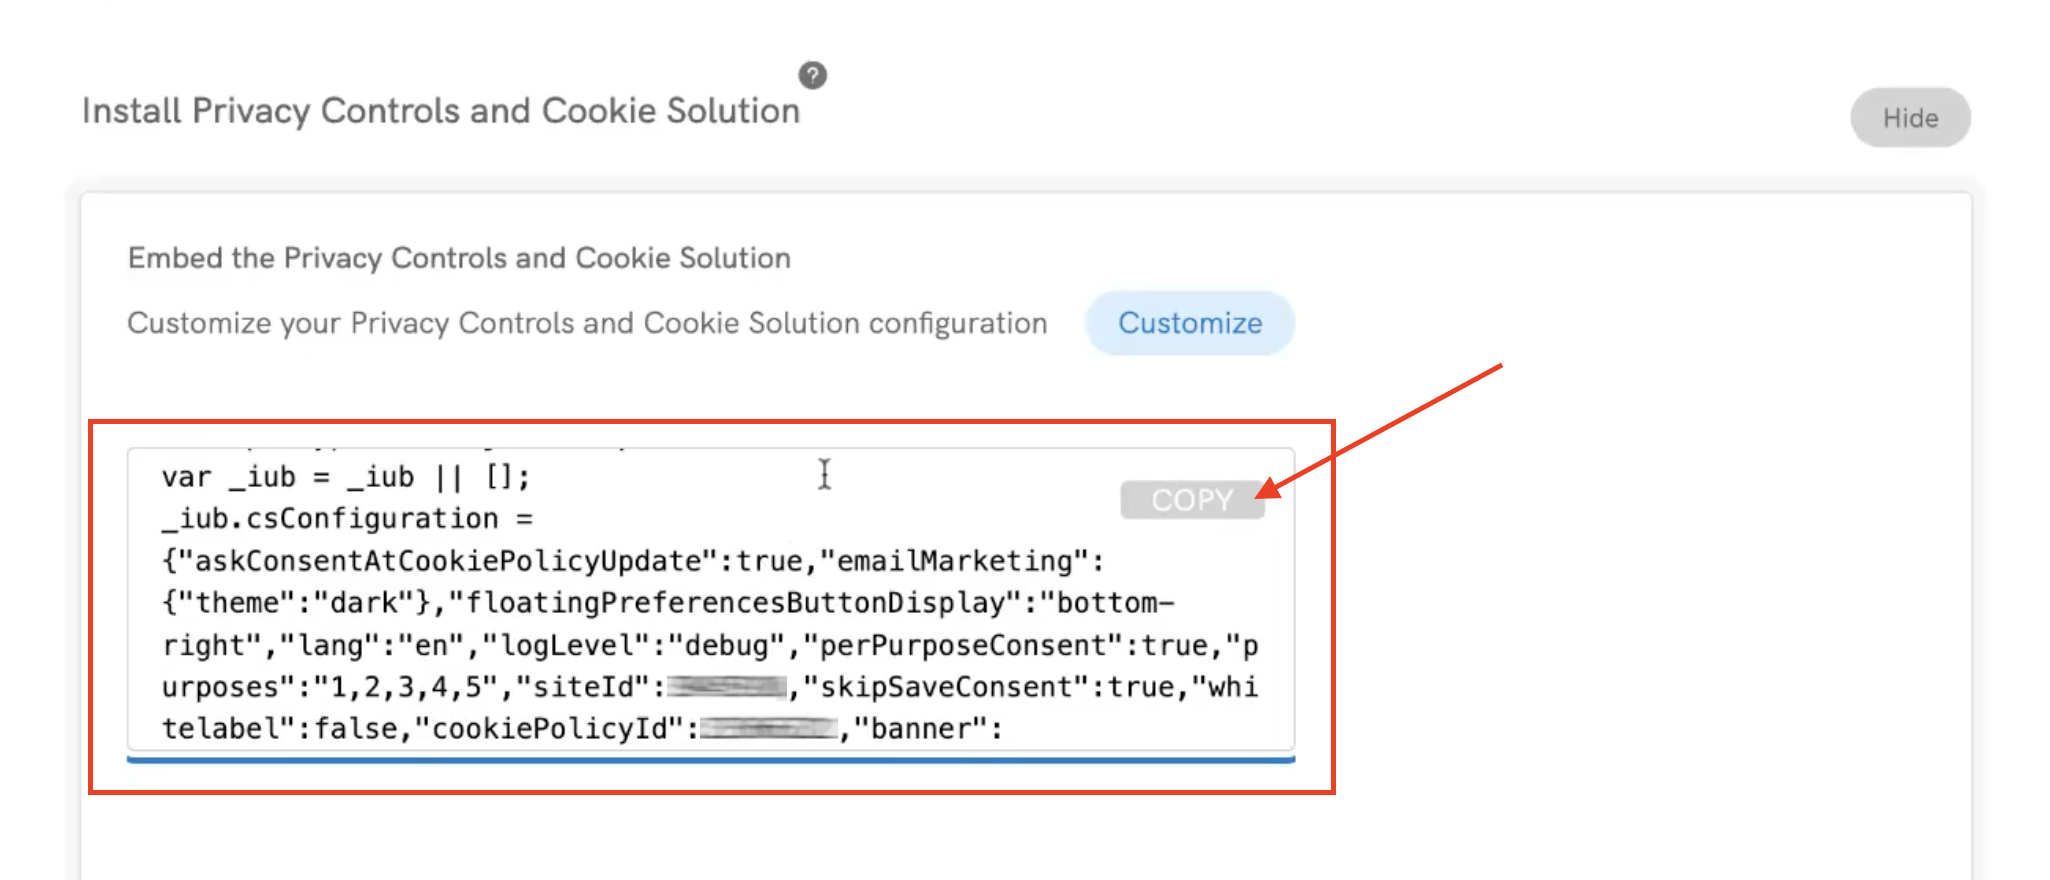
- Copy the embedding code (extended snippet) from your iubenda Dashboard.
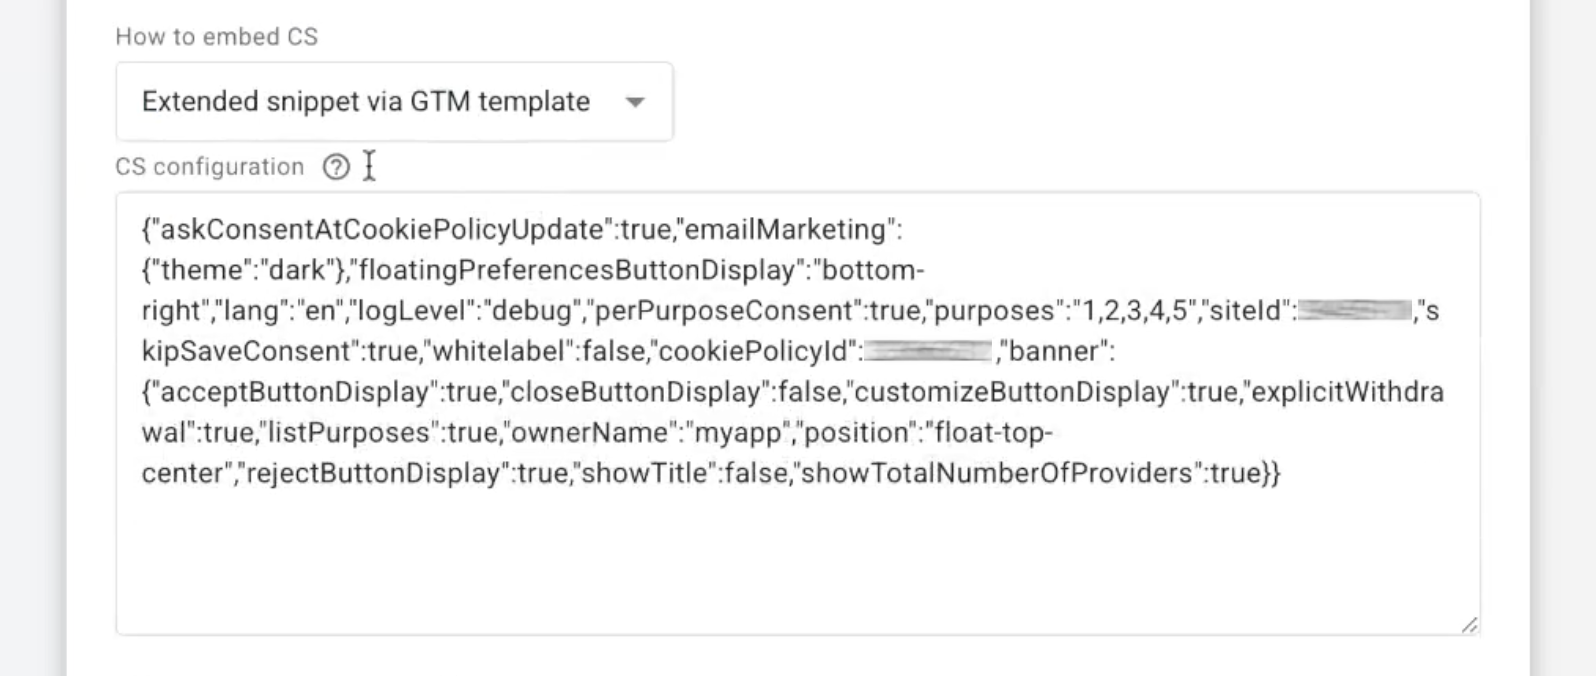
- In your GTM dashboard, choose the option “Extended snippet via GTM template”, then paste only the part after
var _iub = _iub || [];and within the_iub.csConfiguration = {...}into the GTM CS configuration box.
⚠️ Important
As you may notice, the code to paste for the extended snippet is slightly different from the code included on your iubenda embedding page.
Here’s an example of the parts not to paste into the configuration box (strikethrough):
<script type="text/javascript">
var _iub = _iub || [];
_iub.csConfiguration =
{
"ccpaAcknowledgeOnDisplay": true,
"ccpaAcknowledgeOnLoad": true,
"ccpaAppliesToEntireUSA": true,
"consentOnContinuedBrowsing": false,
"countryDetection": true,
"enableCcpa": true,
"gdprAppliesGlobally": false,
"lang": "it",
"perPurposeConsent": true,
"siteId": 2398592,
"whitelabel": false,
"cookiePolicyId": 55062451,
"banner": {
"acceptButtonDisplay": true,
"backgroundColor": "#FF0000",
"closeButtonDisplay": false,
"customizeButtonDisplay": true,
"logo": null,
"position": "float-top-center",
"rejectButtonDisplay": true
}
}</script>
<script type="text/javascript" src="//cdn.iubenda.com/cs/ccpa/stub.js"></script>
<script type="text/javascript" src="//cdn.iubenda.com/cs/iubenda_cs.js" charset="UTF-8" async></script>
- Save the changes and publish the GTM container.
- Whenever you make changes to the configuration, you will need to copy the updated extended snippet and re-paste the corresponding portion in GTM, followed by re-publishing the container.
Manual embedding
You can also embed the Privacy Controls and Cookie Solution code manually. To do that, you have to follow the standard embedding method described in this guide.
❗️ To make sure this method works correctly, remember to add the parameter: "googleConsentMode": "template" to your Privacy Controls and Cookie Solution configuration. Follow these steps to add it properly:
In your Privacy Controls and Cookie Solution settings, make sure to uncheck the “Enable remote configuration” option. This is essential for manual embedding to work properly.
After disabling remote configuration, copy the updated snippet and add the following parameter:
"googleConsentMode": "template"Your updated snippet with the added parameter should look like this example:
<script type="text/javascript">
 var _iub = _iub || [];
 _iub.csConfiguration = {
 "countryDetection": true,
 "consentOnContinuedBrowsing": false,
 "perPurposeConsent": true,
 "lang": "en",
 "siteId": 11111111, //use your siteId
 "cookiePolicyId": 11111111, //use your cookiePolicyId
 "floatingPreferencesButtonDisplay": "bottom-right",
 "banner": {
 "acceptButtonDisplay": true,
 "customizeButtonDisplay": true,
 "rejectButtonDisplay": true,
 "position": "float-top-center"
 "googleConsentMode": "template"
 }
 };
</script>
<script type="text/javascript" src="//cdn.iubenda.com/cs/iubenda_cs.js" charset="UTF-8" async></script>
Finally, you can choose the Privacy Controls and Cookie Solution channel (Beta, Current, Stable).
Use collected preferences to set default consents
You can optionally enable a feature that sets default consent values by reading stored user preferences from cookies or localStorage.
This feature is experimental and has some limitations. Use it only if you fully understand how it works to avoid improper consent handling.
How does this feature work?
When this option is enabled, the tag checks for specific storage items to determine whether to automatically grant consent. Consent is set to “granted” only if all the defined items confirm the user has opted in (or hasn’t opted out) for that purpose.
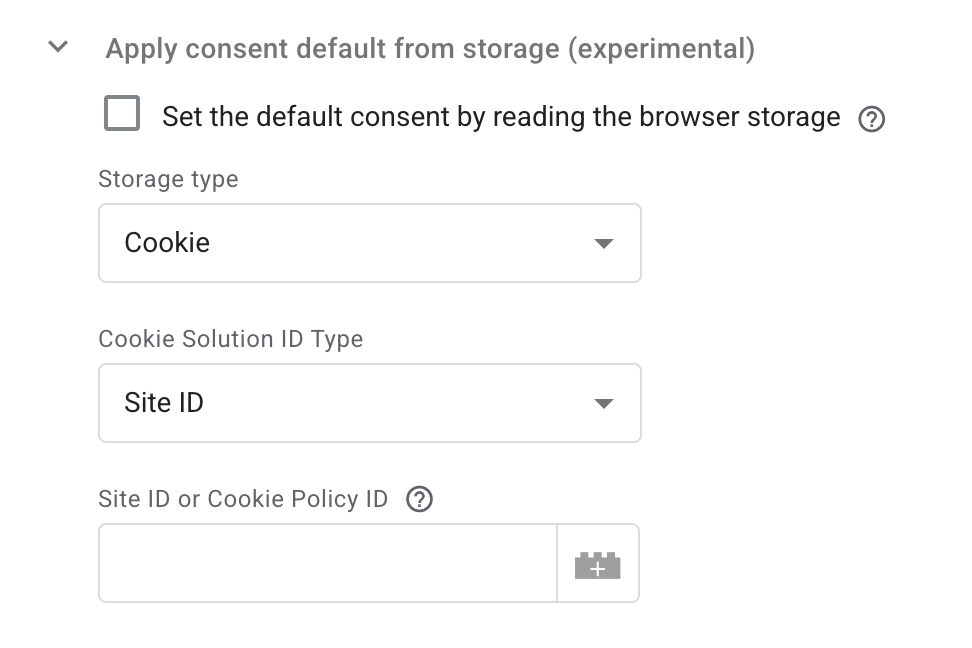
To configure this:
- Enable Default consent from storage (experimental).
- Choose the Storage type: Cookie or Local Storage.
- Choose the ID type and enter the ID value:
- Site ID (preferred)
- Cookie Policy ID (use only if you have a single Cookie Policy configured)
Important notes
- Works only with a single Cookie Policy ID or if
storage.useSiteId = true. - As GTM does not support country detection, the safest assumption is applied: consent is granted only if all relevant storage items indicate an opt-in or no opt-out.
Remember, this is an experimental feature intended to improve consent handling before the iubenda banner is shown. Use it carefully due to its experimental nature and current limitations.
Advanced Settings
In this section, some advanced settings can be set up, such as the Tag firing priority, Tag Sequencing, and advanced Consent settings. Please note that there’s no need to edit these settings for the template to work, so if you’re unfamiliar with them, you can ignore them.
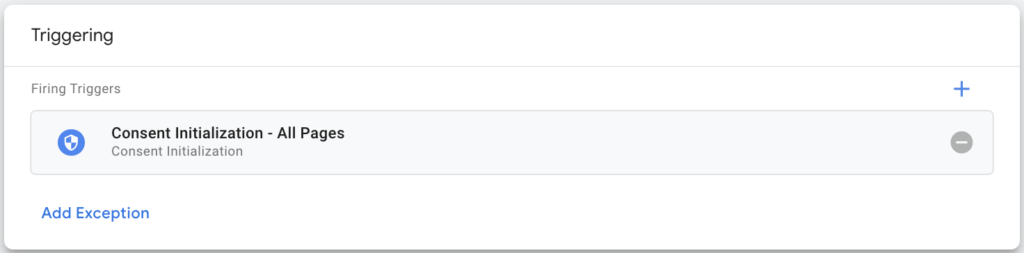
3. Triggering
After configuring the tag, you need to set up the trigger to make the tag fire.
You can select “Consent Initialization – All Pages” as the trigger.
Publish the Container
After completing the configuration, click the Save button at the top right of the page. The tag is now ready to be published.
From the GTM dashboard, click on Submit at the top right of the page:
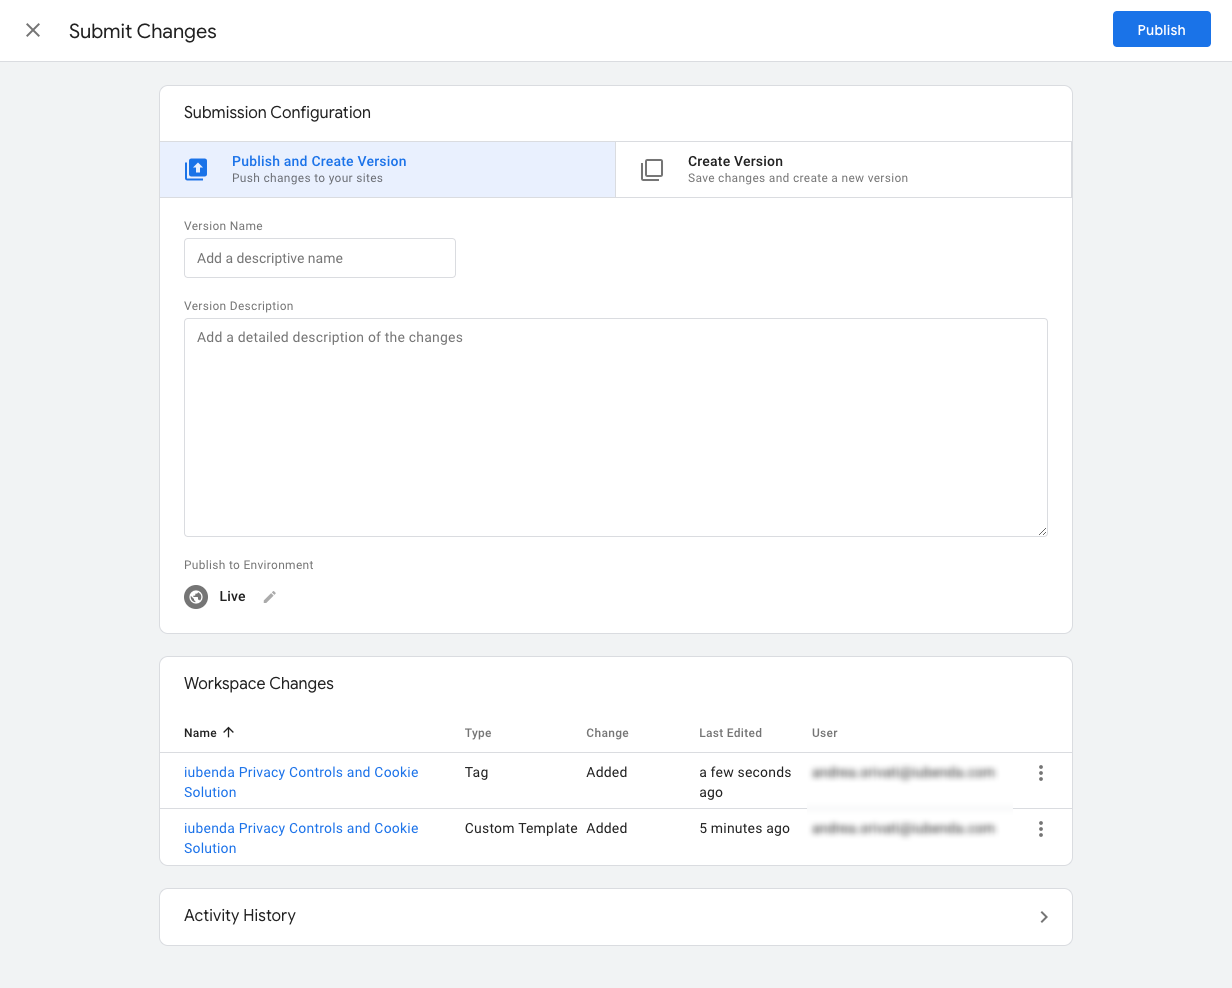
Finally, add a version name and description, click on Publish, and that’s it! The tag is up and running, seamlessly integrated with our Privacy Controls and Cookie Solution!
How to control cookies
Built-in consent checks
Tags like Google Ads, Analytics, Floodlight, and Conversion Linker have built-in consent checks. They are natively compatible with Google Consent Mode.
This implies that these tags possess a mechanism that alters their functionality in response to the user’s consent status.
Please note that no consent configuration is needed for this type of tags.
You can simply assign “All pages” trigger to tags that have built-in consent checks like Google Ads, Google Analytics, Floodlight or Conversion Linker
Example:

Additional consent checks
Some tags — like Google Ads, Google Analytics, Floodlight, and Conversion Linker — are natively compatible with Google Consent Mode. These tags include built-in consent checks, meaning they automatically adapt their behavior based on the user’s consent status.
➡️ For these tags, no extra configuration is required: you can safely use the “All pages” trigger.
However, tags that do not support built-in consent checks (for example, Custom HTML tags embedding Facebook Pixel, Hotjar, LinkedIn Insight, or other third-party scripts) must be configured with additional consent checks.
Step 1: Enable emitGtmEvents
To make additional consent checks possible, you need the event iubenda_gtm_consent_event to be sent whenever user preferences change.
You now have two options:
- Recommended: enable the
emitGtmEventstoggle directly in the iubenda GTM template. This automatically handles event emission with no need to edit code. - Alternative (manual method): add
"emitGtmEvents": trueinside your_iub.csConfigurationsnippet. This is only needed if you prefer not to use the template option.
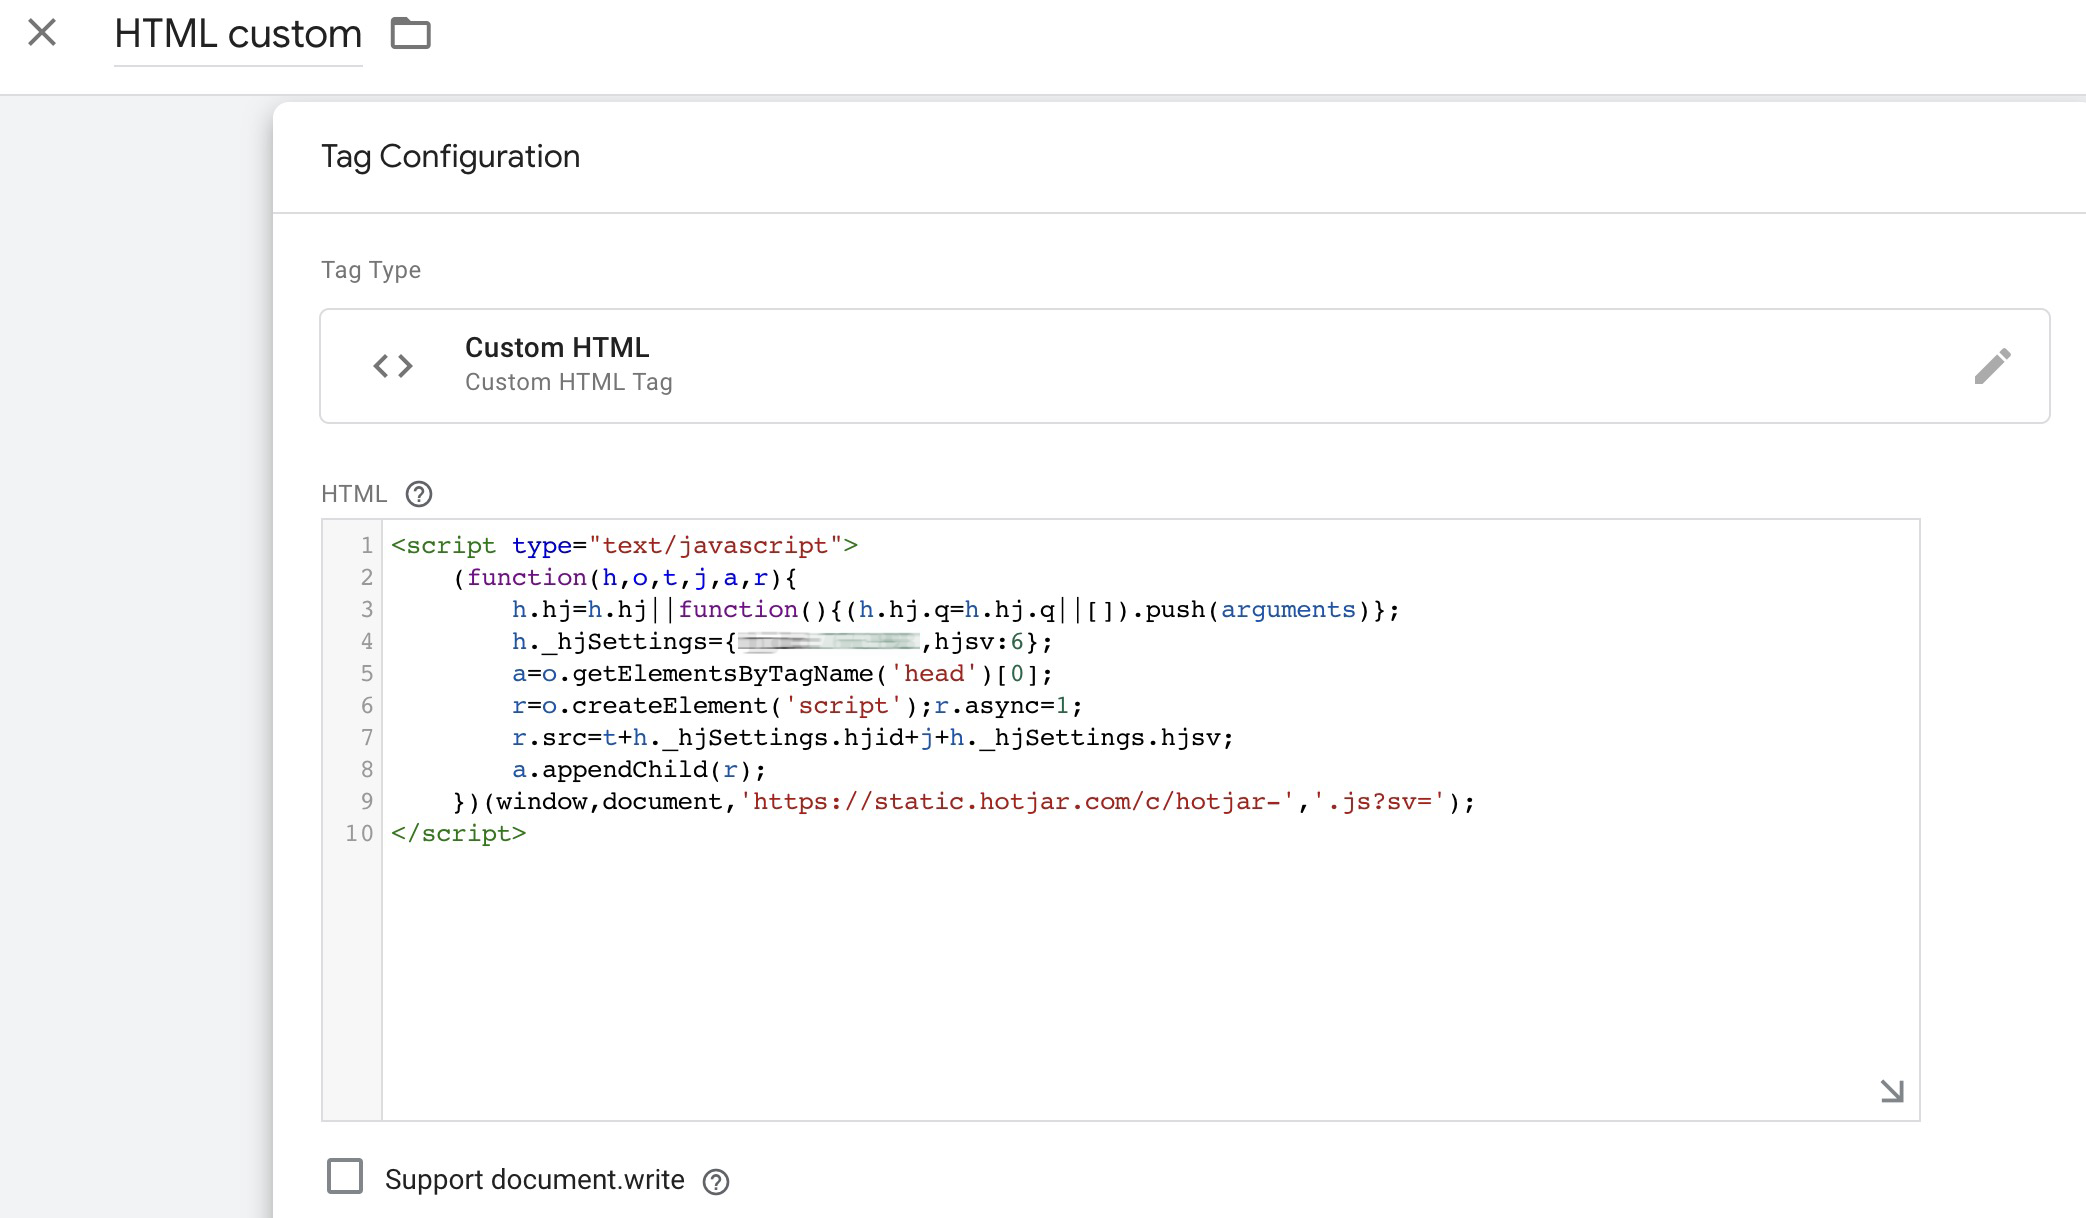
Step 2: Create your Custom HTML tag
- In GTM, add a new Custom HTML tag.
- Paste the script you want to use (e.g. Hotjar, Facebook Pixel, LinkedIn Insight Tag).
Example (Hotjar script as placeholder):
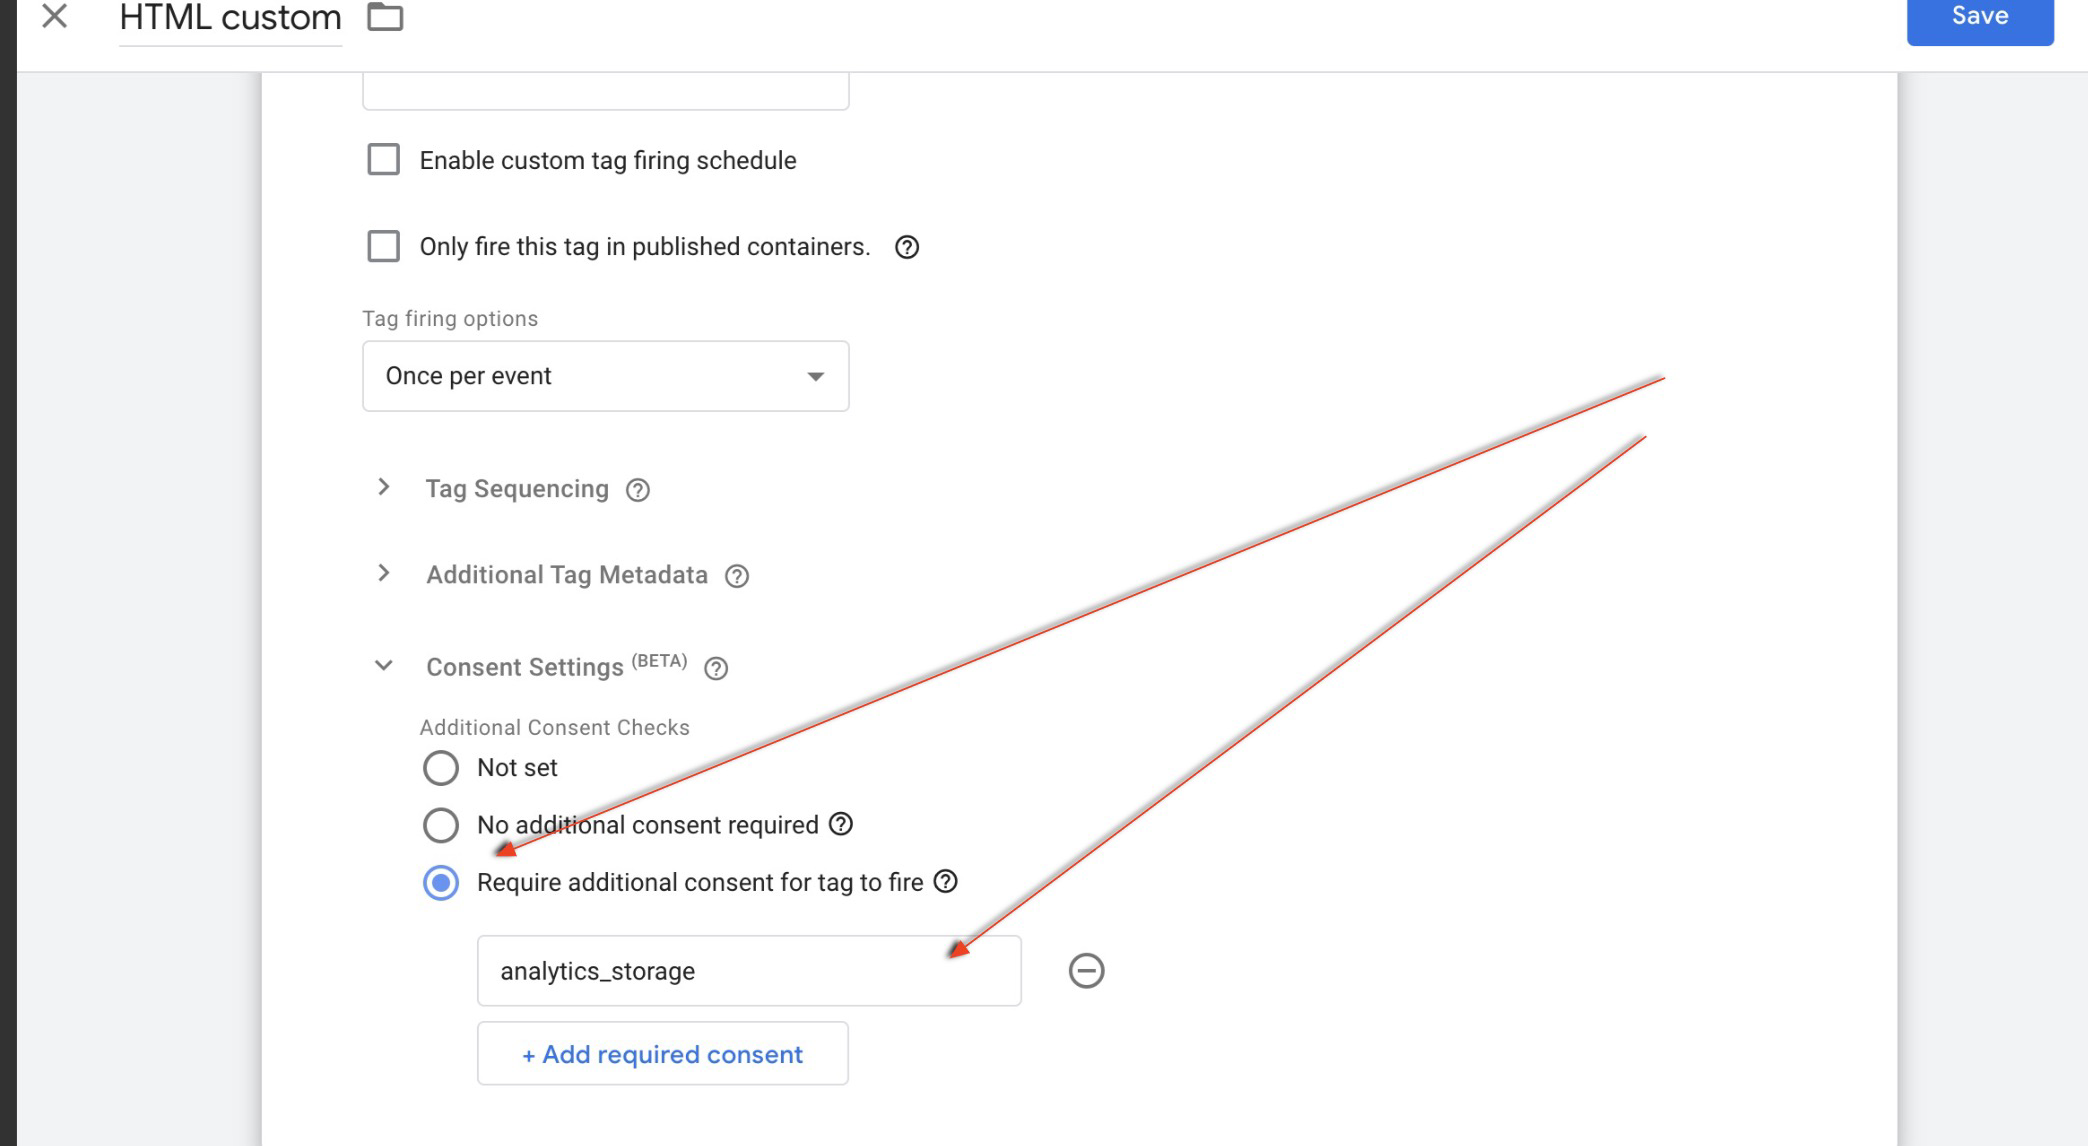
Step 3: Configure consent requirements
Go to Consent Settings in your Custom HTML tag and select:
“Require additional consent for tag to fire”
Then, choose the relevant purpose based on the type of script. For example:
| Purpose | Google Consent Type(s) | Description |
|---|---|---|
| Functionality | functionality_storage | Supports the website or app’s functionality, for example, by saving language settings. |
| security_storage | Protects users by enabling security features like authentication and fraud prevention. | |
| Experience | personalization_storage | Enhances user experience by personalizing features, like video recommendations. |
| Measurement | analytics_storage | Collects data (such as cookies) for analytics purposes, e.g. tracking visit duration. |
| Marketing | ad_storage | Stores data for advertising purposes. |
| ad_user_data | Allows sending user data related to advertising to Google. | |
| ad_personalization | Enables personalized advertising by adjusting ads based on user preferences. |
Step 4: Assign the trigger
Instead of using “All pages,” create a Custom Event trigger with the following settings:
Event name:
iubenda_gtm_consent_event
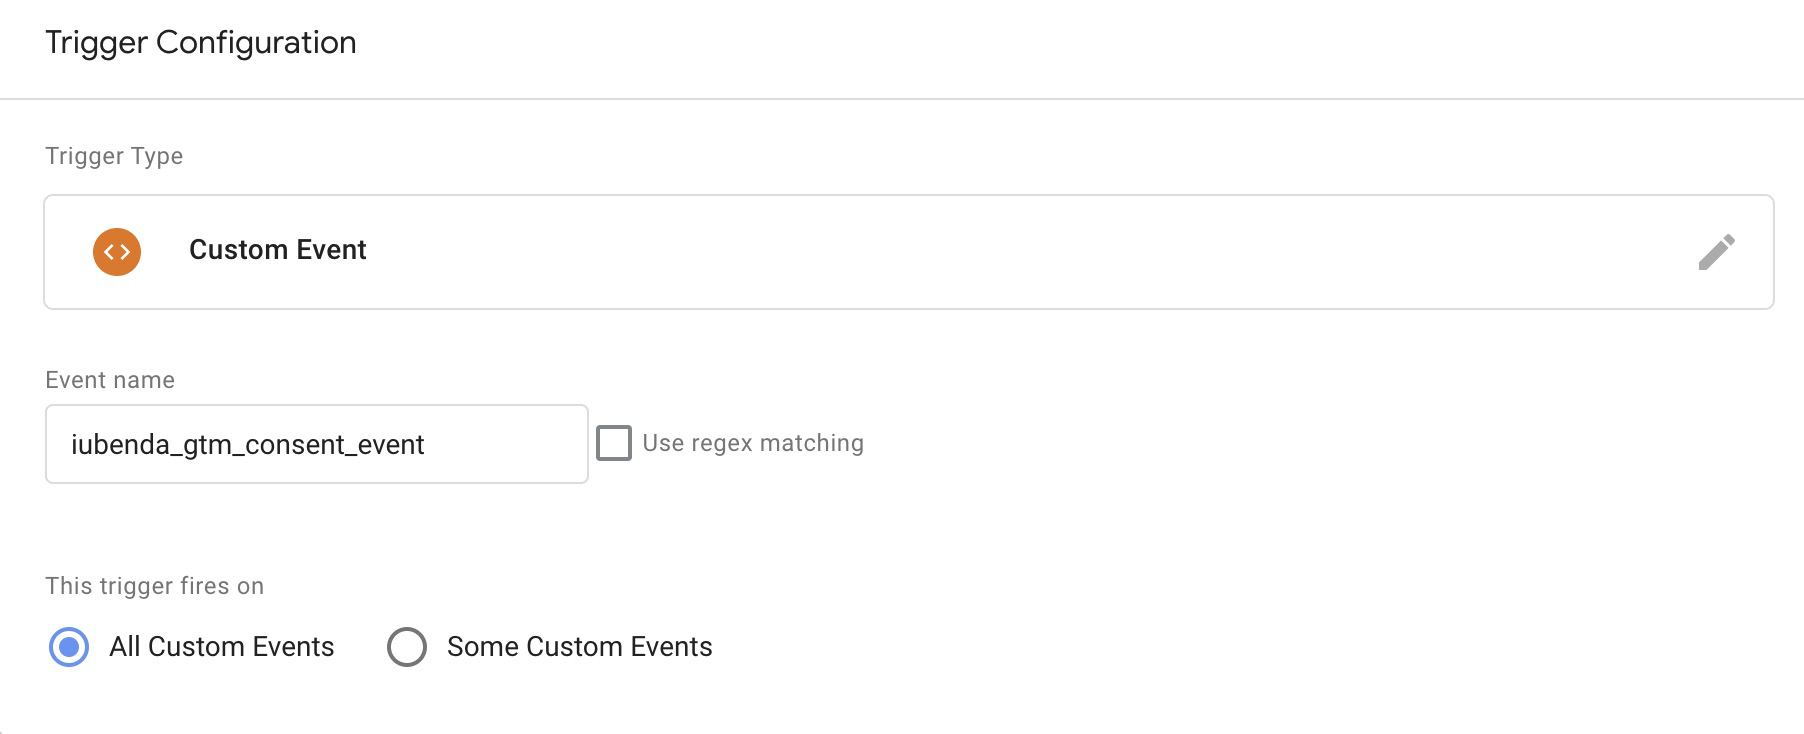
This ensures that the Custom HTML tag fires only after the user has given valid consent for the selected purpose(s).
Note: when the user preferences change, the Privacy Controls and Cookie Solution sends the event iubenda_gtm_consent_event to GTM
Prior-blocking is set for the tag!
✅ With these steps, you can safely integrate third-party tracking tools that don’t natively support Google Consent Mode.
💡 Keep in mind, the new template-level emitGtmEvents option streamlines this process by removing the need to edit your configuration code manually.
For US users, things to know: how to honor opt-out
The explanation for built-in and additional consent checks is also valid in this case. If you enable US Law in the ‘Privacy Controls and Cookie Solution’ configurator, the default behavior for a US user is that the Cookie Solution sets all the GCM (Google Consent Mode) purposes to ‘granted‘.
Note: If you are on a “Free” Plan, this is true if you disable GDPR and apply only US Law in the configurator. Alternatively, if you want to apply GDPR for EU Users and US Law for US users, you’ll need at least an “Advanced” plan.
When the user opts out of a specific purpose under US Law, we adjust the settings for ‘ad_storage‘ and ‘analytics_storage‘ accordingly.
Specifically:
‘ad_storage‘ is granted when the user either hasn’t opted out of any of the following USPR (US Privacy Rights) purposes or when they are not relevant (e.g., USPR does not apply):
- Sale of my personal information (purpose s)
- Sharing of my personal information (purpose sh)
- Processing of personal information for targeted advertising (purpose adv)
‘analytics_storage‘ is set to granted when the user either hasn’t opted out of the US purpose ‘Sale of my personal information’ (purpose s) or when it’s not relevant (e.g., USPR does not apply).
Unlock additional features with just one click 👉 Upgrade to the Advanced Plan now!
Apply US Law exclusively for US users, and unlock the full range of iubenda’s features
How to Set Up iubenda’s GTM Template for Multilingual Sites
If you manage a multilingual website and are implementing Google Consent Mode with the iubenda GTM template, it’s essential to ensure that your cookie consent banner adapts seamlessly to different languages. Here’s how you can configure the iubenda GTM template for multilingual sites:
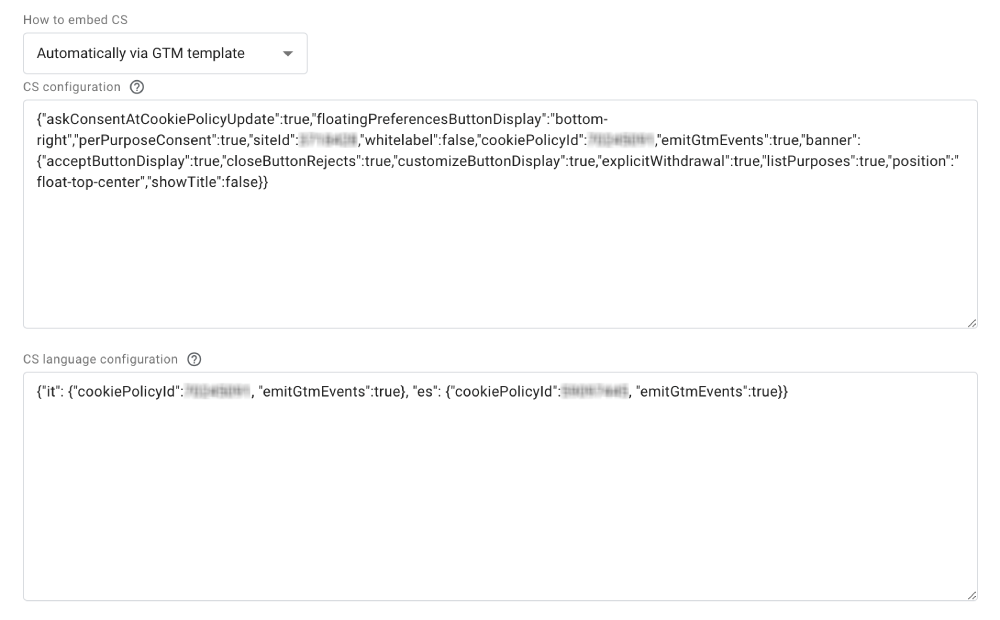
CS Configuration Textarea
In the first textarea related to CS Configuration, insert the JSON of the main script, which will also be used as a fallback. However, it is important to remove the “lang” parameter from this script. This script can contain the siteID and cookiePolicyId parameters.
CS Language Configuration Textarea
In the CS Language Configuration textarea, insert the initial language code and, if possible, only the cookiePolicyId that identifies the language in the configuration. Do not include the “lang” parameter in this configuration.
Visual Example
Below is an example of how the setup looks in the GTM interface:
Code Example to Copy
For CS Configuration, use this example code:
{
  "askConsentAtCookiePolicyUpdate": true,
  "floatingPreferencesButtonDisplay": "bottom-right",
  "perPurposeConsent": true,
  "siteId": "your-site-id", // <-- Replace with your actual site ID
  "whitelabel": false,
  "cookiePolicyId": "your-cookie-policy-id", // <-- Replace with your actual cookie policy ID
  "emitGtmEvents": true,
  "banner": {
    "acceptButtonDisplay": true,
    "closeButtonRejects": true,
    "customizeButtonDisplay": true,
    "explicitWithdrawal": true,
    "listPurposes": true,
    "position": "float-top-center",
    "showTitle": false
  }
}
For CS Language Configuration, use this example code:
{
  "it": {
    "cookiePolicyId": "your-cookie-policy-id", // <-- Replace with your actual IT cookie policy ID,
    "emitGtmEvents": true
  },
  "es": {
    "cookiePolicyId": "your-cookie-policy-id", // <-- Replace with your actual ES cookie policy ID,
    "emitGtmEvents": true
  }
}
Note: You can copy and paste these examples into the respective textareas. Be sure to replace "your-site-id" and "your-cookie-policy-id" with your specific values, ensuring the lang parameter is removed.
How it Works:
- The Privacy Controls and Cookie Solution detects the correct language from the HTML code of the page (
langattribute in the<html>tag). - If the attribute is not available, it uses the main language set in the user’s browser.
- If both are unavailable, the default language is English.